• Welcome to Overclockers Forums! Join us to reply in threads, receive reduced ads, and to customize your site experience!

The Not-Uncarved Block (External Box making - Pics!)

Overclockers is supported by our readers. When you click a link to make a purchase, we may earn a commission. Learn More.

BlueMan

Member
Joined
May 20, 2004
So I have spent the last week on furious runs to Home Depot and back, working late into the night in my garage, waking neighbors with oscillating sanders and what not.

I will now unveil the result. My first real attempt at any kind of handywork, and I hope you all will like it. I'd like to thank Yelgnid, who helped get my thoughts rolling.

So first I'll introduce the cast:

Tools:
*Oscillating Sander (wonderful tool, little handheld thing that sure beats the heck out of elbow grease)
*Handheld Jigsaw
*Power drill/screwdriver
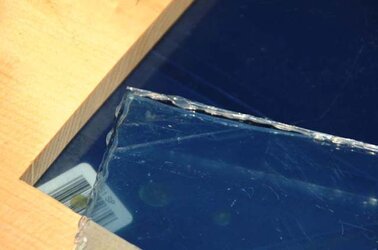
*Plastic Scorer - special hooked razor blade for scoring plexi glass so you can cut it. ~$2 at Home Depot.
*C Clamps (love 'em!)
*Breaking Shears (from stained glass work, but they work great to help finish off a plexi glass cut)
*maybe more I'm forgetting now

Materials:
*1 board of 3/4" thick Eastern Pine cut to the sizes I had planned out
*1 1/2" MDF board for top and bottom
*Wipe-On Clear Gloss Polyurethane
*1 sheet plexi glass
*silicone seal
*1-5/8" screws (and some 1-1/4")
*hinges
*latches
*L brackets and various metal strips
*Weather stripping

I'm going to have to attach all the pics, as I don't have a hosting site. Sorry!

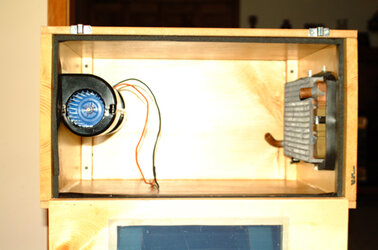
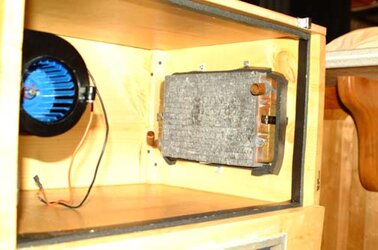
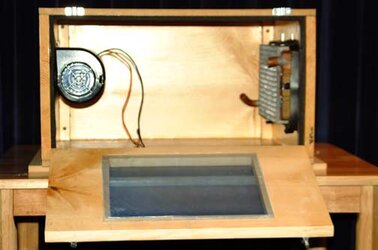
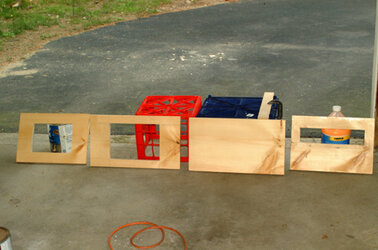
Here are all of the boards with the inside holes cut. the small one is for my 540cfm blower, the middle one is for a Fedco 2-342 HC, and the large one is for the window I'm installing.

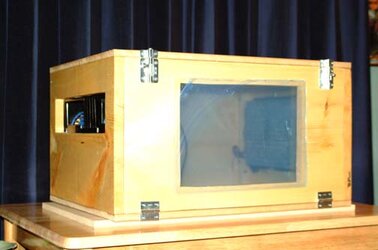
All of these boards were thoroughly sanded and then had 2-3 coats of a wipe-on polyurethane applied. you have to lightly sand inbetween coats for optimal smoothness.
 

Attachments

  • DSCF0051.jpg
    DSCF0051.jpg
    40.4 KB · Views: 664
Last edited:
This shows the HC with some fudged L Brackets. I was too lazy to get real Z brackets at the right height (if they even existed), so I tried this. Works fine, looks a bit off, with with the box closed up you can't really even see it.
 

Attachments

  • DSCF0063.jpg
    DSCF0063.jpg
    39.8 KB · Views: 663
Close up of the home made Z bracket
 

Attachments

  • DSCF0054.jpg
    DSCF0054.jpg
    42.2 KB · Views: 657
Here's the blower and the HC mounted in the box. It's upside down (I had to get in the bottom), so the floor is actuall the ceiling, sort of. lol, it's all turned around, you'll see what I mean in later pictures)
 

Attachments

  • DSCF0065.jpg
    DSCF0065.jpg
    38.8 KB · Views: 644
Here is the window, already cut. I'm using silicone seal to adhere it, which is what you see around the edge. The plastic wrapping is still on one side of the window, so the blue scratched stuff is not the real window, just the coating.

I did two layers of Plexi for the window, one on each side of the hole. This way there is an air barrier that is sealed, which will help in the sound dampening.
 

Attachments

  • DSCF0059.jpg
    DSCF0059.jpg
    35.3 KB · Views: 639
A better picture of the HC and blower mounted. I'm going to put an 80mm fan grill over the blower hole to avoid lawsuits... :)
 

Attachments

  • DSCF0071.jpg
    DSCF0071.jpg
    34.1 KB · Views: 639
The black ridge is weather stripping that I put all around the hinged side panel. I'm looking for an air-tight environment, since the blower will be working on suction. to this end I silicone sealed every edge in that box, every joint, etc. However, I can't seal the door that opens, so I put this foam weather seal stuff all around the edge of it. I made sure it fits SNUGGLY, it takes alot of pressure to close the door, so I think it worked.

As you can see, I also sealed all around the HC since there were bits of space leftover. This way air will ONLY be coming through the HC fins.
 

Attachments

  • DSCF0074.jpg
    DSCF0074.jpg
    43.7 KB · Views: 636
Peek-a-boo! I see you mr. 540cfm blower! :clap:
 

Attachments

  • DSCF0078.jpg
    DSCF0078.jpg
    32.6 KB · Views: 634
And.....drum roll please..........

Ta da!!

here is the box - the windows are obviously still covered in their protective layer. I checked them out with the corners pealed back and it's crystal clear.

You can see that the hinged-side door has latches that hold it in place, as well as hinges. inexpensive but important. I think I may add a lock at some point too, so nosy people in my dorm don't make a very expensive mistake.
 

Attachments

  • DSCF0080.jpg
    DSCF0080.jpg
    35.4 KB · Views: 632
With the door open - you can see the fan grill on the blower here.
 

Attachments

  • DSCF0083.jpg
    DSCF0083.jpg
    37.7 KB · Views: 633
Pump, maybe res if I get one (though I am in serious internal debate as to res. or t-line). I also plan on mounting my HDD in there for better cooling. It also takes more heat outside my case so I can use less fans IN the case.

And the fun isn't over, oh no. in the mail I have a 16 amp PWM controller (thanks green...um, green something, I forget the name of who helped me with that) that will allow me to take the blower from 0-100% on a potentiometer (dimmer). That will go in there as well, and oh! the power supply that will power the blower and the lights in there.
 
Last edited:
just gotta wait for the MCW6002 to come out so I can put the rest of the setup together.
 
BlueMan said:
Pump, maybe res if I get one (though I am in serious internal debate as to res. or t-line). I also plan on mounting my HDD in there for better cooling. It also takes more heat outside my case so I can use less fans IN the case.

And the fun isn't over, oh no. in the mail I have a 16 amp PWM controller (thanks green...um, green something, I forget the name of who helped me with that) that will allow me to take the blower from 0-100% on a potentiometer (dimmer). That will go in there as well, and oh! the power supply that will power the blower and the lights in there.

greenman? :)
i would go for a res in ur case, u have the space, and it'll make it a lot easier to fill. I wouldn't want to fill a system with so much tubing with just a t-line, would take hours..
yea, thos pwm are the best for blowers, simply lowering the voltage makes them twitch and click.
 
killer box man!

I employ you, use some sort of dust filter. I doubt it will hurt air flow too much, lol.

I am glad you are putting some lights in there..... ANy color will kick axe.
 
Res or T-line?

Neither. Airtrap :)

Looks good, would it be possible to post the size of the holes you cut for the single pass and the blower?

What voltage are you planning on running the blower at? Ive found at 12v you can get rid of the high picthed wine by covering about 3/4 of an inch of the bottom of the holes.. see below.
IM000573.jpg

Noise reduction at the expense of the goverment :p
 
Lol excess. I'll definitly have to try that. I'm not sure what voltage it will end up being - the PWM circuit that is coming is 0-100%, so I'll have to play around.

The hole sizes are the following:

*Blower Hole: 12 7/8" wide by 3" tall
*HC Hole: 9 3/8" wide by 6 5/8" tall

Surreal: Yes, I definitly plan on filtering it somehow. what do you suggest? I'm going to find an equilibrium between airflow and noise, but I can't decide on the kind of filter material I want. I'll try the cheap blue filters from Home Depot, but is there something else anyone knows of?

Heheh - my dad was suggesting I put a chinese rock/sand garden in the middle for ambiance...then we realized a sandstorm is probably not what I would want in there :)
 
I understand the money issue. I was not expecting to pay as much for this setup as I will, but I'm letting it be a gift to me from me. The blower itself was $50 with shipping, which I was fine with, but the PWM circuit i didn't expect to have to get, and that was $30, plus I'll need another power supply to juice this baby. Lol, oh well, hopefully it'll be worth it.

I'll be posting some more info on the box making process tomorrow. I'm also working up a list of things I would have done differently so you all can benefit :)
 
Back