Has anyone ever built any type of pump insolation mount? Not just putting a piece of foam in your case to set on, but a true mount? I was thinking of maybe some 1/4 ID vinyl tube or even surgical tubing, fill it with silicone, and then stick some round head machine screws in each end. Say a 10-24 x 1 inch screw with about 1/2 inch protruding, but not touching each other in the middle. Let it set up, and you have studs on each end to go through the pump and through your case somewhere. Thoughts anyone?
-
Welcome to Overclockers Forums! Join us to reply in threads, receive reduced ads, and to customize your site experience!
You are using an out of date browser. It may not display this or other websites correctly.
You should upgrade or use an alternative browser.
You should upgrade or use an alternative browser.
Pump isolation mount.........
- Thread starter 2Busy
- Start date
I bought silentblocks that fit your description for about $10:
http://www.frozencpu.com/cgi-bin/frozencpu/ex-tub-66.html
http://www.frozencpu.com/cgi-bin/frozencpu/ex-tub-66.html
- Joined
- May 29, 2002
- Location
- Japan/Daytona Beach
trade secret: pantyhose
if you think im joking bet me=)
if you think im joking bet me=)
- Joined
- Dec 5, 2001
- Location
- Random Dumpster/Alley
If you have any type of caulk (preferably one-part [not acid-curing] silicone or polyurethane) around the house and some sheet metal, I'd suggest you create one. I'm in the process of letting an issolation mount for my HDD's cure (one-part silicone in a big space takes a week to cure), and I'll do a write-up soon. Basicly its like the one here at forzencpu, except I'm using 90-degree aluminum pieces for better cooling (the inner rails cradle the HDD). I'd buy the ones there, but I needed the holes in difference places.
The same idea with a silicone baseplate for the pump could be addapted. Silicone & polyurethane are better than solid rubber mounts mainly because they can strech much better & are softer, meaning less jiggles are transfered. They're also better than any elastic mount if you plan on moving your case like I have to to access it. Just remember - properly scuff & clean the areas you want the caulk to stick to, and that polyurethane is paintable but typical silicone isn't.
The same idea with a silicone baseplate for the pump could be addapted. Silicone & polyurethane are better than solid rubber mounts mainly because they can strech much better & are softer, meaning less jiggles are transfered. They're also better than any elastic mount if you plan on moving your case like I have to to access it. Just remember - properly scuff & clean the areas you want the caulk to stick to, and that polyurethane is paintable but typical silicone isn't.
- Joined
- Jan 14, 2003
- Location
- Parma, OH
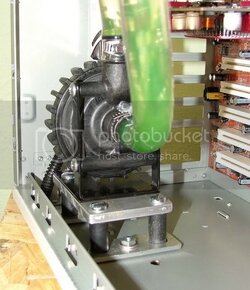
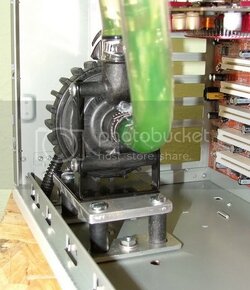
I bought some rubber pieces and screws to make a ruuber mount from Lowes for about $4. They're in the drawers in the hardware section. This mount is a little more than you really need but I leaving on a trip Thurs. morning and I don't have time now to photograph the simplier mount I have on a Mag 3. If you're interested PM me and I'll post a more detailed description in about 2 weeks.

- Thread Starter
- #9
Mount
Excellent job. This is very similar to what I had in mind, minus the plates on each end. Would like to see and know more, especially the flexibility, what hold the scews in the rubber,etc. Is the rubber solid, or was it a tube as I mentioned?
fhanderson said:I bought some rubber pieces and screws to make a ruuber mount from Lowes for about $4. They're in the drawers in the hardware section. This mount is a little more than you really need but I leaving on a trip Thurs. morning and I don't have time now to photograph the simplier mount I have on a Mag 3. If you're interested PM me and I'll post a more detailed description in about 2 weeks.

Excellent job. This is very similar to what I had in mind, minus the plates on each end. Would like to see and know more, especially the flexibility, what hold the scews in the rubber,etc. Is the rubber solid, or was it a tube as I mentioned?
- Joined
- Jun 10, 2004
- Location
- Ft Worth - Texas
trade secret: pantyhose
if you think im joking bet me=)
Unless I'm missing something, I would classify that as a suspension, rather than a mount.
If I am missing something, then consider me intrigued.
- Joined
- Jan 14, 2003
- Location
- Parma, OH
Sorry, I couldn't post this sooner. This is a mount for a Mag 3 but can be adapted to almost any pump. The total cost was $4 and everything was purchased at Lowes in the hardware section. This mount is soft and absorbs a lot of vibration. The 2X120 aluminum fans make more noise than the Mag 3 on this mount.
What you need:
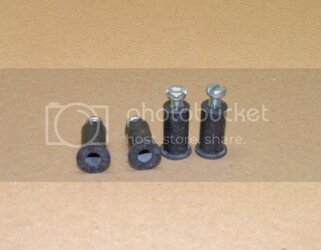
4-6mmX1 well nuts
4-6mmx1/2 panhead screws
1-electrical box cover plate
Tools
Hacksaw with metal cutting blade
1/4 and 1/2 drill bits and drill
flat and round file to dress up edges and holes

You need to put the mag 3 mounting plate on the electric box cover plate and mark the holes and the out side of the plate

This is how the plate should look after you mark it

You need to drill 1/4" holes in the four corners and halfway in between marked by the Xs. Then you need to drill the 4 corner holes to 1/2". After that cut the plate as shown and round the corners. Remove all the rough edges with file. If you would like to paint the plate a certain color, now is the time to paint it.
Locate the spot where you are going to mount the pump and mark the 2 middle 1/4 holes. Drill the appropriate size holes, this will depend on your method of securing the plate.Assemmble the parts as shown and fasten the plate down with either sheetmetal screws or machine screws and nuts. I used #8X1/2 machine screws and nuts. I used grommets in these holes but I don't think they are absolutely needed. (The holes marked by the Xs wre already in the plate and are not used.)

Mount the mag 3 pate and silde the pump into place. You will need to dill the mounting holes on the mag 3 plate to 1/4" and remove the small lip on the bottom of the holes. I also found that adding a couple of large rubber bands around the pump and the pump mounting plate stopped the pump from vibrating in the base.

What you need:
4-6mmX1 well nuts
4-6mmx1/2 panhead screws
1-electrical box cover plate
Tools
Hacksaw with metal cutting blade
1/4 and 1/2 drill bits and drill
flat and round file to dress up edges and holes
You need to put the mag 3 mounting plate on the electric box cover plate and mark the holes and the out side of the plate
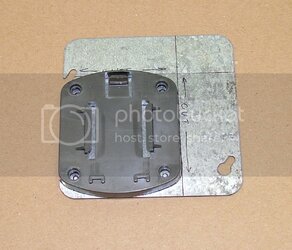
This is how the plate should look after you mark it
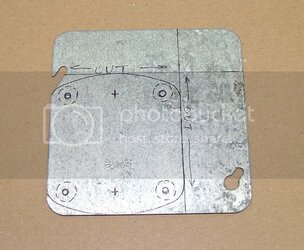
You need to drill 1/4" holes in the four corners and halfway in between marked by the Xs. Then you need to drill the 4 corner holes to 1/2". After that cut the plate as shown and round the corners. Remove all the rough edges with file. If you would like to paint the plate a certain color, now is the time to paint it.
Locate the spot where you are going to mount the pump and mark the 2 middle 1/4 holes. Drill the appropriate size holes, this will depend on your method of securing the plate.Assemmble the parts as shown and fasten the plate down with either sheetmetal screws or machine screws and nuts. I used #8X1/2 machine screws and nuts. I used grommets in these holes but I don't think they are absolutely needed. (The holes marked by the Xs wre already in the plate and are not used.)
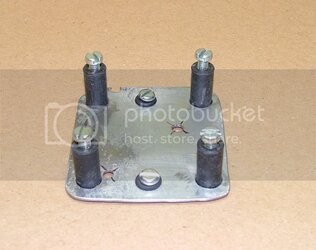
Mount the mag 3 pate and silde the pump into place. You will need to dill the mounting holes on the mag 3 plate to 1/4" and remove the small lip on the bottom of the holes. I also found that adding a couple of large rubber bands around the pump and the pump mounting plate stopped the pump from vibrating in the base.
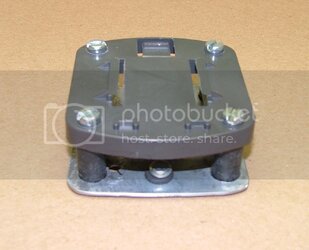
Last edited:
- Joined
- Oct 27, 2004
Wait...I'm lost. What happened to just using 4 little rubber washers? It worked for me. I got em on my case fans too.
- Joined
- Oct 11, 2003
I don't see how that is an isolation mount. If I am looking at that correctly, the bottoms of the well nuts come in direct contact to the case. That would cause vibration to travel down the nut and into the case, what you don't want. Could you elaborate a little on how exactly your method works?
- Joined
- Jan 14, 2003
- Location
- Parma, OH
The well nuts are rubber with just a small brass thread in one end. The is no metal to metal contact plus the soft rubber really absorbs the vibration. The bottom plate has a rubber gromut the isolates the plate from the screws. The is no metal contact with the case. This mount works great with the Mag 3.
- Joined
- Apr 17, 2001
- Location
- Los Angeles
Iwaki MD20 isolation mounting.
In made an isolation mount for my Iwaki out of scrap materials left over from other projects. I used a piece of .189" black lexan for a base plate. The pump mounting bracket is floating on very soft neoprene foam rubber held together with 4 8-32 nylon socket head cap screws and some bits made from .125" aluminum. The base plate is mounted in my case with 3M double sided foam tape.


In made an isolation mount for my Iwaki out of scrap materials left over from other projects. I used a piece of .189" black lexan for a base plate. The pump mounting bracket is floating on very soft neoprene foam rubber held together with 4 8-32 nylon socket head cap screws and some bits made from .125" aluminum. The base plate is mounted in my case with 3M double sided foam tape.


Similar threads
- Replies
- 8
- Views
- 2K
- Replies
- 3
- Views
- 1K
 )
)