• Welcome to Overclockers Forums! Join us to reply in threads, receive reduced ads, and to customize your site experience!

AW9D overclocking BIOS settings

Overclockers is supported by our readers. When you click a link to make a purchase, we may earn a commission. Learn More.

batboy

Senior Moment
Joined
Jan 12, 2001
Location
Kansas, USA
Here is a quick primer that covers the basic overclocking BIOS settings of the Abit AW9D and AW9D-Max. Hopefully, other guys will jump in and add additional info as we go along.

Disclaimer: Overclocking is not entirely without risks, but if you have good cooling and don't go crazy with the voltage settings, then chances are almost nil of any damage occurring. But, if you do screw it up, don't blame me.

For more info, check out a thread made by Master Of None, a moderator on the Abit Forum.

http://forum.abit-usa.com/showthread.php?t=114338

First off, I recommend updating to one of the latest BIOS versions. This can be easily done with the Abit FlashMenu program that comes on the AW9D install CD. I recommend downloading the BIOS file first and then using the "update from file" option.

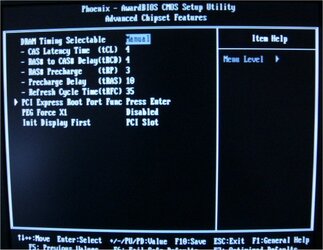
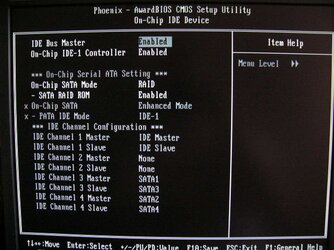
Ok, let's start out with a screenshot of the uGuru Utility menu page of the BIOS. You enter the BIOS by pressing the "delete" key when the system first boots up. The first thing you'll see is the menu page. Click on the top item to go to the main overclocking page (see image).

AW9D-BIOS-3GB.jpg


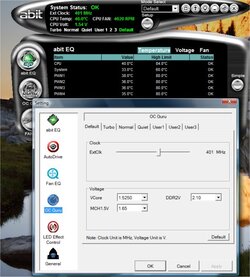
I'm showing an example of what my E6600 will run 110% rock stable at 3 gig. I have good Mushkin Xtreme Performance DDR2-800 RAM, so it'll overclock pretty good. If your RAM isn't as good, you might need to run at the 1:1 ratio instead (change it in the "Dram Spec." option).

If you have a better E6600 than my old one, then you can probably do 3 gig with less vcore. Actually, mine will probably do ok with less voltage, but it's been so long since I ran it this slow that I don't remember exactly what vcore will work.
 
Last edited:
Advanced Chipset Features is where the ram timings come into play

What timings you use will depend on a number of variables, what IC's your memory has, what kind of overclock you are running, and of course the voltage you are prepared to put through them.

As I'm using nice G.Skill HZ memory with d9 chips I have several options at my disposal, as I have opted to run my memory at 1:1 at a fsb of 400 that puts them at spec so I have tightened the timings from 4-4-4-12 to 4-4-3-10. Each user will need to play around to find the sweet spot for their setup.

If you have updated your bios to number 13 or one of the betas you will also be confronted with a new option called Refresh Cycle Time many users have found this to be set too low by default and have needed to raise it, to achieve 4ghz with a E6600 I set it to 40 while I have it set at 35 for 3.6
 

Attachments

  • Ram.jpg
    Ram.jpg
    51.5 KB · Views: 5,058
CPU Feature

Under this menu you will find something called EIST Function.
Basically this little thing slows the cpu down when idle by dropping the cpu multiplier, some what counter productive when overclocking if you ask me, so set it to Disabled
 

Attachments

  • EIST.jpg
    EIST.jpg
    43.1 KB · Views: 5,077
Resetting your CMOS

On the subject of overclocking, in the unlikely event it all goes pear-shaped clearing you cmos can be very handy, it basically sets everything in your bios back to default.

1: Turn off your PC
2: Unplug your power supply
3: Wait for several moments so that the motherboard has no LEDs remaining lit.
4: Find the CMOS jumper (in the middle of the red circle Ive put on the picture)
5: Move the jumper to the left most 2 pins
6: Wait several minutes
7: Return the jumper to right most 2 pins
8: Power back on
 

Attachments

  • aw9d-max.jpg
    aw9d-max.jpg
    56.8 KB · Views: 5,009
Hi all is it poss for someone to post some simple easy steps say to get my 6400cpu @2.13 up to say 3gig.
 
Deanzo said:
Advanced Chipset Features is where the ram timings come into play

What timings you use will depend on a number of variables, what IC's your memory has, what kind of overclock you are running, and of course the voltage you are prepared to put through them.

As I'm using nice G.Skill HZ memory with d9 chips I have several options at my disposal, as I have opted to run my memory at 1:1 at a fsb of 400 that puts them at spec so I have tightened the timings from 4-4-4-12 to 4-4-3-10. Each user will need to play around to find the sweet spot for their setup.

If you have updated your bios to number 13 or one of the betas you will also be confronted with a new option called Refresh Cycle Time many users have found this to be set too low by default and have needed to raise it, to achieve 4ghz with a E6600 I set it to 40 while I have it set at 35 for 3.6


i am on the 13 bios i know that much but all these memory timmings and stuff go way over my head.
 
Jamie, I answered your other post.

Deanzo, thanks mate for the help with those other BIOS menus.
 
Overclocking in windows using uGuru utility.

I am adding this little bit of info as this little utility save your OC in the bios, cool eh

Some including myself still prefer to set everything in the bios menu's though

First off you will need to install the uGuru utility, you will find it on the CD that come's with your board or it can be downloaded from here. Vista use's please only use version 3101 or later.

Once installed start it up and you well see it give's you read out's of your external clock, cpu temperature (as well as other temperature's lower down), cpu fan speed and cpu voltage.

To overclock with this bad boy hit "setup" and in the new window that open's hit "OC Guru" down the left had side of the new window, there you will find all the tools to do a basic overclock.

Have Fun !!
 

Attachments

  • Image2.jpg
    Image2.jpg
    77.3 KB · Views: 4,996
Last edited:
batboy said:
Here are the BIOS setting I use when running 400 FSB or 3.6 gig.

AW9D-BIOS-400FSB.jpg

Hi, what temps do you get idle and under load with the above OC at 400MHz?
I have almost similar setup to your apart from the ram, check my sig for details.

I am currently running at 385FSB stable under prime 95 but my underload temps are about 65c with vcore at 1.4, is this running too hot?
 
My load CPU temp is about 50 degrees at most when running 3.6 gig, but I'm watercooled. Yeah, 65 degrees is pretty much the limit. I prefer 60 or less for 24/7 safety. Look into improving case ventilation and/or maybe put a higher CFM fan onto the CPU heatsink.
 
I clocked down to 360FSB and temps are more around 54-55c under full load which I can live with for a 24/7 machine.

May try steady increases to get upto 3.4GHz or just invest in some better cooling.
 
Thanks for this thread Batboy & Deanzo. Great information here.

I see you can have different overclock profiles in the OC Guru. Can different profiles be saved in BIOS, like the AI7? IMO that's a really nice feature.
 
I can run 380FSB stable at 1.28V (bios) but can't seem to get 400FSB to boot windows at even 1.48v (bios) is this normal?
Does an extra 20FSB really require this much extra power? I have noticed that batboy used 1.525 to get to 400FSB but that seems strange?
 
Last edited:
I just downloaded the uGuru utility version 3101 for Vista. The temperatures of the CPU as shown do not correspond to what is shown in the actual BIOS. From the BIOS, my CPU temp shows 45C/113F.

uGuru from within the Vista desktop shows 34C/95F. Also, I have a minor OC of 300FSB. There is no way my Intel HS is doing this good of a job, although, the two Antec case fans have dropped temps, including to my CPU. but I'm going to go by what is shown in the BIOS itself not uGuru.

I've also noticed that since I've been getting all sorts of Vista updates, my computer can no longer be OC'd to 333FSB as it was easily able to achieve when the OS was first installed. It'll boot up but when it gets to the windows sign on screen, it simply just keeps rebooting endlessly. Very weird.

Richie
 
r00t3d said:
batboy, what BIOS rev are you using 13?

I'm currently using the "non-official" M606C_14.A02 (BIOS 14 Alpha 2). I also had great luck with M606C_13.A11 (modded BIOS 13).

Richie, try bumping up vcore another notch.
 
You can disregard my previous post. I think the problem was the original BIOS version 12. I saw the Vcore voltage was fluctuating from 1.20v-1.36v within the uGuru utility. I took a chance that it was time to update to BIOS 13 from Abit's website. Seemed to fix all the problems and I'm not back up to 333FSB. Vcore seems to sit between 1.36v-1.37v. It also upped my DDR2 ram voltage to 2.0v, which is the upper limit of the type of ram I have. The CPU temp is steady at 39C/100F.

Richie
 
Overclocking to me is getting the most out of what Ive got.
And Ive just started to play around with raid / matrix raid and I must say Im very happy with the results.
Here are the steps you will need to take to set it up in your bios.

First off go to "Integrated Peripherals" and select "On-Chip IDE Device"

IDE Bus Master = Enabled
On-Chip IDE-1 Controller = Press Enter

*** On-Chip Serial ATA Setting ***
X On-Chip SATA Mode = RAID – set this second after setting On-Chip SATA to Enhanced
X – SATA RAID ROM = Enabled – this will be Enabled once On-Chip SATA Mode is set to RAID
On-Chip SATA = Enhanced – set this first then you’ll be able to set On-Chip SATA Mode to RAID

Should end up looking like this"
 

Attachments

  • P1030251.JPG
    P1030251.JPG
    47.4 KB · Views: 4,806
Second: in "Integrated Peripherals" now select "Onboard PCI Device"

IEEE 1394 Controller = Enabled or Disabled - this is the firewire controller
Serial 1 ATA Controller = Disabled if you aren’t using SATA 5 or SATA 6 (Silicon Image)
- SATA RAID Mode = if Serial 1 ATA Controller is Disabled this is grayed out
- SATA Option ROM = if Serial 1 ATA Controller is Disabled this is grayed out
Serial 2 ATA Controller = Disabled if you aren’t using SATA 7 or e-SATA (Silicon Image)
- SATA RAID Mode = if Serial 2 ATA Controller is Disabled this is grayed out
- SATA Option ROM = if Serial 2 ATA Controller is Disabled this is grayed out
LAN1 Controller = Normally Enabled, Disabled if you aren’t using LAN
- Invoke Boot Agent = Normally Disabled, Enabled if you what to boot from LAN
LAN2 Controller = Normally Disabled, Enabled if you use both LAN connections
- Invoke Boot Agent = Normally Disabled, Enabled if you what to boot from LAN2

Depending on what you Disable, it will end up looking something like this:
 

Attachments

  • P1030252.JPG
    P1030252.JPG
    44 KB · Views: 4,814
Last edited:
Back