• Welcome to Overclockers Forums! Join us to reply in threads, receive reduced ads, and to customize your site experience!

Jas's New build - TT Armor, dual Rad

Overclockers is supported by our readers. When you click a link to make a purchase, we may earn a commission. Learn More.

Jas

Member
Joined
Feb 7, 2005
Location
Kenosha, WI.
Jas's New build - TT Armor, dual Rad (PICS)

PART 1: The Game plan:

Arriving tomorrow will be the following:

ThermalTake Armor chasis
Swiftech MCWRamcool
Swiftech MCW30
Assorted neccesities (tubing, clamps, etc)

Background on why the build (The problems):

My current Case has been in use for close to 5 years. It is an Aspire X-Alien, That has been modded. The bottom fornt Drive cage has been cut out, the front vents driled out for better airflow, and I custom wired the case. This case has seen 4 hardware rebuilds, and numerous cooling rebuilds through out it's life. Time has teken it's toll, and it's showing it's age.

With my current hardware, I am quickly hitting walls in regards to my cooling, namely, the NB, which is hindering my OCing.

The current build is based on the design I used for my Old A64 system, a BIX mounted in the bottom front being driven by a Panaflo rated at over 110 CFM at fulle speed, and a BIM mounted on the back exaust. This provided more tham ample cooling for my A64 and Geforce 6800GT, but is running short on my current hardware.

My mother board has a craptastic NB cooler that is causing me some headaches. My high FSB OCs are meeting with major instability issues, and the occasional non POST. All because the NB is getting way too hot. The lmitations on current real estate in my case and a lack of available mouting points precludes the addition of more fans, or the addition of a chipset cooler to this loop as it currently stands.

The solution:

I needed a larger case that would take larger radiators, and allow for improved airflow with the ability to add a chipset block to the loop. The TT Armor seemed the perfect fit.

Next up was the Radiator. My first plan was to move to a single 120.3 Radiator, but I wasn't too keen on how much realestate the radiator would take up in the front bays, and despite an initial thought of modding the case similar to Thideras, and placing the radiator on the bottom of the chasis, I descided against having to do any major mods to the chasis.

I had a '77 Bonny HC that was already modded and ready for WC that was just sitting around. Plus I had the BIX that was in use currently. I decided to go the Dual radiator setup again, but this time, with more power. The Bonny core would sit in the bottom front, while the BIX would mount to the rear of the case. This would offer up nearly the same cooling power as a 120.3 radiator, but without taking up the entire fornt of the case, or having to do any excessive modding.

The trade off: slightly less performance for more real estate to work with and no modding.

I decided to add in the Swiftech MCW Ramcool block as well, to cool the GPU ram. I haven't been too happy with the passive sinks I put on my card, and for $30, I fgured why not. Plus one less spot to worry about getting lots of air directed.

The Plan for the Loop:

The basic loop will look like this

pump -> CPU -> GPU -> NB -> BIX -> HC -> pump.

This should result in the shortest tube routes. I will use a dual T line, one being the main fill line which will run down directly before the pump. The second Will sit at the top of the loop, and will be opened during initial filling to help allow air to escape, minimizing fill time.

Some options I am considering:

Installation of valves to seal parts of the loop, to make removing individual components easier.

Parts should be ariving tomorrow, 12/7 So hopefully I can get some initial pics, and setup stuff up next week.
 
Last edited:
Part 2: Initial Setup

Everything but the NB cooler (MCW30) arrive on Friday, 12/07. I took off early form work to get a head start on the build for the weekend. Since I wouldn't have the chipset cooler till 12/10, I planned to get everything else setup and put together, so that all I had left to do was bolt the chipset cooler on and hook up some tubes.

The case

It's huge, what else can I say, it rivals some floor standing Server form factors. The build quality looked great. So, I looked it over. First thing I noticed was the top grill for the 92mm fan exaust. Was this a joke? Those holes were so small you couldn't even measure them in fractions of an inch. Those would need to be drilled out. Some quick measuring showed that widing the holes to 3/8" inch would open things up without wrecking the plastic. I drilled them out,and that opened things up nicely.

Thermal take advertises this case as having openings on the back for routing tubing for external water cooling. This is becomming a common feature on cases these days, but when I took a look at the 4 punch outs in back, it was obvious they were too small for 1/2" tubing. Thermal take makes 1/4" water cooling products, so I assume these punch outs were made with only their 1/4" setups in mind. This would prove to be a minor issue.

I initially though I would mount the BIX 120.1 radiator internally, on the rear 120 fan exaust. However, the radiator was too big to fit in the space. And keeping with my desire to not cut up the case unless it was an improvement, I opted to mount it externally, and route tubes through the provided cut outs. I had to decide if I wanted to open those holes up, or come up with another solution. Then it hit me. I like to use 3/8" Copper pipe T line fittings in my loops. The OD of the fittings are about 9/16", with an ID of around 7/16", 1/2" tubbing fits nice and snug over them, and they don't restrict flow like many plastic Ts. I figured I could use some 3/8" copper pipe couplers inserted through the cutouts, and attach tubing on either side. This worked wonderfully. The BIX, and fan shroud were mounted externally with the fan internaly mounted. I had nice clean, non restrictive tubing routes going external without having to cut up the case.

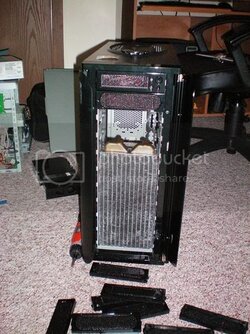
I checked the front of the case, and the '77 bonny core fit nicely, a little wiggle room on the sides, but nothing some padding couldn't take care of.
100_0057.jpg

The verdict: The TT armor case is pretty awesome, but it's not perfect. The top exaust needs to be drilled out, or don't even bother placing a fan there. The punch outs for tubing are too small for anythign but 1/4" tubes. The tooles pci lock downs hold well, but they aren't as easy to work with as the ones I've seen on Cooler Master cases. If I had to rate the case, I'd give it an 8 out of 10.

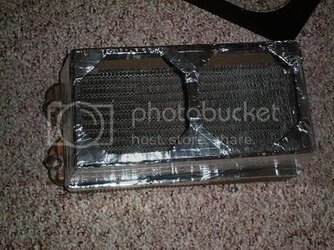
The '77 Bonny core and shroud

There is less incentive to use a HC these days, considering good off the shelf radiators can be purchased for $40-50. But there is nothing quite as satisifying as making your own cooling soultion and watching it kick the crap out of off the shelf components. I've had a '77 Bonny core laying around for close to 3 years, that had never made it into a WC setup. The Core itself was modded and ready to go, what I needed was a shroud.

I thought about going the acrylic route, but that seemed like it would be too much of a hassle. So I took a step backwards, and remembered the old days, experimenting with duct works inside cases, and how I built ducts using nothing but strong cardboard and aluminum tape. So, why not make a shroud out of my favorite ghetto materials?

I took some measurements, and designed a venturi style shroud that would push the fans 3 inches off the radiator. Thankfully Newegg uses some high quality boxes, I was able to empty the contents of a box they just sent me, and one side of it quickly became a radiator shroud. With a liberal amount of aluminum tape, I took the core and shroud out to the garage and gave them a spray down with some black metalic spray paint. It was cold, so I figured I'd give it a couple hours to dry.

End result:
100_0058.jpg

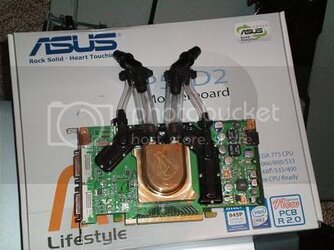
MCW Ramcool

When I first saw this product I was really excited about it. Coupled with a standard GPU block it would give you the ability to completely cool your graphics card, just like an all in one block, BUT, it was a portable system that could be used on other cards as well, something the all in one blovcks can't do. As a swiftech product it is of course very well made. The Ramcool lines up perfectly with the ram, and fits nicely under My Maze 4 GPU block. The Ramcool is secured by the use of 5 small screws, making it a VERY sturdy addition. The main drawback to this setup became readily apparent when I bgan to connect the tubing to the F couplers. You are really limited as far as how you can set this up, and you pretty much need a wide case to make room for the hieght of the F couplers and tubbing. It took quite a bit of trial and error to find some positions on tube length that would work, and bend without resulting in any kinking.

Heres a pic before I had to make some adjustments to the couplers.

100_0059.jpg

The Verdict: I think this product is a great idea, although it does add an extra level of difficulty to the placement, and routing of your tubing. But you do get a cooling solution for your graphics card that gets both the GPU and the RAM, and it can be used on different cards.


Thats it for today. I'll write up more once I get the chipset cooler installed, and the final build completed.
 
Last edited:
Part 3: Conclusion

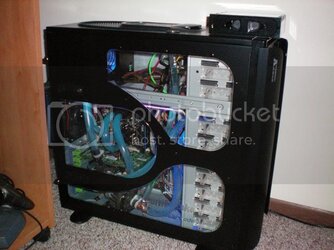
Got the build completed today. Final results:


100_0115.jpg

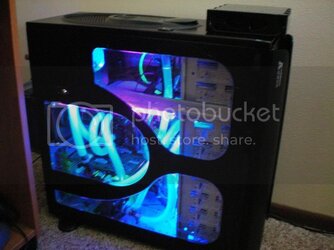
And all Lit up

100_0116.jpg

The final loop ended up looking like this:
Pump- > CPU -> NB -> BIX -> GPU/Ramcool -> Bonny core -> pump

I orginally thought I might try putting in some valves, and a double T, but after I started the mock up, I realized I would have enough potential points of failure as it was. So the old addage of "Keep It Simple Stupid" lept to mind. I ditched the valve idea right off the bat, and the Second T for bleeding was scrapped shortly there after. There wasnt anything fancy to the loop. but it did look good. The tubes were routed nice and clean, and made for a nice display in the window.

The D-Tek Blue dye came to life very nicely, although it was more greenish blue than blue, but still it looked great.

After getting the machine built, and the loop bled, it was time to see what if anything I would get out of this new setup. I had been running my CPU at 3ghz lately, since my old case/build just couldn't keep the NB cool enough to OC any further without major stability issues.

I fired up the machine at 3ghz and checked the temps. Idle had dropped from ~22c to ~17c. Load dropped from ~48c to ~33c. Major difference in the cooling. So I started dialing up the OC, I first shot for 3.2 Ghz, and the CPU hit it no problem with just a minor bump in voltage.

Next it was time for 3.4Ghz. It took a little playing around but I got it running stable at 3.4 I did a temp check during Orthos, and load topped out around ~48c Idle was ~20c. Roughly the same temps as my old setup, but 400Mhz faster.

Well, I couldn't let it go there, With some extra pushing on the voltage, I hit 3.6

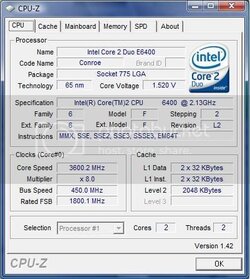
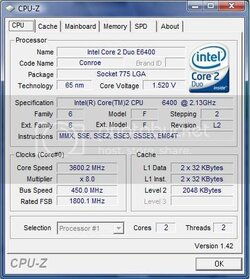
CPUZ-20071211.jpg

I dialed in the Ram at 4-4-4-12 and ran orthos checking temps.

Idle was ~21c Average load was ~55-56c (peak of 58c for a quick burst).

So far so good, she's running nice and fast, and no stability issues.

I'll probably let the machine settle in for a week or two and see if I can't push past 3.6

Oh, and next up is probably dumping another 2G of RAM in here. Vista is cranking at around 40-45% memory usage just web surfing.
 
Last edited:
You picked a good case, I've been watercooling mine for over a year now and it's always been a pleasure to work with except for the weight.
 
Well It looks like the Chipset cooler won't get here till Monday. I was kind of hoping to have it al here today so I could get most of the build done this weekend, but, looks like it will be a longer project now. I'll probbaly just paint the inside of the case and modd up the HC this weekend.
 
Ups just dropped off the Chipset cooler. So I should have a running system within the next couple of days!
 
Glad you got your parts. I haven't really taken a good look at the Ramcool.

I'm on hold for an 8800GT from Dell and they keep changing the anticipated ship dates and I have a guy at work with cash in hand waiting to buy my 7900GT. And I've got Orange Box installed and waiting...
 
Just got the machine up and running this morning. Got the OC up to 3.6 Ghz.

CPUZ-20071211.jpg

Orthos stress test (both cores) resulted in a max load temp of 58c but averaged ~55c. Idle is around 21c.

Core voltage is at 1.52. Not too shabby considering the fans are on low, and the AS5 hasn't cured yet.

I'll post pics, and more write up later this week.
 
Last edited:
Glad you got your parts. I haven't really taken a good look at the Ramcool.

I'm on hold for an 8800GT from Dell and they keep changing the anticipated ship dates and I have a guy at work with cash in hand waiting to buy my 7900GT. And I've got Orange Box installed and waiting...

The Ramcool currently only works with the 6 and 7 series cards. The 8 series cards have more ram chips on them, and the Ramcool wouldn't cover them all. I got it for $30 from jab-tech. Wasn't pricey, so I figured I'd check it out, even though I plan on getting a 9 series card next year when they come out (hey, maybe it will be compatible with one of those???)

My 7950gt runs everything I currently play extremely well. So I'm in no rush to grab a new card. But as more DX10 games hit the shelves over the next 6 months or so, I'll definately be ready for on by the time the 9 series is out.
 
I was checking out some 8800 series reference pics and it might be possible to mount the Ramcool on a 8800 series car with 512mb of ram. It looks like you could get 3 of mounting holes to line up. Would actually have to give it a try though to be sure...
 
As I've got some RAMCool's, too, I'd be very interested to see what you come up with!


@ sunrunner20 - A little spray paint goes a long way ... ;)

I'm not to keen on dropping a few hundred on a new card, when I know the 9 series will be out within 6 months. I'll probbly just wait till the 9 series comes out and see if I can't get the ramcool to mount on a 9 series card. That is unless of course Santa is really good to me this year.
 
Glad you got your parts. I haven't really taken a good look at the Ramcool.

I'm on hold for an 8800GT from Dell and they keep changing the anticipated ship dates and I have a guy at work with cash in hand waiting to buy my 7900GT. And I've got Orange Box installed and waiting...


I just checked th elocal Best buy, and they have the 8800 GT 512mb cards in stock from BFG for $237.

Not sur eIf i can afford to pick one up this weekend, but if they are still on sale by the end of next week (assuming they have any left) I may just snag one, and see if the ramcool wil fit on it.

all 5 mount points won't lin eup but it loosk liek at least 2 will, if not 3. if two on either side of the block will line up that shoudl be "good enough" to maintian decent pressure and coverage on the ram.

Anyway we will see. Little bit surprised they have them in stock.
 
Good luck finding one of the Best Buy ones. I got in on ordering one this Monday online and they were only available for about 1/2 of the day before being sold out. I just got it in today and went to Best Buy and they did a return/rebuy for me so that I could use the 12% rewards coupon for a total of $210 + tax. That is a deal that is hard to beat. They are only on sale through tomorrow.
 
Yeah, don't think I can afford one this weekend. Will have to wait. Store by me has them in tstock though
 
I like your first idea the best. Not trying to dissuade you from getting the 8800 now but with the 9's due out anytime I'd just wait. If nothing else the price of the 8's will drop then.

I was referring to the RAMCools fitting the 9's anyway. I've seen an example of someone trying to put one on an 8800 - it's not pretty ... :-/
 
Back