• Welcome to Overclockers Forums! Join us to reply in threads, receive reduced ads, and to customize your site experience!

Got My Parts, Time to Build

Overclockers is supported by our readers. When you click a link to make a purchase, we may earn a commission. Learn More.

leftheaded

Member
Joined
Jul 16, 2007
Location
the present
The Fedex dude just dropped off a lot of loot...

Thermochill PA120.3 with 1/2" Plastic Barbs
Swiftech MCP655™ 12 VDC Pump
D-Tek FuZion Accelerator Nozzle Kit
Dtek FuZion Intel 775 Pro-Mount set
Swiftech MCW60-R VGA cooler
Swiftech MCW30 Chipset cooler
3 x YATE LOON 120x120x20mm Case Fan - D12SM-12C Medium Speed
15' ClearFLEX 60 Tubing 1/2" ID / 3/4" OD
Swiftech MCRES-Micro
D-TEK FuZion Universal CPU Waterblock - 1/2"
Swiftech MC8800 SMC Cooling Kit
15 x Stainless Steel Worm-Drive Hose Clamp (Wide Band w/Liner)
Petra'sTech "PT_Nuke" Concentrated Biocide (10mL)
Danger Den Acetal T-Fitting
Danger Den Acetal FillPort
EK High-Flow Fitting (G EK-G38-12 3/8" Thread, 1/2" OD)

I've got my work cut out for me. This is my first attempt at h2o. Any last minute advice or tips for me?

All I'm doing is following this guide. I hope it's not too out of date.

How important is the McMaster-Carr filter? I don't have one.

On my way to the store to pick up a few gallons of distilled water and vinegar for cleaning. wooT :beer: :beer: :attn:

2008-02-15
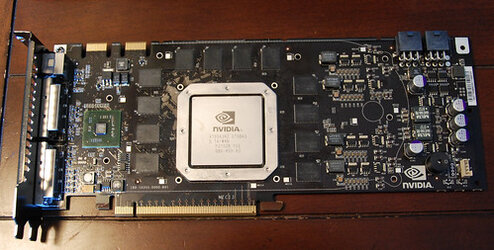
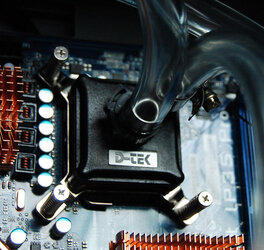
Today, I finally busted out the water blocks after flushing the radiator out last week. I mounted the Fuzion & used the quad nozzle. Also pulled off the stock cooler on my 8800 Ultra and cleaned it up.

2275535561_90b6080e59.jpg

2008-02-17
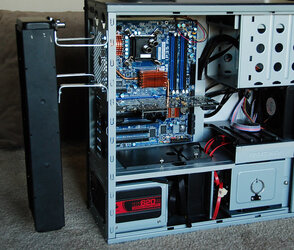
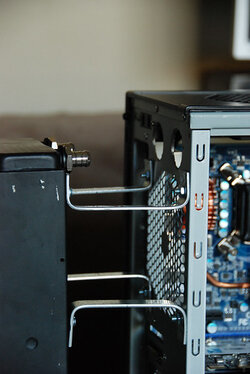
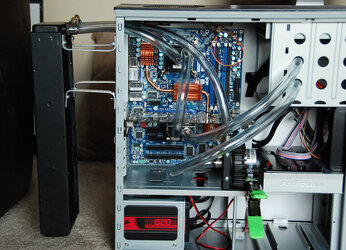
Today, I made my brackets to mount the radiator off the back of my case. Not as pretty as the build that inspired me (lasse.j5 at XS), but same idea. Also cut holes in the case for rad tubing.

2275545777_709ec8ac73.jpg
2276342314_5b7a9814aa.jpg


2008-02-18
I wanted to cut some tubing so, today, I dry mounted everything except the reservoir. I damaged an o-ring and need to get another before I can mount the res. Also, I'm still trying to decide where to actually put the res. Also thinking about getting the EK res and mounting it the way lasse.j5 did, and even use the fill port hole in the top of the case.

2276328982_880882957f.jpg

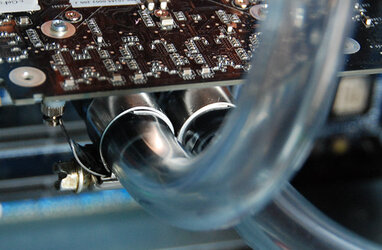
Using 3/4" OD tubing with the Fuzion means there is little to no room for hose clamps. It was pretty tight where the tubing meets. First, I put a black, plastic clamp on the in-flow. Then I painstakingly worked a metal worm-drive on the out-flow right up to the plastic clamp.

2276350130_bca7e5a55d.jpg

the VGA clamps
2275556299_1535d260bb.jpg

And here's where I stopped. The unconnected tubes are stuffed into the 5.25" bay in the upper right hand side since the res isn't included yet.

2275554567_f294390900_b.jpg
 
Last edited:
Post lots of pics! I'll be joining you in a week or two, although my build will be a little less extensive since I'm only doing the CPU and possibly the NB.
 
Copy of what I just put on xtreme forums for your info::::: You dbl posted, so i did too!

...................
I posted this on the Danger Den site, this was 3-4 days before I built mine, and it's darn close to your system.
.................................................. .
I will be doing this method since it's my first time doing WCing. I'm not gonna destroy my Mobo or vid card, I have read too many horror stories about rush, not knowing etc.

Once I have done this a few times, I won't be going to such great extremes.

Use distilled water to leak test. Do not use house water. I will be using distilled water and a few drops of biocide in my system. No other special liquids. My loop will be all copper blocks/rad so no need for any special anti-corrosion additives. I don't need UV lights or anything like that.

Dry mount everything, getting fittings right and hose length figured out. Then take it all out and off the mobo, cards etc. Remove res from case, rad everything.


Lay it all on a table and hook it all up again like it was in the case. No GPU card, CPU chip etc. Just the water portions. Doesn't have to be pretty or proper angles etc. Put the rad down low, the res up high. Add water to the res to start filling the pump up. Do not let the pump run dry.

Disconnect all connectors from your computer, NO PSU outputs except the pump connector. I have an old PSU that I will use. Take your power supply 24 pin connector and using a piece of wire short the green and ANY black wire. That will start the pump. I had to bump my pump off/on a few times and kept adding water. I just used the PSU power switch to bump the pump. Keep adding water as the res level drops. Move the rad, blocks, pump, and hoses around to get bubbles out. I even put the rad fittings pointed to the top and had to shake my rad a few times over a few hours to get all the bubbles out. Thats whats nice about having it all layed out. Keep at it, it will take quite a while. Once all full then put paper towels around the fittings and watch closely for a few hours. If there are no more leaks, then put new paper towels and let it run a full day. Once your SURE there are no leaks after this, your done testing.

Now put it ALL back in the case, check your connections thrice if not four times. Check for kinked hoses etc etc etc.

Add your choice of liquids to the res to prime the pump. Short out the wires on the PSU DO NOT CONNECT THE MOBO/HD/GPU, ANY power to anything except the pump. Same routine as last time. Keep filling, rotating case to get rid of bubbles, shake etc etc. Keep filling watching for leaks etc. Put paper towels around the fittings and keep checking. Once you think there are no leaks put new paper towels and let it run for a day. if no leaks great! It can take a long time to get all the air out. You will need to check the res every hour or so while it runs like the first time.

Then connect your PSU to all the components and boot it up! Don't rush it.
.................................................. .............

One for rad cleaning I posted, I got a PA 120.3 too
.................................................. ...........
Not sure what rad brand you have. I have a Thermochill PA 120.3. They use water based flux. Some other manufacturers use other types, and vinegar is one way.

I remember a recent post on one of these boards where one of the experts talked about acetone, supheric acid in a solution of distilled water and other exotic materials. I forgot where that was, no linky. Since I have a Thermochill rad it wasn't necessary for me.

I got a few gallons of distilled water. Only distilled. I got a gallon to almost boiling and poured it to fill the rad and let sit until not super hot. Drained 1/2 out or so and shook the rad a LOT. Poured the water into a glass bowl, and I could see the little pieces in the water with a bit of cloudyness. I repeated this like 15 times, and then rinsed 4-5 times with hot water. The water was clear when I was done. I used like 3 gallons to do this. At $1 a gallon it's not too expensive.

Don't need a filter. My loop is clean, your's will be too. Ohh open the blocks and pump up to make sure they have no stuff. I found 2-3 small peices of packing foam stuff INSIDE my pump. I'm gonna make a few hose changes in another week, so I'll drain etc. Maybe thats a good idea to let it run a week or so, then drain and refill......

What I bought:

Rad: PA 120.3 $135 JAB
Rad fittings: EK High Flow (G3/8 thread, ½” OD) $6 Pet
Rad Shroud: PA 120.3 shroud $19 JAB
Pump: Laing D5 MCP655 vario DD ver. $83 Pet
Res: EK-Multioption RES 100 rev.2 $34 JAB
EK Anti Cyclone: $2.50 JAB
Tubing: Tygon Silver 1/2x3/4 15’ $56 USP
T fitting for drain: Delrin T $8 Pet
Drain port: Delrin Fillport $12 JAB
Clamps: Stainless worm drive w/liner (15) $19 Pet
Biocide: PT-Nuke $3 Pet
Blocks:
DTek FuZion CPU $62 Pet
D-Tek FuZion Accelerator Nozzle Kit $7 Pet
Dtek FuZion Intel 775 Pro-Mount set $12 Jab
IONE for NVIDIA G92 GT and GTS $116 DD
NB block: Swiftech MCW30 Chipset block $28 Jab

Store code:
DD is Danger Den
Pet is Petras
Jab is Jab-Tech

My pics, scroll to the end::
http://www.ocforums.com/showthread.php?t=544599
 
Take your time!!! Either double or triple check all your clamps to ensure you have no leaks. And last but not least follow the instructions that come with all your blocks so you have a nice tight seat against your cpu and gpu. Good luck and may your build go smoothly and don't forget to post pics afterwards.
 
Make sure all the screws and barbs are nice and tight (don't over tighten or your strip something). I wouldn't bother with a filter as it'll only hinder your flow.
 
Looks like a very solid WCing setup. If you do everything right the first time (read: don't kill any parts) you should be very please with the setup...

Can't wait to see some pictures.
 
How far out from the case is your rad mounted? Did you fabricate the brackets from bar stock? Im looking at doing something very similar, same rad but on a taller case. Would be nice to get an idea of how far out I need to be for cable clearance since my mobo is not in the case yet.

Also I notice you removed the rear case fan. Why? I assume you plan to use 3 fans in pull configuration on the rad? Why not also leave the case fan in to exhaust warm air out of the case? Seems there is enough space between case and rad that it would not create a heat problem with the rad. In my case I have 2 120mm case fans that will be behind my radiator...

Thanks! And very nice setup by the way!
 
Yea, you'll need that fan on the back of the case for case flow still. You gotta cool the NB/SB/Mosfets still. PA rads work best with pull fans so put them to pull on the outside from the case. You will pull a bit of case air but not a lot to worry about cuz your rad can handle it easy.

Yea it's a ***** to get those screw clamps on the FuZion. I did, took some work.

Looks pretty clean except where is your Mem and Vram GPU HS? They need air cooled still..... See them listed in your parts, guess you took the pic first.

Ohh and looks pretty normal, that's a good thing :)
 
How far out from the case is your rad mounted? Did you fabricate the brackets from bar stock?
yeah, i bought a 36" bar from from home depot and cut four 6" pieces. then bent each end about an inch, so the distance from the case is about 4 inches.

Also I notice you removed the rear case fan. Why? I assume you plan to use 3 fans in pull configuration on the rad? Why not also leave the case fan in to exhaust warm air out of the case?
I removed some fans just to make it easier to work. But I actually don't have my rig/loop running yet. should finally get it done this weekend. just been too busy to finish.

Is that rad running passively?
nope, its going to run with three fans pulling

Yea, you'll need that fan on the back of the case for case flow still. You gotta cool the NB/SB/Mosfets still. PA rads work best with pull fans so put them to pull on the outside from the case. You will pull a bit of case air but not a lot to worry about cuz your rad can handle it easy.
yeah, this is all 100% true in my experience too. my NB/SB/PWM were running way hot. I was done with my wc job, but I used hose clamps with oil-lubed screws and some of that oil got in my loop. I couldn't live with it, so I broke it down and cleaned everything. It's taking me forever, but I think it was the right move to clean it and reassemble.

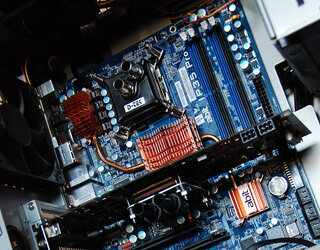
and while I had the rig apart i decided to do the IP35 pro heatpipe mod.

I ran my leak test all night last night with no leaks. so, tonight I'm hoping to put the rig back together. hopefully, do some overclocking/benching on the weekend to see what this cooling bought me in terms of MHz lol :beer:


Yea it's a ***** to get those screw clamps on the FuZion. I did, took some work.
Yeah, this is the only reservation I'd have if doing this again. I wouldn't use 1/2ID, 3/4OD with the Fuzion if I was building something new. 1/4" thick tubing is just too much for the Fuzion. It's a pain to get both clamped. easily the most annoying part of my loop build.


Looks pretty clean except where is your Mem and Vram GPU HS? They need air cooled still..... See them listed in your parts, guess you took the pic first.
yeah, took photos first. I kept knocking off the HS when experimenting with tubing.

I'll post more photos since i've made more progress since posting here. Maybe next week they'll be ready.

thanks guys - hope this helps someone lol

:beer::beer::soda::soda:
 
yeah, i bought a 36" bar from from home depot and cut four 6" pieces. then bent each end about an inch, so the distance from the case is about 4 inches.

thanks guys - hope this helps someone lol

:beer::beer::soda::soda:

Cool. Its aluminum, right? Bend it with a vise and hammer?

Helps me for sure! Thanks!
 
Cool. Its aluminum, right? Bend it with a vise and hammer?

Helps me for sure! Thanks!

yeah, vise and hammer would be ideal. I don't have a vise, so I used c-clamps on a bench, then pounded it with a hammer :D

i'm not sure what the material is though. it felt heavier than aluminum, but i don't know... it could have been. lol
 
yeah, vise and hammer would be ideal. I don't have a vise, so I used c-clamps on a bench, then pounded it with a hammer :D

i'm not sure what the material is though. it felt heavier than aluminum, but i don't know... it could have been. lol

If it bent easily without cracking it's probably steel. Stick a refrigerator magnet on it sometime to be sure :)
 
the Antec P182 is little small for watercool set up,you should go for bigger case but it looks nice anyway.
 
Back