• Welcome to Overclockers Forums! Join us to reply in threads, receive reduced ads, and to customize your site experience!

Microcontroller boards -Post your project!

Overclockers is supported by our readers. When you click a link to make a purchase, we may earn a commission. Learn More.

xsuperbgx

Benching Team Leader
Joined
Dec 31, 2006
Location
Ut.
I ordered both a raspberry Pi and an arduino to mess around with, but I have been looking at some of the other various types of boards that can be found. I see that there is quite a bit of discussion in the fan controller thread, but I am wondering what else are you using these for?


Raspberry Pi, Arduino, Ti MSP430, beagleboard, etc.

http://www.mkt-element-14.com/raspberry/4G.html?sku=43W5302&COM=raspi-group

http://www.microcenter.com/single_product_results.aspx?sku=869016

https://estore.ti.com/MSP-EXP430G2-MSP430-LaunchPad-Value-Line-Development-kit-P2031.aspx

http://beagleboard.org/buy

I have a couple ideas for things, but I am just starting to figure out what these different boards can do. I have an interest in building a control for the single stage phase that I am building. I would like to control the condenser fan speed and the compressor, but also show some temperature readouts and maybe have it turn the computer on and off if needed. It seems that the arduino would work as a good starting point on this.
 
Great thread idea!

The arduino should be able to do it. You'll need temp sensors that read in the right range, but that's doable. It may require resorting to thermocouples (the chip I used to read 'em runs $7, a SMD to DIP board is another buck or so) for the cold stuff unless you can find a thermistor that reads well that lot.
Definitely doable though!

The most recent thing I've made is a one-button combination lock. As the code sits now you press for 1s, let up, press for 0.5s, let up, then press for 1s and let up. At that point the MCU will do whatever it needs to in order to unlock whatever needs unlocking.
Next up is building a box with a latch controller by this device, so to open the box you'll have to enter the combination.
Should be fairly kid-proof :D
Right now it's +/- 0.25s to allow lots of wiggleroom. Below is the code, it's for the Energia IDE for the TI Launchpad MSP430. Changing pin numbers will make it work for the Arduino, as the Energia IDE is a port of the Arduino IDE aimed at MSP430s.
The TI Launchpad has an LED on pin 1.0 and another on pin 1.6, plus a button attached to pin 1.3, the built in button/LEDs is a nice touch.
Code:
int counter;
byte wiggleRoom = 25;  //the amount + or - of the exact correct push length to pass a lock level, measured in 10ms steps.
byte lockLevel = 1;           //Stores what button press the lock is on
boolean open = false;
boolean buttonState;
int test1 = 100; //Number of 10ms steps the button should be held down for the first time
int test2 = 50;  //Same, for press two.
int test3 = 100; //And press 3. So for this setup, we press for 1s, let up, press for 0.5s, let up, press for 1s

void setup(){
  pinMode(P1_0, OUTPUT); 
  pinMode(P1_6, OUTPUT);
  pinMode(P1_3, INPUT_PULLUP);
}

void loop(){
  if (!open){  // normal state, red LED on, green LED off.
    digitalWrite(P1_0, HIGH);  //In this section you would shut the lock, whatever it was.
    digitalWrite(P1_6, LOW);
  }
  else{
    digitalWrite(P1_6, HIGH);  //Open the lock
    digitalWrite(P1_0, LOW);
    delay(3000);  //Wait a bit.
    lockLevel = 1;
    open = false;  //Set the lock to close next pass through the code.
                   //Might not be a bad idea to close the lock here too, really.
                   //That would prevent the button being held down keeping the lock open.
  }
  buttonState = digitalRead(P1_3);
  if (!buttonState){  //Button is pushed
    counter = 0;  //reset the counter, this is crucial.
    while (!buttonState){  //As long as the button is held down, this cycles.
      counter++;
      delay(10);  //10ms per cycle, record the number of cycles.
      buttonState = digitalRead(P1_3);  //We do need to get out eventually, when the button opens
    }

    switch (lockLevel){  //Now that we have a press duration, we need to find what level the lock is on
    case 1:  //If it's the first press, we start here.
      if (counter >= test1 - wiggleRoom && counter <=test1 + wiggleRoom){  
        lockLevel = 2;          //Adjust wiggleRoom to be the number of 10ms steps you want for wiggle room.      
        counter = 0;            //Right now we get +/- 250ms. 
        digitalWrite(P1_6, HIGH); //Flash the green LED if the push was successful. Mostly for debugging.
        delay(50);
        digitalWrite(P1_6, LOW);
      }
      else{
        lockLevel = 1;  //If the push is the wrong length, start over.
        counter = 0;
      }
      break;

    case 2:
      if (counter >= test2 - wiggleRoom && counter <=test2 + wiggleRoom){  //Second push, same deal.
        lockLevel = 3;
        counter = 0;
        digitalWrite(P1_6, HIGH);
        delay(50);
        digitalWrite(P1_6, LOW);
      }
      else{
        lockLevel = 1;  //If the push is the wrong length, start over from push 1.
        counter = 0;
      }
      break;

    case 3:

      if (counter >= test3 - wiggleRoom && counter <=test3 + wiggleRoom){
        open = true;  //Third correct push opens the lock.
        counter = 0;
      }
      else{
        lockLevel = 1;
        counter = 0;
      }
      break;
    }
  }
}

Next up is some learning (so it adjusts to you), and ideally a way to switch to programming mode to enter a new combination without having to hook up a computer.
With an Atmel chip that'd be easy, just use the EEPROM to store the data and a library that makes EEPROM use very easy. The MSP430 series lacks EEPROM but has some "reserved" areas on the main flash, I need to figure out how to program those areas from inside the program.
For a built-into-a-box-with-a-battery type thing this MCU is nearly perfect as it is designed from the ground up to draw very little power.
 
Anyone know good Microctonroller forums? Need help with a Heaven 420D screen.
 
I received my ras pi yesterday. I can't seem to find any sd cards, so I have to go buy one before I can try it.
 
I am looking forward to doing a bunch of the arduino stuff with my son. I think will be good for learning some basic electronics stuff and programming. They have the little kits with details on all of the projects. It reminds me of the old radio shack 100 in one type kits that I got when I was a kid.

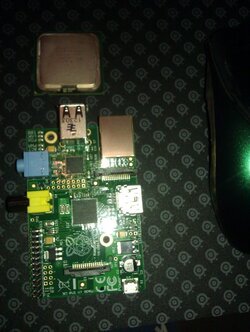
Here is a picture of the raspberry pi, with a c2d cpu and my mouse as a size reference.

IMAG1352.jpg
 
100 internetz for the first person to figure out what my Arduino is doing here...

Ed doesn't count... He already gets free Internetz... He's the one who helped me teach it to do this.

 
I remember doing that in one of my labs in second year of uni (Physics) with some a PIC. Looks like it is counting to 64 where each LED is a bit.
 
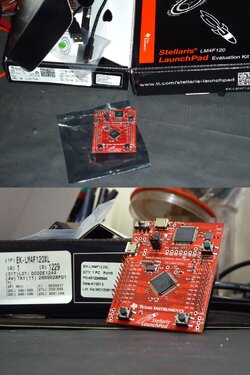
Just arrived 2 TI Stellaris EK-LM4F120XL LaunchPad at TI promotional sale for $4.99 each and free shipping too, can't complain too much when its priced like this. :D

PS : The promotion is ended, its now $12.99 each. :shrug:

Its a 80Mhz ARM Cortex™-M4F core, the F suffix means it has hardware floating point unit, and built-in USB 2.0 controller too, what a beast ! :attn:

An overkill :screwy: fan & pump controller maybe ? :chair:

Stellaris Launchpad.jpg
 
Last edited:
I remember doing that in one of my labs in second year of uni (Physics) with some a PIC. Looks like it is counting to 64 where each LED is a bit.

0-128 if each LED is a bit, that gives 256 total count.
 
Very nice Bing! I almost bought a couple, didn't, then the price went up and I wished I had. Those should be very nice :D
 
Massive update to my combination lock, now it's programmable via that same single button, and saves the new button values (including the wiggle room) to flash. The comments are from the old flavor, not all are accurate and not everything is commented.
Code:
#define FLASHCLOCK FSSEL1+((F_CPU/400000L) & 63); // SCLK
#define flash ((unsigned char*)0x1000)

boolean timeToFlash = false;
boolean waitACycle = false;
int counter;
byte wiggleRoom = 25;  //the amount + or - of the exact correct push length to pass a lock level, measured in 10ms steps.
byte lockLevel = 1;           //Stores what button press the lock is on
boolean open = false;
boolean buttonState;
byte password[4]; //Number of 10ms steps the button should be held down for the first time
//Same, for press two.
//And press 3. So for this setup, we press for 1s, let up, press for 0.5s, let up, press for 1s

void setup(){
  Serial.begin(9600);
  pinMode(P1_0, OUTPUT); 
  pinMode(P1_6, OUTPUT);
  pinMode(P1_3, INPUT_PULLUP);


  for (byte x = 0 ; x < 4 ; x++){
    password[x] = (*(flash+x));
    delay(10);
  }

  for (byte x = 0 ; x < 4 ; x++){
    Serial.println(password[x]);
    delay(10);
  }
}

void loop(){
  if (!open){  // normal state, red LED on, green LED off.
    digitalWrite(P1_0, HIGH);  //In this section you would shut the lock, whatever it was.
    digitalWrite(P1_6, LOW);
  }
  else{
    digitalWrite(P1_6, HIGH);  //Open the lock
    digitalWrite(P1_0, LOW);
    delay(3000);  //Wait a bit.
    lockLevel = 1;
    open = false;  //Set the lock to close next pass through the code.
    //Might not be a bad idea to close the lock here too, really.
    //That would prevent the button being held down keeping the lock open.
  }


  buttonState = digitalRead(P1_3);
  if (!buttonState){  //Button is pushed
    counter = 0;  //reset the counter, this is crucial.
    while (!buttonState){  //As long as the button is held down, this cycles.
      counter++;
      delay(10);  //10ms per cycle, record the number of cycles.
      buttonState = digitalRead(P1_3);  //We do need to get out eventually, when the button opens
    }
    waitACycle = false;
    if(counter > 500){
      Serial.println("Programming!");
      lockLevel = 8;
    }


    switch (lockLevel){  //Now that we have a press duration, we need to find what level the lock is on
    case 1:  //If it's the first press, we start here.
      if (counter >= password[0] - password[3] && counter <=password[0] + password[3]){  
        lockLevel = 2;          //Adjust password[4] to be the number of 10ms steps you want for wiggle room.      
        counter = 0;            //Right now we get +/- 250ms. 
        digitalWrite(P1_6, HIGH); //Flash the green LED if the push was successful. Mostly for debugging.
        delay(50);
        digitalWrite(P1_6, LOW);
      }
      else{
        lockLevel = 1;  //If the push is the wrong length, start over.
        counter = 0;
      }
      break;

    case 2:
      if (counter >= password[1] - password[3] && counter <=password[1] + password[3]){  //Second push, same deal.
        lockLevel = 3;
        counter = 0;
        digitalWrite(P1_6, HIGH);
        delay(50);
        digitalWrite(P1_6, LOW);
      }
      else{
        lockLevel = 1;  //If the push is the wrong length, start over from push 1.
        counter = 0;
      }
      break;

    case 3:

      if (counter >= password[2] - password[3] && counter <=password[2] + password[3]){
        open = true;  //Third correct push opens the lock.
        counter = 0;
      }
      else{
        lockLevel = 1;
        counter = 0;
      }
      break;


case 8:
lockLevel++;
Serial.println("Lock advanced to 9");
break;

case 9:
if (counter >100){
  lockLevel++;
  Serial.println("Lock advanced to 10");
}
break;
  

    case 10:
      
        password[0] = counter;
        lockLevel++;
        Serial.println(password[0]);
      

      break;

    case 11:
      password[1] = counter;
      lockLevel++;
      Serial.println(password[1]);
      break;

    case 12:
      password[2] = counter;
      lockLevel++;
      Serial.println(password[2]);
      break;
      
      case 13:
      password[3] = counter;
      lockLevel = 1;
      Serial.println(password[3]);
      timeToFlash = true;
      break;
    }
  }

  if(timeToFlash){
    disableWatchDog();        // Disable WDT
    FCTL2 = FWKEY+FLASHCLOCK; // SMCLK/2
    FCTL3 = FWKEY;            // Clear LOCK
    FCTL1 = FWKEY+ERASE;      //Enable segment erase
    *flash = 0;               // Dummy write, erase Segment
    FCTL3 = FWKEY+LOCK;       // Done, set LOCK
    enableWatchDog();         // Enable WDT


    disableWatchDog();        // Disable WDT
    FCTL2 = FWKEY+FLASHCLOCK; // SMCLK/2 
    FCTL3 = FWKEY;            // Clear LOCK
    FCTL1 = FWKEY+WRT;        // Enable write
    for (byte x = 0 ; x < 4 ; x++){
      *(flash+x) = (password[x]);
    }
    FCTL1 = FWKEY;            //Done. Clear WRT
    FCTL3 = FWKEY+LOCK;       // Set LOCK
    enableWatchDog();         // Enable WDT  
timeToFlash = false;
    Serial.println("Flashed!");


  }
}


Still needs lid detection (so it doesn't re-lock before the lid is down) and servo controls, I've done the servo bit but wasn't happy with it and scrapped it.
 
Spent some time playing with a WS2811 RGB LED strip, too.


A second video, this code is somewhat more complicated but also a lot more polished:
 
That's pretty cool. I have yet to do anything with my stuff.
 
I gave the arduino to my son for christmas. We have been working through the electronic basics, a little programming, and a few easy projects. I am hoping it inspires him to learn more. We made LED's blink and stuff like that.
I have to buy a few more resistors and other components, the basic kit I bought didn't have much of the right stuff.
 
That sounds like fun!

Be careful of those little jumper wires and such, if you Do It Wrong they can hurt.
Shanked myself in the finger last night and sunk one >0.125" into one finger. Could feel it tear through each layer of skin/tissue. I recommend against the experience.

I've spent a bit more time playing with the LED strip, but that's it lately, been busy.
 
Back