This is the updated version with a little tweakage to the process...the original was done last year and things have been added and changed as needed. 
For some time, I have been using 1971 Caprice heatercores when I wanted to use 2-4 120mm fans for some serious cooling power. The problems with that core (barbed fittings that are a royal pain to get out and odd shaped holes punched into the top tank) led me to search for a different core.
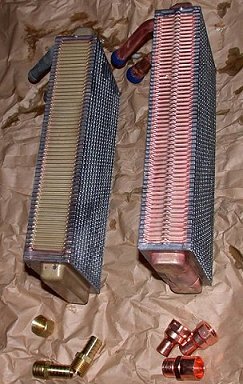
After scanning through tons of heatercore specs, I decided to give the heatercore for the 1977 Pontiac Bonneville (with a/c) a test run if the price was right. A quick call to autozone confirmed that it was a heatercore that they normally stock and with a great pricetag of $17.99 this one looked like a sure bet for replacing my caprice cores for future mods. (Note: AutoZone has since had an unusually high number of the b'ville cores with brass tanks instead of the copper ones - check all of your local auto stores for the best price and make them pull it out of the box before you buy it - the copper ones have a color much like that of a new penny - I will add pics and a better description of how to tell them apart a little later)
Quick run down of the specs:
10-3/4" X 5-5/8" X 2" w/o the tanks
about 12-1/2" X 5-5/8 X 2" with the tanks
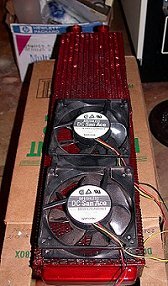
To put the size into perspective, this is the '77 Bonneville core with two 120mm fans laying on top of it:

Almost perfect...
On to other good points of this core:
One of the best things about this core are the holes in the tanks for the fittings. They are not odd-shaped oval disasters like the ones that are punched into some cores. Instead, they are almost perfectly round and their size makes the switch over to barbed fittings much easier than you would expect.
Pic of the top tank with the factory tubes:

^nice round holes -- that are the same size.
As I mentioned earlier, the caprice cores that I had been using started causing problems as the tubes were barbed -- they are almost locked into the tanks and it is very hard to get them out without cutting, drilling and some torch work -- when they are gone, they leave nasty oval punchouts that are a PITA to seal up properly. Due to the barbs on the factory tubes, if you try to heat them up and yank them straight out, it will tear the brass on the tanks - another headache. I halfway expected the tubes on the '77 Bonneville to be barbed like those on the caprice cores but this is not the case -- a little torch work and some vise grips gets them right out.

^1st fitting came out cleanly with just a little solder residue left.
For those that have never taken a torch to one of the heatercores: you have to be careful with where you apply the heat. The top tank is held on with nothing but solder. If you overheat the tank, that sucker will come right off and it is very hard to get it back on without leaks.
To avoid overheating, I 1st filled the heatercore with cool water. Then I wrapped most of the top tank in soaking wet paper towels (check the above pic). Just to make sure I had everything covered, I then wrapped the core area with a insulating plumber's wrap -- several water soaked paper towels would work in place of the wrap. [This is overkill - if you are careful, filling the core with water is more than enough to protect the fins from the heat. Laying a few soaking wet paper towels on the top tank can help avoid some problems with leaks on the seams of the tank though]
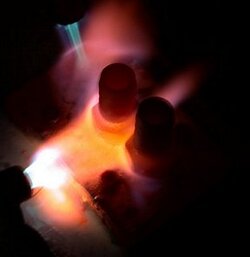
Once you have the tank protected from excessive heat, apply heat with the torch directly to the tube where it enters the tank -- like this:

^If you look in the right hand side of the (fuzzy) pic, you can see vise grips locked onto the tube. Once the solder starts to melt, try moving the vise grips side to side a little - once all of the solder becomes liquid, a bit of side to side action and a straight pull with the vise grip will pull the tube out cleanly.
both tubes out with no problems:

On to the really nice bonus you get with this core -- the pre-drilled holes are perfect in size for a 3/8" -18 NPT tap. If you buy 3/8" NPT x 1/2" barbed fittings, this is a piece of cake. Just thread the existing holes like so:

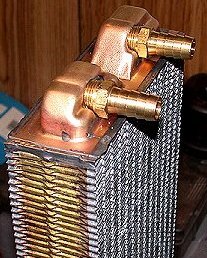
Then screw in the barbed fittings. To make sure there are no leaks whatsoever, you can add some JB Weld to the threads and then let it dry or use the torch a little more and silver solder the fittings in place.
Before sealing the fittings in place it looks like this:

A tweak for better waterflow through the core:

If you look at the pic, you can see that the fittings are screwed in and they are ready to be soldered...but the ones that are in place have had the threaded section cut down (Dremel + high speed cutoff wheel) to prevent any flow restrictions.
On the far tank, one of the 3/8"npt x 1/2" barbed fittings in its original form is setting on top of the tank to demonstrate the possible problem -- when it is screwed all the way into the tank, it would be very close to the back wall of the tank -- in between the tanks you can see the section of thread that was cut off with the Dremel.
I just threaded the fittings in as far as they would go, marked em with a sharpie (sharpie mark still readily apparent on the threads of the fitting that is screwed into the 1st tank) and then cut them off leaving 3-4 full threads before the sharpie mark. That gives me a little more clearance and no concerns about overly restricting water flow.
To do this correctly, you have to screw the fittings into the tank and then mark them as each top tank is just a little different and that will change how much you have to cut off. If you cut the threads too short, you will have to run down to the auto parts store, buy some new ones and start over.
Tweakage for looks:
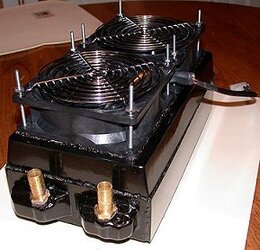
I cut 2 panels out of 22 gauge brass sheet and silver soldered them to the sides of the core - they are approximately 2" wide x 10.75" long. Once they were cut and propertly soldered to the core, I cleaned everything up and added primer and black paint to get this:

No more wavy sided look.
For some time, I have been using 1971 Caprice heatercores when I wanted to use 2-4 120mm fans for some serious cooling power. The problems with that core (barbed fittings that are a royal pain to get out and odd shaped holes punched into the top tank) led me to search for a different core.
After scanning through tons of heatercore specs, I decided to give the heatercore for the 1977 Pontiac Bonneville (with a/c) a test run if the price was right. A quick call to autozone confirmed that it was a heatercore that they normally stock and with a great pricetag of $17.99 this one looked like a sure bet for replacing my caprice cores for future mods. (Note: AutoZone has since had an unusually high number of the b'ville cores with brass tanks instead of the copper ones - check all of your local auto stores for the best price and make them pull it out of the box before you buy it - the copper ones have a color much like that of a new penny - I will add pics and a better description of how to tell them apart a little later)
Quick run down of the specs:
10-3/4" X 5-5/8" X 2" w/o the tanks
about 12-1/2" X 5-5/8 X 2" with the tanks
To put the size into perspective, this is the '77 Bonneville core with two 120mm fans laying on top of it:

Almost perfect...
On to other good points of this core:
One of the best things about this core are the holes in the tanks for the fittings. They are not odd-shaped oval disasters like the ones that are punched into some cores. Instead, they are almost perfectly round and their size makes the switch over to barbed fittings much easier than you would expect.
Pic of the top tank with the factory tubes:
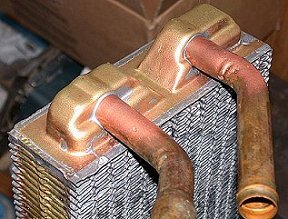
^nice round holes -- that are the same size.
As I mentioned earlier, the caprice cores that I had been using started causing problems as the tubes were barbed -- they are almost locked into the tanks and it is very hard to get them out without cutting, drilling and some torch work -- when they are gone, they leave nasty oval punchouts that are a PITA to seal up properly. Due to the barbs on the factory tubes, if you try to heat them up and yank them straight out, it will tear the brass on the tanks - another headache. I halfway expected the tubes on the '77 Bonneville to be barbed like those on the caprice cores but this is not the case -- a little torch work and some vise grips gets them right out.
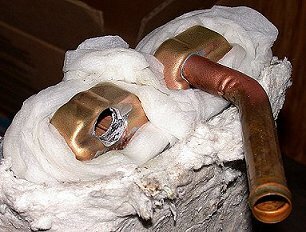
^1st fitting came out cleanly with just a little solder residue left.
For those that have never taken a torch to one of the heatercores: you have to be careful with where you apply the heat. The top tank is held on with nothing but solder. If you overheat the tank, that sucker will come right off and it is very hard to get it back on without leaks.
To avoid overheating, I 1st filled the heatercore with cool water. Then I wrapped most of the top tank in soaking wet paper towels (check the above pic). Just to make sure I had everything covered, I then wrapped the core area with a insulating plumber's wrap -- several water soaked paper towels would work in place of the wrap. [This is overkill - if you are careful, filling the core with water is more than enough to protect the fins from the heat. Laying a few soaking wet paper towels on the top tank can help avoid some problems with leaks on the seams of the tank though]
Once you have the tank protected from excessive heat, apply heat with the torch directly to the tube where it enters the tank -- like this:
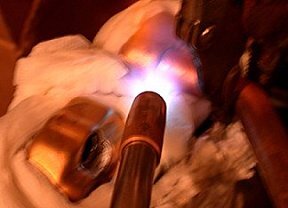
^If you look in the right hand side of the (fuzzy) pic, you can see vise grips locked onto the tube. Once the solder starts to melt, try moving the vise grips side to side a little - once all of the solder becomes liquid, a bit of side to side action and a straight pull with the vise grip will pull the tube out cleanly.
both tubes out with no problems:
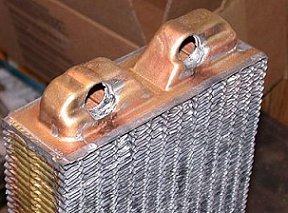
On to the really nice bonus you get with this core -- the pre-drilled holes are perfect in size for a 3/8" -18 NPT tap. If you buy 3/8" NPT x 1/2" barbed fittings, this is a piece of cake. Just thread the existing holes like so:
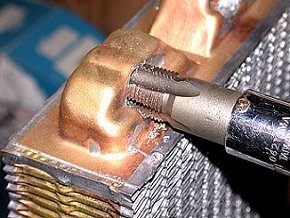
Then screw in the barbed fittings. To make sure there are no leaks whatsoever, you can add some JB Weld to the threads and then let it dry or use the torch a little more and silver solder the fittings in place.
Before sealing the fittings in place it looks like this:
A tweak for better waterflow through the core:
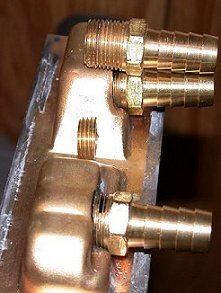
If you look at the pic, you can see that the fittings are screwed in and they are ready to be soldered...but the ones that are in place have had the threaded section cut down (Dremel + high speed cutoff wheel) to prevent any flow restrictions.
On the far tank, one of the 3/8"npt x 1/2" barbed fittings in its original form is setting on top of the tank to demonstrate the possible problem -- when it is screwed all the way into the tank, it would be very close to the back wall of the tank -- in between the tanks you can see the section of thread that was cut off with the Dremel.
I just threaded the fittings in as far as they would go, marked em with a sharpie (sharpie mark still readily apparent on the threads of the fitting that is screwed into the 1st tank) and then cut them off leaving 3-4 full threads before the sharpie mark. That gives me a little more clearance and no concerns about overly restricting water flow.
To do this correctly, you have to screw the fittings into the tank and then mark them as each top tank is just a little different and that will change how much you have to cut off. If you cut the threads too short, you will have to run down to the auto parts store, buy some new ones and start over.
Tweakage for looks:
I cut 2 panels out of 22 gauge brass sheet and silver soldered them to the sides of the core - they are approximately 2" wide x 10.75" long. Once they were cut and propertly soldered to the core, I cleaned everything up and added primer and black paint to get this:
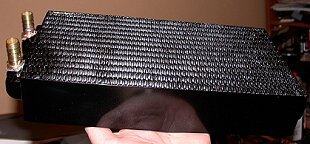
No more wavy sided look.
Last edited:

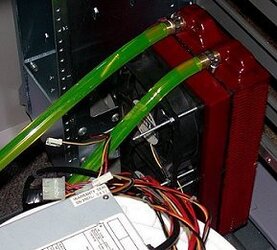


 On the bright side, I will have some really cool pics of the guts of a heatercore when the nikon gets back in action as I went ahead and dissected this one with the dremel armed with a fiber reinforced cutoff wheel -- the number of layers of copper that are packed between the flow channels in these things is downright amazing. I'm still fairly shocked the bit snapped -- it must have already had a crack in it from drilling tops for waterblocks as there is no way the thin metal in a heatercore tank should have even slightly phased it.