PROPER STABILITY TESTING METHODOLOGY
PREAMBLE
To be perfectly honest with everyone, stability testing isn’t all that complicated.
Awareness is way more than half the battle.
There are three programs which I live by when it comes to stability testing, two more so than the third, but I digress.
These three programs are Prime95, 3DMark, and memtest86. All three are small programs that are completely free and easily accessible to anyone running a Windows machine with internet access. Respectively, these programs focus on stress testing your CPU, your GPU, and your RAM.
There are also tons of other stress testing programs which are effective to varying degrees – when it comes to these it’s all about using what you feel is necessary, credible, and thorough. Some of the many stress testing programs I’m not going to mention or talk about are fairly effective substitutes for the ones which I am going to talk about.
However, if you skip
any of the "big three" - CPU, GPU, and RAM - you really
aren’t being thorough enough, to put it bluntly. Three programs, one of each focusing on CPU, GPU, and RAM, do need to be used, as individually they are inconclusive.
One important thing for you to remember is that this is not an opinion. This is a fact that is backed up by a
lot of experience, most of which isn’t mine; rather that of the millions of other overclockers out there.
Of further importance, is the factor of general system stability at manufacturer settings. Before overclocking or tweaking your machine, one should ensure that all hardware is operating properly and with integrity. Overclocking an unstable machine then stress testing it, finding errors, and spending hours troubleshooting a problem inherent to some faulty component, isn't something anyone wants to put themselves through! Sometimes a component is simply faulty to begin with, and needs to be replaced or switched out.
WHY THE FOLLOWING 'RECCOMENDED' TESTING PROCEDURE IS THOROUGH, BUT NOT DECISIVE
Stability is also not always compromised by CPU, GPU, or Memory processing errors as a result of overclocking or heat. Instability can also be a result of other components failing or causing conflicts, most notably a machine's PSU (Power Supply Unit), Motherboard, and internal add-on cards.
When overclocking, we add strain to our computer PSU, requiring higher power output from it. This can compromise the consistancy of a unit's voltage outputs, causing it to deliver inadequate power to the computer. Especially when paired a high power draw overclocked machine, low voltage rails often compromise stability, even when no processing errors or faults are occuring with the computer's other hardware. Such intstability will manifest itself through errors during the following 'reccomended' testing procedures, and might even appear to be CPU GPU or RAM specific! If instability is experienced, it is important to rule out one's PSU by testing it with a load - using a voltmeter to read the PSU's output voltages while stress testing the computer with the same test that previously generated errors. If readouts are normal, if they don't fluctuate or droop when the test load is applied, the PSU can generally be ruled out as a source of error.
Motherboard integrity is more difficult to pinpoint, but can usually be ruled out by researching known issues with one's specific board, or by testing the machine's responses to the sort of changes that would compromise the motherboard, without the simultanious application of CPU GPU or RAM overclocks. These variables include things such as overvoltages, PCI AGP or PCI-E frequencies, newer/older/aftermarket BIOS revisions,and general frequency changes independant of CPU GPU or memory clockspeeds.
Sometimes an external device, such as a wireless USB adaptor or a printer, can create hardware or software conflicts that will compromise a computer's stability. This sort of instability is usually quite easy to pinpoint - for example: if you add a new device and your machine starts crashing every five minutes, if the errors go away when the new device is removed... you can usually infer the cause of the errors through simple application of logic and common sense
") THE MOST IMPORTANT TESTING GUIDELINE: RULING OUT ALTERNATE SOURCES OF ERROR
THE MOST IMPORTANT TESTING GUIDELINE: RULING OUT ALTERNATE SOURCES OF ERROR
When stability testing the various components within your machine, it is a good idea to try and test them more or less 'one at a time'. If we test our processor while running an unstable memory overclock, for example, we might attribute instability present in our RAM to an otherwise perfectly stable and rock solid CPU overclock.
To remove alternate sources of error, one should clock up and overvolt one component at a time while stability testing, focusing testing on the altered component's integrity while the overclock is in place. By focusing on one component at a time, and keeping other component's running at confirmed-stable manufacturer's specifications, we make it a lot easier to rule out alternate sources of error. This allows us to easily tweak the source of error (whichever overcocked component it might be) back into a stable setting before proceeding with other hardware.
By ruling out alternate sources of error, we test with the confidence that any errors we discover are a result of the single modified component that has been configured with settings of unknown integrity.
For the same reasons, it is important to confirm a machine's integrity at stock settings before overclocking it, and important to ensure the integrity of a PSU if errors are discovered.
Ultimately, it does us no good knowing the machine is unstable, if we do not know which
part of the machine is unstable. It is impossible to take appropriate measures towards ensuring stability, if we don't know which component needs adjustments.
Of course, testing components alone is no measure of an entire system's stability. If everything within your computer is aggressively overclocked and overvolted, some tests should be run with all your alterations in place, to make sure that none of the adjusted settings are causing conflicts with each other that would not normally manifest themselves at purely stock settings, or partially overclocked settings.
Now that we've covered some basic principles of stability testing, and some common problems we might encounter independant of CPU GPU and RAM, lets go over CPU, GPU, and RAM specific testing in three easy to follow steps
.
We'll start with the CPU.
STEP 1: CPU STABILITY - PRIME95
There is one program that is very widely viewed as the CPU stability-tester to rule over all CPU stability testers, for good reason, and that program is Prime95.
There are many alternatives to Prime95 for CPU stress testing, some of which are highly effective and very easy to use. Although Prime95 is a well-proven "tried, tested, and true" stress test program, some of the alternatives are by no means inferior. I choose to keep Prime95 here, as the 'recommended' CPU stress tester, due to its time tested effectiveness. Prime95 is not definitively 'the best', I only recommend its use because I know that it is highly effective.
Please keep in mind that Prime95 can error even with a completely stable processor overclock. Unstable memory, or other system problems can also cause erroring in Prime95 - your processor is not the sole potential cause of Prime95 testing errors.
From Prime95 Readme
This program is a good stress test for the CPU, memory, caches, CPU cooling, and case cooling. The torture test runs continuously, comparing your computer's results to results that are known to be correct. Any mismatch and you've got a problem!
Prime95 puts your processor through a very rigorous "math test", and immediately checks your chip’s answers for any mistakes.
The work which Prime95 makes your chip do will bring your processor up to a near-peak load temperature, which in turn helps stress your processor as much as possible, while also conveniently giving you an idea of what your load temperatures are. Any potential for instability that’s present will be found by Prime95 after a sufficient amount of time, given that you use the software properly.
You can download the latest version of Prime95 here:
http://www.mersenne.org/freesoft.htm
HOW TO USE PRIME95 EFFECTIVELY
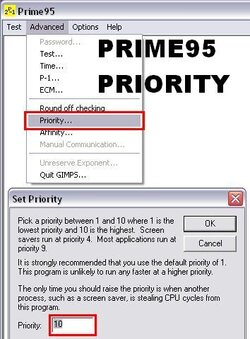
First, install the program as you would any other. Next, run it, and go to the ‘Advanced’ tab – select ‘Password’. Type in the password 9876 and enter it. Now go back to the ‘Advanced’ tab, and select ‘Priority’. Set the priority level to 10.
This effectively gives all of your system resources to Prime95 when it is running – now any processes running hidden in the background won’t be able to steal work time from Prime95, ensuring the most effective stress test possible.
At the very bottom of this post, a picture has been uploaded to further clarify Priority Ten setup for Prime95.
When you want to stress test your processor, run Prime95, go to the ‘Options’ tab, and select ‘Torture Test’. Run the Torture test at the default settings.
Make sure that you have turned off any screensavers, and closed all other applications when Prime95 is running.
Prime95 should never be run in tandem with any other stress testing programs,
period. Prime95 is known and proven to be most effective when run by itself, and is less thorough when used with something else running at the same time. If you use Motherboard Monitor Five to monitor your temperatures, you should turn the interval time way down – 60 seconds is appropriate.
If you have an Intel processor with Hyper Threading, you need to run two instances of Prime95 for complete effectiveness. This is proven fact; in that two instances of Prime95 will catch instability that one instance won’t, on an Intel machine with HT. In order to run two instances simultaneously, simply install a second copy of Prime95 in a different folder, and run it in tandem with your original. Priority ten should be used for both instances of Prime95 in this case.
When you are stability testing with Prime95, you want to run the Torture Test for at least 24 hours. Why 24 hours?
There is a very common misconception that if your machine can pass Prime95 stability testing for, say, four hours, your machine will be able to run stable, regardless of what you are doing, for four hours as well, without issue. This is simply not the case.
Prime95 often finds errors in its 16th - 20th hour of testing, a potential for instability that wasn’t found after only four hours of testing. After only four hours of Prime95, the
potential for instability still exists. 24 hours is widely viewed as a sufficient time period to catch any instability that may be present, but by all means test longer if you are able.
If 24 hours seems like an extraordinarily long time to leave your computer on, keeping your machine unusable because of the processes it’s doing, try running Prime95 overnight, and then through to all day while you’re at school or work.
For CPU specific testing, a Large FFT Prime95 test is an alternative to the more "system-stress" oriented Blend test that runs by default. The choice is ultimately up to the end user - the Blend test is reccomended in these guidelines because of it's qualities as both a processor and system stress test.
That’s all there is to Prime95 – 24 hours of Prime95 at Priority ten is "certified stable", and ready to rock for 24/7 use.
EXCELLENT PROCESSOR STRESS TESTING ALTERNATIVES
Distributed computing
A lot of people run distributed computing programs 24/7, which constantly keep their CPU at full stress load while helping to aid important scientific research.
Running a program like Folding@Home or SETI
after passing 24 hours of Prime95 is a superb way to constantly keep an eye on your system's stability, while also aiding Medical research, or the search for extraterrestrial life.
It is imperative that one does not run a distributed computing program on a machine that hasn't been stability tested, as mistake-filled results do not in any way help the effort.
For more detailed information about these distributed computing programs, check out the ocforums SETI and F@H team forums.
F@H team forums:
http://www.ocforums.com/forumdisplay.php?f=21
SETI team forums:
http://www.ocforums.com/forumdisplay.php?f=18
StressPrime2004 Orthos
A new program called StressPrime2004 Orthos, based on the Gromacs core (which is used with F@H) and designed for CPU stability testing, is a highly viable alternative to Prime95. The Gromacs core is known to be
very stressful on an overclock, this program should be very effective.
You can download StressPrime2004 Orthos here:
http://sp2004.fre3.com/beta/beta2.htm
SuperPi
SuperPi, a Pi calcation program, is another excellent and widely proven CPU stess tester. The '32M' length benchmark is an easy-to-use indication of stability, and is usually quite accurate. A SuperPi software mod that can be looped indefinitely is in the works - such a program will be ideal for long-term processor stability testing.
SupePi can be downloaded here:
http://files.extremeoverclocking.com/file.php?f=36
PiFast
Another Pi calculation benchmark program.
PiFast can be downloaded here:
http://numbers.computation.free.fr/Constants/PiProgram/pifast.zip
CPUBurn
Another processor stress tester like 'Toast', designed to maximize temperature and power draw.
CPUBurn can be downloaded from the project page here:
http://pages.sbcglobal.net/redelm/
OCCT
This program is really amazing. Made by a group French overclockers, with the intention of being an enthusiast-oriented stress-tester, OCCT is perhaps the very future of processor stability testing. This program is extremely effective - it will peak your processor temperature at a full workload, and in a relatively (compared to Prime95) brief period of time give a very thorough indication of processor stability.
OCCT can be downloaded here:
http://www.ocbase.com/perestroika_en/index.php?Download
Toast
Toast is a temperarure-increasing processor stress tester that will take your chip right up to a peak load temperature and keep it there. Toast is a good indication of long-term stability, and excellent for testing the capacity of one's cooling.
Toast is available here:
http://www.majorgeeks.com/download.php?det=867
STEP 2: 3D STABILITY – 3DMARK
When it comes to stability, 3D testing is often overlooked completely. Many people do not overclock their video cards, and as such decide that 3D stability tests are a waste of their time. They couldn’t be more wrong! An increasingly common phenomenon is an overclock which will pass Prime95 and memtest86 for 24 hours, but lock or crash 3DMark in a few minutes – it is for this reason that 3DMark testing is a good idea. And for those who do overclock their video cards, 3DMark is an invaluable video card stability testing tool.
From 3DMark 2001 SE Readme
3DMark2001 SE is a diagnostics tool for measuring the 3D game performance of PCs. It is entertaining and easy to use, which makes it "must have" software for all home PC users interested in 3D games. Even a beginner PC user can get a game performance measurement with 3DMark2001 SE. For the more advanced users, 3DMark2001 SE offers a wide range of display settings and testing options for the benchmark run.
You can download 3DMark 2001 SE here:
http://www.futuremark.com/download/?3dmark2001.shtml
You can download 3DMark 2003 here:
http://www.futuremark.com/download/?3dmark03.shtml
You can download 3DMark 2005 here:
http://www.futuremark.com/download/?3dmark05.shtml
You can download 3DMark 2006 here:
http://www.futuremark.com/download/3dmark06/
HOW TO USE 3DMARK EFFECTIVELY
Using 3DMark as an effective stability test is a little bit different from using it to bench your machine. There are two main ways to effectively use 3DMark as a stability tester. Running all of the tests looped in order to test your entire machine, or running only the Nature test (from 3DMark01 or 3DMark03) looped while checking visually for artifacting in order to test your video card at peak load temperatures.
Artifacting, or 'snow', is a term for visual erroring, almost always caused by graphics card instability. Artifacting most commonly makes itself apparent through large geometric objects flickering in and out on your screen, texture corruption (checker boarding), and 'texture snow', which appears as many white specks.
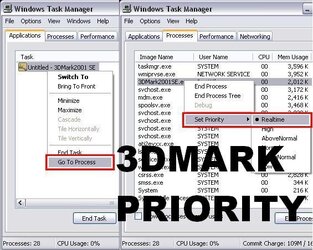
After installing 3DMark, run the program, and select all the 'game' tests for use. Now set the benchmark for 'looping', so that all the tests you have selected will loop indefinitely. With looping, the benchmark will not stop after one run, which will enable you to stress test with 3DMark for several hours. Next press CTRL+ALT+DELETE, and go to the Task Manager. Right-Click on the 3DMark icon in the ‘applications’ tray, and select ‘Go To Process’. Right click on the process you are taken to, and select ‘Set Priority’. Set the Priority to ‘Realtime’. This needs to be done every time you use 3DMark for stress testing.
Giving the program 'Realtime' priority effectively gives all of your system resources to 3DMark when it is running – any processes running in the background won’t steal resources from 3DMark while it’s stress testing, ensuring the most thorough test possible.
Make sure any screensavers are turned off, and that no other applications are running, and start running the tests when you’re ready.
You should always run 3DMark by itself, never at the same time as any other stress testers. This ensures that it’s doing the most thorough job that it can.
Because 3DMark will
almost always lock within the first ten test run loops, if it’s going to lock at all, 4 hours of looped testing is a more than sufficient test for your machine. After four hours of looped testing, 3DMark has done all it really can, and
likely isn’t going to catch any instability.
From Above
An increasingly common phenomenon is an overclock which will pass Prime95 and memtest86 for 24 hours, but lock or crash 3DMark in a few minutes – it is for this reason that 3DMark testing is a good idea.
The reverse is also often true; many machines can run 3DMark for hours and hours without issue, but will fail Prime95 or memtest86 after a short period of time; 3DMark isn’t particularly useful as a system stability test when used by itself.
Other tests in newer versions of 3DMark can also be very effectively used to detect artifacting and video card instabilty, although the Nature test in 01 and 03 is often regarded as the best at getting your video card's core and RAM temperatures to a peak, and keeping them there.
GRAPHICS ADAPTOR STRESS TESTING ALTERNATIVES
ATiTool
A useful program with built in overclocking features, and a built in stress tester. ATiTool is not always entirely accurate, and is known to pass overclocks that are not actually stable when applied to games or 3D Benchmarks.
ATiTool is useful though, especially with ATi video cards.
ATiTool can be downloaded from the project page here:
http://www.techpowerup.com/atitool/
STEP 3: MEMORY STABILITY – MEMTEST86 / MEMTEST86+
Memory instability is perhaps the stability-aware overclocker’s second worst nightmare, because of the problems it can cause. Luckily for all of us, this superb little program exists. It’s idiot-proof, really small, and fantastically effective at sleuthing out any memory instability. Because memtest86/memtest86+ tests as much of your RAM as is possible, it’s a stand-alone program, meaning it needs to be run outside of your OS.
Please keep in mind that memtest86 can still error even with a completely stable memory system/subsystem. An unstable processor, or other system problems can also cause erroring in memtest86 - your memory is not the sole potential cause of memtest86 testing errors.
From memtest86 Readme
There are many good approaches for testing memory. However, many tests
simply throw some patterns at memory without much thought or knowledge
of the memory architecture or how errors can best be detected. This
works fine for hard memory failures but does little to find intermittent
errors. The BIOS based memory tests are useless for finding intermittent
memory errors.
There are two "versions" of memtest86 out there; memtest86+, and memtest86. Both have been updated and improved on fairly recently, and both appear to be "living" programs that are still seeing fairly regular update and improvement by their respective designers.
The choice is really up to personal preference.
You can download memtest86 here:
http://www.memtest86.com
You can download memtest86+ here:
http://www.memtest.org/
HOW TO USE MEMTEST86 / MEMTEST86+ EFFECTIVELY
It’s fantastically easy. A quote from the memtest86 Readme:
From memtest86 Readme
memtest86 is a stand alone program that cannot be executed under windows and must
be loaded from a floppy disk.
To install Memtest86:
- Extract the files from the zip archive
- Open the directory where the files were extracted and click on "install.bat".
- The install program will prompt you for the floppy drive and also prompt you to
insert a blank floppy.
- To run Memtest86 leave the floppy in the drive and reboot.
NOTE: After the boot floppy has been created you will not be able to read the floppy
from windows. This is normal.
Note that memtest86+ can be run from a CD as well, via a pre-made, bootable, ISO image that you can download from the memtest86+ website, and then burn onto a blank CD. memtest86+ can still be installed on a floppy if one so desires, exactly as above.
After installing memtest86/memtest86+ onto a floppy, simply reboot your computer with the floppy still in the drive. memtest86 consists of 11 different tests (Note: The newest version of memtest contains only 9 tests, with the additional tests having been removed). By default, tests #1 through #7 will run in order, endlessly. For our purposes, this is perfect. Once memtest86/memtest86+ starts running, simply leave it, and let it go for 24 hours.
As with Prime95, 24 hours really is required for a complete and thorough memtest86/memtest86+ stability test, and for the exact same reasons. I’ll quote myself for reference sake.
From Above
When you are stability testing with Prime95, you want to run the Torture Test for at least 24 hours. Why 24 hours?
There is a very common misconception that if your machine can pass Prime95 stability testing for, say, four hours, your machine will be able to run stable, regardless of what you are doing, for four hours as well, without issue. This is simply not the case.
Prime95 often finds errors in its 16th - 20th hour of testing, a potential for instability that wasn’t found after only four hours of testing. After only four hours of Prime95, the potential for instability still exists. 24 hours of Prime95 is a slight ‘overkill’, but you can never be too careful. 24 hours is widely viewed as a sufficient time period to catch any instability that may be present, but by all means test longer if you are able.
As with Prime95, it’s easiest for most of us to run memtest86/memtest86+ overnight, and then the following day, so that it’s as un-disruptive as possible.
Many people also use specific memtest86/memtest86+ tests by themselves, to test out a new FSB or memory overclock quickly in order to see whether it’s likely to be stable or not. Tests 5 and 6 in particular are very good for this. However, 24 hours of all the tests on loop is your end-all solution to memory stability testing.
TEST SETUP CLARIFICATION PICTURES
Below I have attached pictures, which should help make clear how to set up Prime95 for priority 10 stress testing, and 3DMark at 'Realtime' Priority.
Some pictures of different types of visual artifacting could be added as well, to give an idea of what to look for during 3D artifact testing. If anyone has a few really clear pictures of different types of artifacting, preferrably from one of the 3DMark builds, please PM me - I'll add them in.

 . Many people find that with extremely high FSB overclocks, things just seem to start messing up for no apparant reason. Whether it's a voltage supply (remember that your board is just as responsible for your voltages as your PSU, and NF7s are notoriously bad in this department) issue, or simply the limits of your board's chipset is up in the air. As an example; my board (NF7-S), chip, and RAM can Prime and pass memtest86 all day with a 225+ MHz FSB and the right BIOS, but anything over 211 MHz invariably locks 3DMark for me. I've tried pretty much everything, with no success.