- Joined
- Apr 17, 2006
IKIKUINTHENUTZ here with a new completed mod
Lamptron FC-2 fan controller mod
MFG Product Link
I introduce my latest modification, my LED switch out and how to fix the not fully lid LED lights on the sides of the unit.
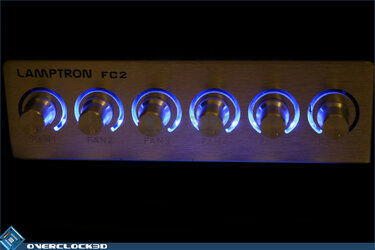
For those of you who don't know, this fan controller has an aesthetic problem of having the LEDs not show up in the corners. Below here is a Image I borrowed from overclock3d.com

As you can see, the unit uses bright blue LEDs and doesn't fully illuminate the unit at the edges.
When I bought my black colored FC-2 from performance-pcs
http://www.performance-pcs.com/cata...t_info&manufacturers_id=158&products_id=24896
I was thinking that my LEDs were too bright and I wasn't too fond of blue and so I decided to switch it out.
My original idea when I started with this project was to switch out the blue LEDs in favor for white LEDs, however during the process I learned some important facts and then I decided to fix the non side illumination issue along with switching out the LEDs.
First I unscrewed the whole unit apart

After doing that I decided to inspect the unit and I noticed this

If Lamptron indeed put a led on the sides, then why doesn't it show? I quickly plugged it in and I decided to look at the back of the unit while I was turning the knobs, indeed it lit up perfectly fine but why doesn't it show? The image below practically shows why, a piece of metal blocks the way.

Another shot of the unit with the metal off

While searching the internet for the LEDs, it was pita finding them in size of 2X5X6mm flat rectangular white leds so I decided to get these white 2X5X7mm from ebay
link
After I received them, it took 6 hours total to solder the old ones out and put in the new ones with just a soldering iron. My end result was worth it because it came out to be not too bright or blue.
Perfect

Now for the piece of metal, I went to my local hardware store and bought a brand new Dremel and a miniature hobby table so I can cut the little darn thing. Luckily with purchase of a new Dremel, they give you a sample cutting disk and grinding disk inside the box. I didn't have to spend extra money for more tools.
After cutting the edges off and grinding 1mm all around the openings to accommodate the new bigger LEDs, this was my end result. It's not perfect but it's well hidden anyways when it's put back together. This took me around 15 minutes to do.

Now the finished product images.


That's all
Lamptron FC-2 fan controller mod
MFG Product Link
I introduce my latest modification, my LED switch out and how to fix the not fully lid LED lights on the sides of the unit.
For those of you who don't know, this fan controller has an aesthetic problem of having the LEDs not show up in the corners. Below here is a Image I borrowed from overclock3d.com

As you can see, the unit uses bright blue LEDs and doesn't fully illuminate the unit at the edges.
When I bought my black colored FC-2 from performance-pcs
http://www.performance-pcs.com/cata...t_info&manufacturers_id=158&products_id=24896
I was thinking that my LEDs were too bright and I wasn't too fond of blue and so I decided to switch it out.
My original idea when I started with this project was to switch out the blue LEDs in favor for white LEDs, however during the process I learned some important facts and then I decided to fix the non side illumination issue along with switching out the LEDs.
First I unscrewed the whole unit apart

After doing that I decided to inspect the unit and I noticed this

If Lamptron indeed put a led on the sides, then why doesn't it show? I quickly plugged it in and I decided to look at the back of the unit while I was turning the knobs, indeed it lit up perfectly fine but why doesn't it show? The image below practically shows why, a piece of metal blocks the way.

Another shot of the unit with the metal off

While searching the internet for the LEDs, it was pita finding them in size of 2X5X6mm flat rectangular white leds so I decided to get these white 2X5X7mm from ebay
link
After I received them, it took 6 hours total to solder the old ones out and put in the new ones with just a soldering iron. My end result was worth it because it came out to be not too bright or blue.
Perfect

Now for the piece of metal, I went to my local hardware store and bought a brand new Dremel and a miniature hobby table so I can cut the little darn thing. Luckily with purchase of a new Dremel, they give you a sample cutting disk and grinding disk inside the box. I didn't have to spend extra money for more tools.
After cutting the edges off and grinding 1mm all around the openings to accommodate the new bigger LEDs, this was my end result. It's not perfect but it's well hidden anyways when it's put back together. This took me around 15 minutes to do.

Now the finished product images.


That's all

Last edited:


