• Welcome to Overclockers Forums! Join us to reply in threads, receive reduced ads, and to customize your site experience!

Build Log: CPINTS Cool Practical IKIKUINTHENUTZized NAVIG Tech Station

Overclockers is supported by our readers. When you click a link to make a purchase, we may earn a commission. Learn More.

IKIKUINTHENUTZ

Member
Joined
Apr 17, 2006


I introduce a brand new modification project presented to you by IKIKUINTHENUTZ with the famous and elusive Navig Tech Station handmade by Navig himself with design aided by Thideras!

Now let me let you know the little history about Navig Tech Stations how this particular station was transferred to my ownership and why I am modifying this hand built wonder.

Back in 2007 a little wonder named Navig on OCF & Abit forums (now dead) was creating something called, Navig's AWESOME DIY station. He created a thread to record his progress http://www.ocforums.com/showthread.php?t=528477 and began building his little monsters.
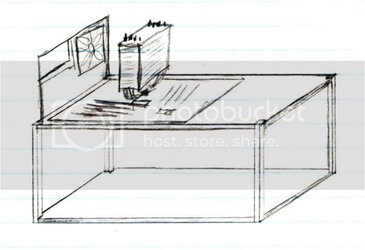
ChiquitoStation1.jpg

The project was simple, to create a better tech station that was easy to work in and cost less than the competition. Long story short the project was successful and he begin taking orders for his made stations.

Link to where he sells it. You need to be OCF member and have 100+ posts to view it.
http://www.ocforums.com/showthread.php?t=536035&highlight=NAVIG

One month after the success of the first station. A little OCF member named Thideras posted on 12-30-07 to request Navig himself to build a station to exactly to his specifications. Navig obliged and a custom design was created just for Thideras.

Details of this transaction is located in this link but to view you must be a member of OCF and must have 100+ posts to see this thread
http://www.ocforums.com/showthread.php?t=541522

An image of Thideras using the station
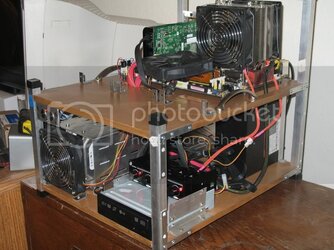
b6291477.jpg

In 06-19-2008 Thideras was selling this hand made wonder. I, IKIKUINTHENUTZ did not hesitate jumping on to the deal. Ownership of the station was transferred.

I used the station for my work, testing products, a temporary parts holding before transfers, overclocking. Day by day I hated the station not because of the usefulness and functionality, in three simple words, it was ugly. :sick:

Honestly I am a picky *** ******* when it comes to looks. Being a Lian li OEM case owner or my love for those shiny Thermalright rip off heat sinks and my awe for those nice practical (acceptable for everyday use) case projects other people posts, this fella I had no love for, I abused the poor thing without care because I just didn't like how it looks. The ugliness became so much, six months ago I dismantled the ******* and stowed it away in my closet.

In may I finished my HTPC project (http://www.xtremesystems.org/forums/showpost.php?p=3781226&postcount=5001 , http://www.xtremesystems.org/forums/showpost.php?p=3811409&postcount=5026). Soon after I was cleaning my closet, I found this little monster dismantled. I forgotten about it but I remember why I took it apart, it was ugly. I didn't want to throw it away but to store it into the garage. Later I went into the garage and found black and white spray paint my dad doesn't use anymore. It begins.

While painting the parts without much care, I thought to myself, " hey these screws are fugly" I went online to mcmasterscarr.com and order a tons loads of button cap screws of lots of sizes to replace the zinc coated fellas with stainless steel socket button caps. It looked very nice but soon after I was done. Fun money ran out and I halted the project completely.


Until a few weeks ago with my funds rejuvenated I was pondering if I wanted to continual this project or just stow it again. Thankfully the new XS member whuzabi inspired me with his white murder mod. http://www.xtremesystems.org/forums/showthread.php?t=225829

Me and whuzabi talked and we shared ideas. Long story short, the chat made me decided I'm going to put some major effort into this into something worth while!

I found some old paint used long ago when my room was being painting. I also went to a Local Ace hardware store and got some spray polyurethane stuff (I might exchange it for the brush on type).


I sanded off (more like BSed it) the old ugly spray paint I used and decided to use rollers to paint the wood in order to put the most amount of effort into it. First is primer. I'll keep you guys updated, enjoy. I have some plans to help me get this aided and done.


Current Sponsors:
NAVIG

Legal Disclaimer:
I Andy (aka IKIKUINTHENUTZ) is not the original concept owner of this bench station. All concepts sans alterations by me are owned and created by Navig (aka Ivan). All images and work may not be reproduced without consent from me or Navig.
 
Last edited:
Clean, Primer, Sand, Clean, primer, Sand, Clean, Prime, Sand, Sand 60 grit, Sand 150 grit so far Im almost to a even flat sexy surface
img8279i.jpg


then I look to the sides
img8277.jpg

img8276d.jpg

img8274.jpg

:bang head:bang head:bang head:bang head

Clean, Prime, awaiting sanding :cry:
 
Last edited:
You know you could have save a hell of allot of that Clean , Prime Sand if you had given it a coat of Spray Putty Finish,

Then its only Light sand Prime and Spray Paint,

End result looks like has been Plasti-coated ,,,Nice and Smooth!!
 
Right now I got some small ultra fine smooth rollers to see how it would work out.

Now I wish I started the whole thing with these instead of regular rollers and regular brushes.... UGH

yea I'm working traditional paint and wood working the hard way right now because I never worked on wood before. All I know is that there has been a lot of things I could have done that would have made this 10x easier

oh and I'm using water based primer and paint so that oil based poly stuff I got has to go now. Yea I learned water and oil don't mix rule even applies to paint now
 
Update on primer guys

I'm almost freaking there!
img8293cdj.jpg


220 grit
img8294m.jpg


But the sanding kept going and going and I couldn;t get lower in some parts which got me completely confused, so I decided I'm just gonna put the last darn coat on to fill those itty bity dimples (to the left of the screw holes).

img8296y.jpg

img8295.jpg

img8297g.jpg


After this, NO MORE FREAKING PRIMER. Sand, clean, and then SEMI-gloss paint!
 
Last edited:
Final Primer sanding done, I didn't have time to get to paint but it will be done very soon

img8298m.jpg


I got too curious in my own nature and I decided to rub Computer printer paper (92) to see what it can do

img8301.jpg


Holy crap! printer paper is a good polish
 
Last edited:
img8451q.jpg

I decided to keep some texture because without texture, it's boring

Now here is a close up and what your seeing is the surface with water based wood finish for a hard shell for protection. Acrylic Primer, Acrylic Latex paint, then Acrylic finish

now the next thing on my agenda is a complete redo of the metal bar paint
img8452n.jpg


As you can see the paint is chipping away, flaky and just plain bad and peeling.

img8453p.jpg


These are going my aides (the good kind) and both are advertised to be best on aluminum. Only missing is mineral spirits but she's too busy stripping ;)
 
I think it's time for a update

When the wood dried up, I went ahead and got some case handle from P-PCs to replace the weird cabinet drawer style that Navig originally used in favor for these beefy ones

http://www.performance-pcs.com/cata...t_info&manufacturers_id=158&products_id=23828

img8466m.jpg


After I got them in the mail, I didn't hesitate opening them up for installing only to find that my MDF is so thick that the stock screws didn't work. I went down to the local hardware store and got me some Black oxide replacements that were longer.

img8467d.jpg


So far it looks great!

img8468s.jpg

img8470.jpg

img8474z.jpg


However I was a bit worry that the wood was too weak to hold what I had in plan for this build so I decided to put some 19-25 lb watermelon from Costco (yes it was big).

Long story short, more weight and it would not last at all.

Again a trip to the hardware store but this time I got myself some metal bars and I cut it to size accordingly to where the case handles are bolted.

img8785z.jpg


More to come later for this portion.
 
Now you might be wondering what am I exactly trying to put on this? Well I think this next part would be enough to let you know.

I scored a Nice deal on a Thermochill PA 120.3 for $50 local. So cheap because it had rust on it according to the guy but I figured "hey it's a radiator there wont be anything else than brass and copper" after I got it, wow it did have a little bit rust here and there but it didn't mind me.

I pulled out the acetone and started to clean off the rusty parts and old ugly paint on it.

img8486e.jpg

img8492b.jpg


then I learned it had steel sides which explained the rust. Why did Thermochill use steel sides?...
img8484b.jpg


Roughed the sides, tape, then nice ole Primer

img8501.jpg

img8502w.jpg

img8504q.jpg


Now after the primer comes the the part where I paint it and I used epoxy Black.

Nice and all I loved it

img8782y.jpg


Until it falls down and all that spray was for nothing....
Seriously it fell down and the whole paint job was RUINED

I went into my garage and pull out my trusty Jasco

img8786asc.jpg


I get mad every time I look at this image, in one streak of that stripper and it bitterly chewed all that hard work away, including primer.

img8787a.jpg


That's not all, my so called Anti solvent gloves weren't so anti solvent (thanks Stanly). During the process I felt my left hand was BURNING. One look at the left hand glove and it was slowly becoming gooey. In panic because of the poison label on the Jasco, I ran to the trash bin chucked both gloves away and left my hand in running cold water for 20 min until it stopped burning.

What a crappy day

well not really, at least the new handle bars looks sweet but right now I'm tempted as hell to buy a brand new radiator like the Danger Den Black Ice SR1 and call it done for that portion.

Now you maybe wondering what's going on with those metal bars. I'm thinking of powdercoating them but first I have to finalize the metal I am using for added structure support before I spend a lot of money for the service.
 
New update

First off I have learned that the radiator I have bought is a used HE 120.3, NOT a used PA 120.3, sorry for the confusion.

I have sent all metallic pieces of the station to get powder coated by CyberDruid of OCN (http://www.overclock.net/cyberdruidpc/) along with other services I have purchased from him that I will get into details in the future.

Along with the shipment of metal, I have sent him the 6 radiator brackets along with the package. Again, I'll elaborate what have been done once it comes back.

Now lets get to the interesting parts shall we?

Navig had recently came back from his epic vacation and had redone his workshop. In short, me and him talked and he have done me a huge favor.
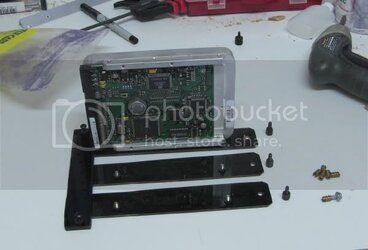
He hand handmade a brand new hard drive set up for my station that is already incorporated into his newer designs. However my station was based on the older design and did not have such feature and used a traditional HD cage.

This image here shows what will be coming in the mail for me and I can't wait until I get my hands on it to install it!

ikikudriverack1.jpg

Now you maybe wondering what happened to the radiator. Well I decided to be super wasteful and lazy that I dunk the whole thing into the gel stripper chemical I had (yes this time I bought expensive nitrite gloves!) and simply jet it with high pressure water from the garden hose to rinse it after 30 mins.

Holy crap it took off the paint on the fins too without adding damage.
img8794e.jpg


Since there wasn't paint on the fins, I sprayed it with some white enamel on to it both sides. It looks a bit quirky thanks to the bent fins but no biggie.
img8893.jpg


I taped up a big portion and on one side of the radiator I put some bondo on and sand the whole section down to make it nice and smooth with 220 grit wet

img8900y.jpg


after painting it

img8903j.jpg


Learning the mistake of rushing it last time, I decided to take my time and slowly work one side a day then taping it up to work on the next.

Here is the finished product with epoxy paint as exterior. I wish the fins weren't bent but at least I'm doing some recycling. Plus I rather do all this on a radiator I got for only $55 vs those new Thermochills that go for $120

img8910e.jpg

img8911a.jpg

img8913c.jpg


Not only that I got some hard to find fans in the mail recently. Teehee.
img8915.jpg


Their so adorable, it even got teeth
img8916c.jpg
 
Back