• Welcome to Overclockers Forums! Join us to reply in threads, receive reduced ads, and to customize your site experience!

PROJECT LOG The Beastly Junkinator

Overclockers is supported by our readers. When you click a link to make a purchase, we may earn a commission. Learn More.
Subbed! Couldn't resist the color and the multiple support fan mount. That is some elegant engineering. I think I see a logo idea , for when you go mass production , in that fan mount. Honestly , it might be worth a patent or copyright on the aesthetics and or mechanics of that item. It's just one of those details that appeals to me. LOL.
I'm looking forward to more installments!
 
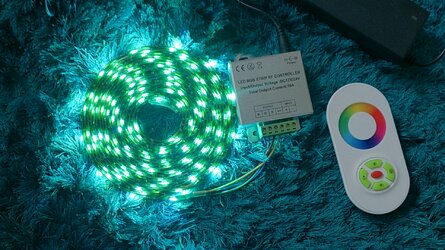
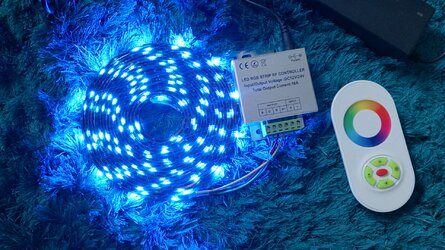
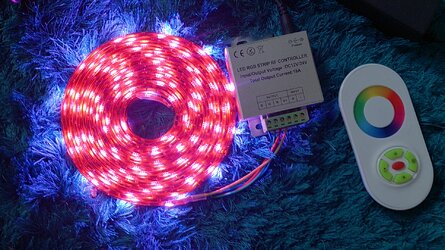
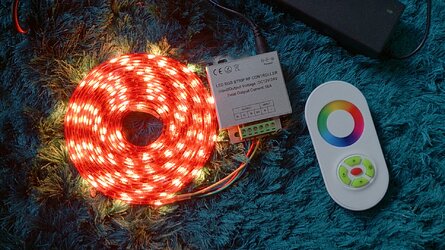
I saw your led strips and wondered have you had a play with the mixable led's
I love them... You get board... Pick 'n mix a new colour with the remote. Awesome fun :D
DSC_0083.JPG

DSC_0084.JPG

DSC_0085.JPG

DSC_0086.JPG

Not exactly cheap but versatile :salute:

:cool: cool diy project.... :thup:
 
Liking that color, you gonna do the whole case like that. I like the SSD mount. Nice to see some more progress on this, keep it up.

Thanks! I'll make the interior black, with some green details. I don't know if the whole exterior will be green or if I should draw some design on it.
Seeing it has lots of windows and grilles, I might do it all green with black grilles and clear windows, so there won't be a predominant colourwhich might result too "heavy".

Subbed! Couldn't resist the color and the multiple support fan mount. That is some elegant engineering. I think I see a logo idea , for when you go mass production , in that fan mount. Honestly , it might be worth a patent or copyright on the aesthetics and or mechanics of that item. It's just one of those details that appeals to me. LOL.
I'm looking forward to more installments!

Thank you, I fell in love with that colour when I tried it!
As for the fan mount, I just went with the easiest and simplest option that crossed my mind! I have to try it with a turning fan, I didn't consider the fact that it might get noisy :(

I saw your led strips and wondered have you had a play with the mixable led's
I love them... You get board... Pick 'n mix a new colour with the remote. Awesome fun :D

Not exactly cheap but versatile :salute:

:cool: cool diy project.... :thup:

Thanks :)
I know about RGB LED strips, but who needs to change the colour when you got green? :p
 
Update

A little update regarding the job.

These days, I tried to build a HDD rack, with many unsuccesful results.
So I opted for a simpler solution, which was in front of me the whole time: I'll mount the HDDs in the 5.25" bays, with some adaptors.
The choice is also supported by the fact that the case is short, about 40 centimeters, so there isn't much room available at the bottom floor, and it is good to leave it for the motherboard and a discrete card reader.

To mount connect the devices on top, I had to get these 1 metre long SATA cables, as the case is very tall.


I'll leave you with some pictures of the frame, onto which I'm thinking to add a front fan 120mm support, as the HDD won't reside there.


I tested the multiple fan support with a working fan, and it does not produce any unconvenient sound :)

 
Another update

Now that I chose to place the HDDs in the upper half, there's room for another fan!


To mount the hard drives in the 5.25" bays, I have some adaptors laying around, enough to hold all the drives.
But where's the fun in grabbing some pieces and putting them together? So I made my own adaptor from an old CD reader.


The superior part is nice and flat.


After measuring everything, here's the position of the holes to house either a 3.5" or two 2.5"s.


The lid can be put back on, onto which I could make more holes for more drives, but I don't really like it that much.


The CD reader is long and pops out in the front, and I need it to be wholly inside, so I cut it with my old good handsaw, which handle broke and has been replaced by a nut.


Since using one adapter for only one disc is a waste, here's the idea to be soon created.


I'll use the piece I cut from the original support as an expansion to the adaptor! I'll have to cut the lower part, so that it fits in 3 5.25" slots.

As the support itself is overturned, the topmost housing is inadequate for a standard 3.5" HDD, but it is perfect for the SSD adaptor I made some time ago (the green thingy on top of the HDDs :))!


I'll leave you with a little bonus, the lamp and the support my mother and I made for the workbench, using an Ikea wardrobe coathanger, some curtain hooks, and S hooks.


The chain is used for... uhh... not for tortures and hangings... no, not for those... :sn:

The lamp is made with a lamp holder, a piece of a blender, another from a hanging light, and a cable. Simple and effective!


:D
 
Last hole... hopefully.

A small update about the work of this afternoon.

The 5.25" bays have these supports to hold optical drives, since they are useless once screwed in place and they don't allow me to fit my adaptor, I removed them.


Smooth as something smooth!


Preparing the last fan hole.
While working on it, I kept shadowing the area with the frame, so I had to improvise to move the lamp towards me:
A wooden plank from a bed, and a wrench thing.


A tip on cleaning and preventing spread of metal waste: hard disk magnets!


A quick swipe on the workbench and everything comes up, fast and easy!

Tomorrow, or next week, I'll file it and make the holes for the fan. I'll also make some openings to let SATA cables and other cables through.

:D
 
Up.

I haven't been working much lately, I have lots of other stuff to do, but here's something I did anyway.

Filed and made holes for the fan support, and other minor fixes, here's the result:


Now, to let SATA cable and other wires through, there's a nice hole on the back of the 5.25" bays.
Too bad not even 3 SATAs fit through, so I have to widen it.


To do so, I had to detatch the base.


Hole made.


Here's the final result, now there's room for all the cables I need to fit through!


:D
 
Not gonna be much case left if ya keep chopping it haha. Looking good, still waiting for this one :)
 
Your cuts are nice, and your front intake setup impresses me. More pics!
 
Not gonna be much case left if ya keep chopping it haha. Looking good, still waiting for this one :)

Ahaha that's what my mother tells me, that it's going to collapse on itself :)

Your cuts are nice, and your front intake setup impresses me. More pics!

Thanks, not much to see at the moment, I'm currently in a bad situation, I have lots of works to do and I have to set up a laboratory to begin my activity!
 
3 months and a half later...

Well, I'm still alive, even if I'm in a semi-vegetative state, and I raked up some strength to compose a new post.
I didn't make much, but I did something, mainly about the air vents.
Meanwhile, let's all greet our new component!

10676125_727067077380195_1124129758540276173_n.jpg


A big beast, does the job magnificently, it's another world compared to the stock heatsink.

Even if changing the backplate isn't required for AM3+ sockets, I have made a hole in the motherboard tray (and even a SATA cables passage), for the future:

1017141_727031644050405_9140087808238202075_n.jpg


As for the vents, I already made the holes, but I didn't have the grilles.
A tour at the junkyard revealed these gorgeous creatures:

10678867_727031754050394_4027296367753060360_n.jpg


The front one is wooden and smells like crème caramel.
For the PC I'll use the white ones, even if dirty, they will be repainted so it's not an issue.

10665957_727031860717050_2621512825984299604_n.jpg


I need a new hole in the front plastic, the previous one was too small:

10410309_727032064050363_1669873518603450344_n.jpg


10710815_727032104050359_8423462392407636577_n.jpg


10653279_727032127383690_6339343450157194827_n.jpg


1780804_727032267383676_8549820762372064483_n.jpg


And now, onto the grilles, a difficult job, handmade...

On the right, the old mesh, discarded as its full/empty ratio wasn't the best.

10704151_727032600716976_9203584858674508414_n.jpg


The hacksaw was difficult to use, and it wouldn't get past a certain point.
So I improvised with a blade and a rag-handle.

10514577_727032654050304_3779967235861687061_n.jpg


The result is perfect, the design really fits the case and the style of the mod.

10665884_727032714050298_4452179573518680601_n.jpg


I'm currently working on the front grille, this time with plenty of clamps and weights to be able to use the jigsaw.
I'm also experimenting with an anti-dust (and anti-cat hair) filter, using a piece of bug net forgotten in the basement.

10525999_685389581547945_1872070538922084153_n.jpg


10405461_685389564881280_740315316756743999_n.jpg


Now it's being tested on the monitor fans, and it works well, certainly better than without.

10460784_685389684881268_4449135267814237041_n.jpg


Well, that's all for today.
See you next time, whenever it will be.
Meanwhile, enjoy Susso's nose close up:

1016485_727076984045871_3065205377620201122_n.jpg
 
Grilles! (Part 1)

Here I am, after having had a few problems with the front grille, solved a couple of days ago.

Here's the work on the back grilles, first the 160mm one for the two 80mm fans.

10801501_751726628247573_7613732375763335958_n.jpg


10635701_751726704914232_3777151140229425678_n.jpg


And here comes the first problem, the original mounting holes have a raised edge:

10421560_751728358247400_4580178341056429576_n.jpg


Solution:

10801719_751728378247398_6211371708025407769_n.jpg


Now the corners corresponding to the holes need to be removed, or the screws won't fit through.

10404132_751726884914214_9217259873354468589_n.jpg


1509798_751726928247543_1696560136137011603_n.jpg


One is done!

10653741_751727384914164_6334386873837361352_n.jpg


Now it's time for the PSU, I start by measuring it:

10801621_751727528247483_9135884979230704783_n.jpg


10366179_751727691580800_1410838627918616342_n.jpg


And here's the socked and switch hole.

10001406_751727738247462_5442798145789355714_n.jpg


The final position:

10678862_751727788247457_8342855156177047901_n.jpg


Testing it on the PSU to mark where the screw holes are:

10646940_751728168247419_8056815294754674125_n.jpg


And it's done!

10250260_751728651580704_2204088766221641657_n.jpg


For the upmost fan, the process is the same. Measure, cut, holes test.

10805731_751728571580712_5920962842384833867_n.jpg


10610648_751728621580707_3000460343034135805_n.jpg


10690242_751728924914010_5867250162996170518_n.jpg


Here's the completed back!

10806372_751728841580685_1226026303544341504_n.jpg


The front grille has been tougher to make, as the front plastic is both flat and curved.

First thing to do, measuring and cutting a piece of mesh. Luckily, the mesh squares match perfectly with the internal dimensions, considering it will be bent.

10806445_751725484914354_8903854862010246596_n.jpg


Room for the supports created.

10453458_751725674914335_5055543954246659211_n.jpg


Perfect. Now onwards with the bending!

10424309_751725748247661_3048104953381625413_n.jpg


The first side is flat, so I make a bend helping with a wooden plank.

10690208_751726018247634_1671034654406905128_n.jpg


To curve the other part, I used a specialized grille-bending instrument: an ambience antiodorant.

10422328_751726138247622_7623028811444393513_n.jpg


- - - Updated - - -

After carefully adjusting the curve, here's the result.

10300888_751726381580931_3508572961969106549_n.jpg


10411835_751726351580934_5136983643826939181_n.jpg


To smoothen the sharp edges, i used this creature:

10526127_751726754914227_1878504464985143370_n.jpg


If you're interested, here are the instructions: Sander / grinder from an old hard disk

Now, how to fix it in place? After a lot of thinking, discarding various alternatives, I chose the simplest and better looking (to me, at least) solution. It also matches the front aluminium panel I previously created.

1622747_751729401580629_5697519689077755152_n.jpg


A lot of screws and nuts! These have been scavenged as well, they were contacts of a box full of electric terminals. I unscrewed enough to fill six bottles.

10672176_751729231580646_6379933597589606280_n.jpg


I laid the nuts down to get an idea of where to drill.

10440902_751729614913941_3094445278994240403_n.jpg


The final number will be lower, this is just a test.

Once I decided where to put them, on with the drill-press*!

*piece of junk with a drill strapped onto it.

10150760_751730034913899_4238958128045807931_n.jpg


First with a small bit...

10802023_751729674913935_6992424101120886914_n.jpg


10675800_751729828247253_4528981530956484803_n.jpg


...then the right one.

10801980_751729954913907_7371029649471410041_n.jpg


Mounting test.

10357609_751730274913875_7839932686836377967_n.jpg


Not being fully satisfied with the gaps along the sides and at the bottom, I put more screws.

10417686_751730494913853_9154464992914304291_n.jpg


Now the distribution is more even!

1924936_751730614913841_7254573807771133195_n.jpg


1461612_751730654913837_3677905248893190185_n.jpg


Once the plastic will be painted and the screw heads polished, they will shine in all their (brassy?) magnificence.

Also, here's the other lion's close-up!
1560391_752258608194375_4668490006891267988_n.jpg
 
More of a lurker, rarely post on forums but the ingenuity and patience shown is mind blowing, great work. Got to say I wasn't sure about a green case either but that paint is beautiful, love your cat's too.
 
More of a lurker, rarely post on forums but the ingenuity and patience shown is mind blowing, great work. Got to say I wasn't sure about a green case either but that paint is beautiful, love your cat's too.

Thank you :)
I don't actually have clear ideas about the painting, I might go with black outside, and a blooming green explosion inside. Maybe green details outside, I really do not know yet!
 
sick build love the creativity!!!

Thanks!

More to come soon, I had to figure out how to make a board onto which I could attach multiple fans... it involves a load of old motherboards, a soldering iron, and a lot of patience!
 
Power button

Ok, we left at the "grilled" front panel, the next step was to modify the power button.
I wanted to maintain the original button, and cover it with aluminium, but the plastic was so rotten it shattered as I tried to remove it.

Here's what's left of it

10687178_766900673396835_6690498909621397228_n.jpg


A new button is needed, let's see who will be the chosen one...

10888914_766900953396807_2241707991068484718_n.jpg


This one! Green, obviously.

10891499_766901083396794_8390711212369783036_n.jpg


10882264_766901066730129_6526669738593666911_n.jpg


Now I have to adapt the opening, first step, measuring.

10731005_766901346730101_4993315404588817098_n.jpg


Plastic flattened and hole made with a file.

10888755_766901386730097_5718930317605063541_n.jpg


Here it is in position.

10891917_766901626730073_5261023270381815994_n.jpg


I think it fits really well!

10363654_766901590063410_2419508115944259857_n.jpg


I'll have to modify it to fit some green LEDs, as it is too clear now (and the lamp is incandescent and 24V)

10885303_766901593396743_3423489994898369875_n.jpg


Now I need to adapt the metal plate to fit it through.

156010_766901846730051_4230452879317219780_n.jpg


Proxxon and file ensure a good job.

10885262_766901856730050_2703038190136755929_n.jpg


10477894_766901900063379_283837379614622684_n.jpg


Another cut to leave room for the modules, and it's done!

10891831_766901966730039_3778799885561684977_n.jpg


10891960_766902040063365_4830095769017899606_n.jpg


It's all for now, I'll install an aluminium plaque in the front to make it match the rest.

Goodbye from my hairy assistant as well!

10421596_766900700063499_7177736599005402098_n.jpg
 
Back