- Joined
- Dec 5, 2004
- Location
- Milwaukee, WI
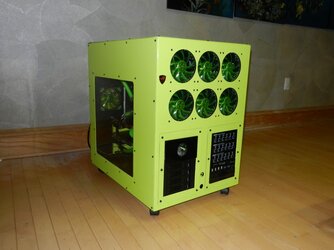
I'm sure everyone remembers this case:


Sneaky's back Baby!


Sneaky's back Baby!
Last edited:
Welcome to Overclockers Forums! Join us to reply in threads, receive reduced ads, and to customize your site experience!


Yeah, you joined OCF long after my initial "Zkylon B/Threshold" project log with this case in 2010-2011. I was incarcerated for the last 3 years, so everything just sat at my parents house and collected dust. Now that I'm out again, I couldn't resist pulling it out of the closet and putting something badass together.Apparently I wasn't around when you were makeing this case...
I missed out.
That case is awesome! I love the paint job, the green just looks sick and the details in it are awesome
Nicely done
It is what it is. Included in the price was match powdercoating of 2x Laing D5 pump mounts, 2x MM 120mm HDD mounts, 3x 5.25" bay covers, 1x Lian-Li PC-75B power supply brace, 1x Sunbeam 5.25" rheostat bezel, 2x Lian-Li PC-A10 HDD Cages + bases, 1x Lian Li modular PSU mounting bracket, 10x Lian-Li PCI cover plates, 9x Thermochill 120.1 fan grills, and 9x wire fan grills. I think it was pretty fair considering everything. Your case only used half the powder it took to do my case... you had one color in and one color outside, mine was first done completely in silver vein and then on top of that went the psycho lime candy topcoat. Easily 5lbs of each powder. Oh.... and they match powdercoated a Zippo lighter for me as well, but the hinge on it broke because the powder was too thick and I couldn't get it to open or close without damaging the hinge.That was a bit smaller than i imagine, and i think you get rip off by MM
i got this GIANT case powdercoat for $250 at the local auto/paint shop green outside, jet black inside, yes, it's the Extender Ascension CYO