• Welcome to Overclockers Forums! Join us to reply in threads, receive reduced ads, and to customize your site experience!

Overclock fx 8350 using asus sabertooth r2

Overclockers is supported by our readers. When you click a link to make a purchase, we may earn a commission. Learn More.

kevin82

Registered
Joined
Nov 17, 2014
Location
Swansea
Ok ive just signed up now so very new here and dont know my way around this site very well, I see there are others who have posted same questions with almost similar set ups but each case im sure is individual, ive had this build now for about a week and ive never done overclocking before and im not looking to break any records either lol but i thought why not possibly boost my hardware and use it to its abilities :) hopefully someone is prepared to help and offer their valuable time with me,ive built a few rigs but when it comes down to the values/numbers etc i know nothing but i am more than capable of following good advice.
 
Kevin welcome to the forums, thanks for creating a signature with your components. It is helpful when helping people, to know exactly what we're dealing with. You best course of action is to read this guide. Then download Hwmoitor, prime 95 and Cpu-z, open Hwmonitor and run prime blend torture test for 20 minutes. Post screen shots using the in forum attachment tool of Hwmonitor and the following screen shots of Cpu-Z, Cpu, Spd and memory. This will give us a look under the hood so to speak, so we can see what is going on under load. If at any time during the test, the Cpu temp or Package temps go above 70c or 62c respectively stop the test, they shouldn't but I mention it just to be safe.
 
Welcome to the Forums...

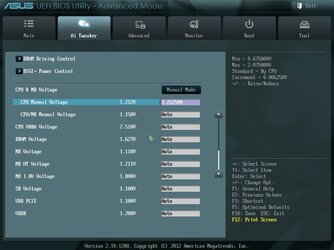
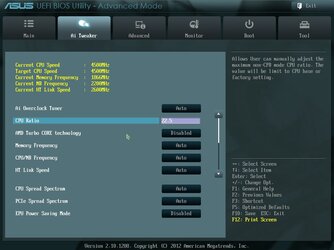
...this below is a more in picture form what "mandrake" was saying. And some of the changes in bios that you likely should make in order to have a little easier time beginning to overclock. Making the changes will remove variables that can mask what is really happening.

This is what we need to see for sure and a real good starting point.

Normally during setup and testing we disable C1/E, C6, Cool N Quiet, APM, TurboCore and in windows performance manager itself we set to "performance" mode. ALSO if you have HPC in bios you would ENABLE it. That way there are not "other" settings messing with the overclocking process. Some of those settings are not available on all models of cpu but where in evidence we disable for setup of overclock process.

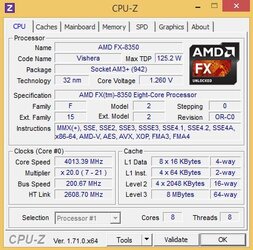
CPU Tab in CPUz from CPUID com
attachment.php


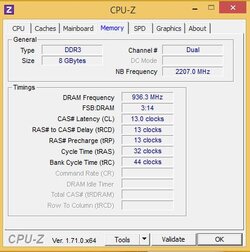
Memory Tab in CPUz from CPUID com
attachment.php


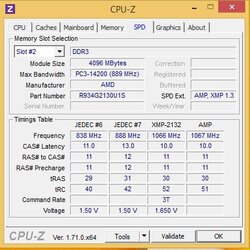
SPD Tab in CPUz from CPUID com
attachment.php


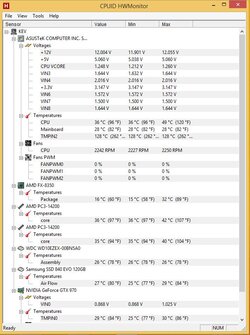
And this is screen capture of HWMonitor (free version) from CPUID com
HWMonitor has been scrolled enough and large enough to show Min/Max of Voltages and includes the CPU CORE TEMPS / "package" temps fully visible. Latest versions of HWMonitor show the CPU Core Temp as " a Package Temp" and is only shown as a single temp since there were never multple, individual core temp sensors anyway.

This capture is made of HWMonitor after it has been open and running on the desktop logging Min/Max temps and voltages while Prime 95 was running Blend Mode test on all cores for at least 20 mins and then the capture of HWMonitor was made and it shows the Min/Max temps and voltages before P95 Blend was started and while running P95 Blend mode and gives much greater insight into how the system is performing without guessing.

attachment.php


In order to attach screenshots of INDIVIDUAL images as suggested, first crop and capture the images with Snipping Tool found in Windows Accessories or equivalent. Then click on Go Advanced, a button at the bottom of every new post window. Then click on the little paperclip tool at the top of the Advanced post window when it opens. Clicking on the paperclip tool brings up the file browser/upload tool and the rest is fairly obvious.
 
ok i first went into bios and disabled C1/E, C6, Cool N Quiet, APM, TurboCore, Then did the blend test and here is the results
 

Attachments

  • Capture1.JPG
    Capture1.JPG
    38.5 KB · Views: 374
  • Capture.JPG
    Capture.JPG
    47.4 KB · Views: 374
  • HWmonitor.JPG
    HWmonitor.JPG
    93.6 KB · Views: 377
  • Capture2.JPG
    Capture2.JPG
    48.5 KB · Views: 372
Ok Kevin thanks, two things I'll mention. When using water cooling as opposed to Air we essentially remove the airflow that would normally be flowing over the VRM/Nb heatsinks. These Fx 8xxx cpu get them nice and toasty when overclocking, you may want to mount a small fan on the Vrm heatsink and/or the backside of the motherboard, to get the temps down a bit. Yours aren't alarming but if you look at the Cpu temp at 49c max and the package temp of 32c max, you will usually see a 8-10c drop in cpu temps by adding a fan to the VRM section and backside of the motherboard. This isn't a necessity, just a suggestion, but it does make a difference when overclocking. Second, if you look at the timings on your ram "Cpu-Z Memory" ss they are what we would call loose. You should be able to run them at the XMP 2132 Jedec profile in the Cpu-Z "spd" ss. Start by setting the timings manually to 10-11-11-30 you should be albe to leave the TRC at 44 and CR at 2, I've never heard of a CR 3. Later on we can try and either push the memory spd or tighten the timings, I'd work on the OC first.
 
Thanks for that information, My appologies aswell for not getting back sooner i had a family emergancy to see to......Back to where we were :) ok so i attached a stock cpu fan to the back of my motherboard and turned one of my h100i fans around so it is blowing air back down towards the vrm/nb heatsinks so hopefully temps will have improved on my next blend test, I also changed the stock thermal paste on cpu to artic silver 5 about a hour ago (12pm my time) so would i be correct to assume that im not quite ready to stress test just yet or should i be ok to resume?
 
You should be fine o sart testing and Overclocking. You have the fans in place so that should help the socket temps a bit. Just follow the guide raising multi and voltage to suit the speed. When you get stuck come back . Just keep an eye on your temps and you'll be fine. 62c for the package and 72 for the socket.
 
If I read what you said about reversing radiator fan...

...Searched in general about fan air thru radiator and found none that thought two side by side fans circulating air thru the same radiator without divider thru the radiator would be good.
RGone...ster.

H100i.jpeg
 
Arctic Silver 5 has a curing time during which you will see temp improvements but it can be used immediately after application. I would usually see about 2c improvement after about 48 hours of continuous use. The company says the curing time is 200 hr. and states up to a 5c improvement when completely cured but that has not been my experience.
 
...Searched in general about fan air thru radiator and found none that thought two side by side fans circulating air thru the same radiator without divider thru the radiator would be good.
RGone...ster.

View attachment 156406

Kevin, it would be much better to pick up a small spot fan (say 50 mm) to blow on the top side VRM area.
 
ok thanks guys for the information, so i should either have both fans blowing in or both blowing out, i have another small fan ( stock fans that come with cpu's) but im really stumped where i can mount it....ive looked at getting the actual cooler for the vrm to replace the fins there but im not in a financial situation to buy them :( anyway il rectify my fan orientaion on h100i to have them both same way.
 
Can you take a pic of the interior of your case and attach it to a post? We may have some suggestions about mounting a spot fan to blow on the VRM area. How big is the fan you speak of?
 
i have changed the h100i fans so they are both blowing up and out so i have 2 front case fans blowing in,1 fan blowing up from bottom (see pic) and a exhaust case fan blowing out, The fan you asked about is a 70mm fan i took off a stock cpu,im not actually sure the fan on bottom of case is necessary but if i use the small fan i will have to use the bottom fan connector so that will come out
 

Attachments

  • 10808385_372693306245450_83409710_n.jpg
    10808385_372693306245450_83409710_n.jpg
    107.1 KB · Views: 352
  • 967867_372693279578786_1268245808_n.jpg
    967867_372693279578786_1268245808_n.jpg
    104.9 KB · Views: 358
  • 10808063_372695499578564_1443736949_n.jpg
    10808063_372695499578564_1443736949_n.jpg
    105.8 KB · Views: 351
Im going to have to look up google to see how and where to put a single fan for best air flow, But i think zip ties is what il use because i dont want to scratch or damage anything lol
 
is it my imagination that you have the two fans running in different directions ..... take a look at the screen cap you can see the fan hub in 1 fan and the fan cross members in the other.

fans.png
 
is it my imagination that you have the two fans running in different directions ..... take a look at the screen cap you can see the fan hub in 1 fan and the fan cross members in the other.

View attachment 156424

Bassnut I think you are correct. He had them running opposite but he said he turned one back around. Don't know but thought the picture was after the turn around.
RGone...ster.
 
Yes sorry guys I took that picture before I turned fan 1 back around so they are both blowing air up and out of case,should of took the pic after I corrected it,sorry for the confusion
 
ok so i set my target cpu speed to 4.5 and increased the cpu voltage to 1.4 and loaded into windows,and went back into bios and lowered voltage 3 x - a time in bios with each visit until windows would no longer load, then increased the voltage by + 1 untill it loaded so i believe i have found the stable voltage for windows to idle.... I shall be stress testing next to make sure no cores fail and increasing voltage by 3 x + untill i can pass prime 95 for atleast 30 mins, If im not being clear with increases im using the + and - keys :) hopefully im on the right track
 

Attachments

  • 141120132441.jpg
    141120132441.jpg
    108.3 KB · Views: 352
  • 141120132421.jpg
    141120132421.jpg
    112.7 KB · Views: 345
  • 141120124807.jpg
    141120124807.jpg
    110.1 KB · Views: 331
Back