Trying to round up a cheap old DICE pot is turning out to be impossible!
Does anyone know if anybody out there still makes cheaper aluminum pots? I had some older Duniek made pots back in the day and looking to get one to hang on to for LGA 775 benching with old hardware.
If I can't find a used one I may as well try to buy a new one.
Any links or ideas are appreciated. Capacity and quality aren't much of a concern.
+1, used is the way to go. The KPC Gemini pot is the better one from him for DICE and it's $265 new.
Actually, now that I'm thinking about it, EK makes a pot now, but there is only one left in stock at PPCs. Here's the link - EK-SF3D Inflection Point. That one is only $167.
Yeah I've had WTB posts on forums across the net with zero action. I see a few go up occasionally, I know the EK/SF3D pot but just too expensive for the once-every-5-years DICE play I will be doing
Basically I'm hoping someone has a mid-2000's Duniek pot sitting in their closet or some homegrown freak for $40. Duniek's alu pots were $65-85 new with hardware/insulation back then.
Ooo....Dimastech pot for $100 on HWBot and in the US. I'd jump on that (assuming trustworthy seller). Trust me when I say you own't find a pot for anything remotely close to what you want it to be. Those days are long gone.
Ooo....Dimastech pot for $100 on HWBot and in the US. I'd jump on that (assuming trustworthy seller). Trust me when I say you own't find a pot for anything remotely close to what you want it to be. Those days are long gone.
Hmm... I'm seriously thinking about getting back into the pot business You're right, there were few people from Poland who made pots couple years ago, but no one is active no more. Duniek quit for sure because I still have contact with him, piotres seems to be doesn't make phase unit or pots any more. ryba... I heard from many people, that they weren't receive ordered stuff from him.
I make my own pots. Have poured liquid aluminum and the whole ball of wax. My latest was brass rings around a copper plug and a brass hand rail. It's not bad for DICE, better for LN2.
Over at ClassicPlatforms most of the guys made "home brew" pots and have had pretty good success.
What makes it even more fun is the low cost of self built and getting some decent results, my FX chips screeaming over 7ghz with LN2 and over 6ghz on DICE.
The one with Blue insulation was made out of an old thermaltake waterblock. My favorite of the two for DICE, both are just as effective with LN2.
Let's sum up, shall we? Your first post here is an attempt to be condescending to someone when it is painfully obvious you have no idea what you're talking about. Not a good start.
I too have made my own pots with good success, much of it was luck in getting the right materials for it to work but I got it done.
Knowing what to get and how to utilize it really helps when making your own stuff.
I too have made my own pots with good success, much of it was luck in getting the right materials for it to work but I got it done.
Knowing what to get and how to utilize it really helps when making your own stuff.
I apologize in advance for the overall crappy pics, seems the camera didn't want to co-operate..... Or maybe the operator just plain screwed up.
Tools/materials required:
Pipe or item that can be used to make the pipe from.
Piece of material such as a solid block of copper or aluminum to create the base from.
Tubing cutter such as a one used for plumbing or a chain cutter and hacksaw as shown.
Drill - Either cordless or with a cord and holesaw of the correct size/size of the tube itself.
Drillbit (optional) for drilling holes in the base for more surface area if you want to.
Measuring tape and marker.
Centering punch.
Sandpaper / flat bastage file (optional).
Benchgrinder (optional).
Solder with a Propane torch(?), MIG welder or some JB Weld for bonding the tube to the block.
*Note that the exact materials used will determine whether it can actually be soldered/MIG'ed together or not*
Here's how I build a pot for benching and the one I already have and use was made in a similar fashion to what's seen here.
With that previous build I used a different material for the tube but the same material for the base.
In the example pic you can see I used a baseball/softball bat to get what I needed for the tube.
You can get these cheap at a yardsale or fleamarket if you want, doesn't matter how scratched up the bat itself is since it will eventually be covered in insulation tape. Just make sure it's not bent or anything like that. The one I used was brandnew and also note the overall shape of the tube - One that flares quickly to the largest size of the tube is what you want, not one that gradually tapers to it for getting the most useable amount of tube from it. The one pictured is the shape you want it to be and a bat is great for this since it's made from a thickwall tube yet it's lightweight at the same time.
In step 1, you'll notice where I have the chaincutter placed, right where the tube's diameter evens out at it's fullest to get the most tubing from it. This is the place you'll always want to start cutting. If you have access to an actual pipe cutting tool such as what's used in plumbing (Rigid pipe cutter as shown), that's the best tool to use. Make sure it's large enough to do the job since these come in different sizes.
Don't plan on running to the hardware store to get one, these cutters are expensive but if you can borrow or use one that would be ideal - In my case I had to use the chaincutter and hacksaw. After I had went around the tube to the point the cutter would do no more, I took the hacksaw and let it finish the job. The saw followed the groove my cutter had made well enough but make sure as you go, the hacksaw blade stays inline with the groove for a decent cut. If using a pipe cutter, you'll get better results.
Step 2 shows me measuring how far to go back for cutting the plug end from the bat. This plug is very hard to remove sometimes without alot of work, just let the tape measure show you how far back to go, then do an external measurement just short of what you get with the inside measurement to be clear of the plug when you cut this end off. You'll see I came up with a tube of about 10 inches long once both ends were cut off.
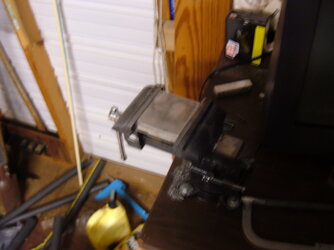
Step 3 is when I broke out the portable benchgrinder to even up the ends and smooth it up roughly, this is also important to do since if one side is slightly off, the tube won't sit flat/straight up on a flat surface and will have a lean to it when you place it on the base. Get the ends evened up and then do some sanding to finish it off. If you use the grinder correctly you can almost eliminate sanding all together. If you use a pipe cutter you probrably won't need to use anything but sandpaper to dress up the ends.
Step 4 is for if you had to do it the way I was forced to do. This is for how you can go about doing this and note where the grinding needs to be done on each end before sanding. Stand it up on a completely flat surface and see how much it leans if at all, then go about getting the ends evened up. Even if using a cutter be sure the ends are right anyway.
For now this completes work on the tube, set it aside until later.
Step 5 shows prepping the base or block for use. In this pic I'm trimming it down a bit to get rid of the holes you see and to be sure it's the right size for use with the mounting hardware. It must also fit onto the socket area without touching anything around it on the board itself such as capacitors for example. Measure it, size it up to the mounting holes and board components before trimming to ensure it will work properly.
Step 6 is when I was sanding the CPU side of the block down. It's best to trim it first, then do your sanding. It's also best to do the sanding before it's attached to the tube itself for ease of working with it.
Step 7 is important - You want to make it so the tube is in the center of the block's mass of material. This helps to even out the cooling effect through the block itself. By doing this you avoid problems with warmer/colder areas of the block due to the pot's tube being off center. I started by making sure the top of the base was a little above the edge of the jaws of my vise so I could straightedge it from corner to corner, creating an X which indicated this center.
Right in the center of the X, a pilot mark such as you'd make with a centering punch is what you'd want to create next. After you make this pilot mark, get the holesaw ready.
NOTE: If the block isn't square as in the edges are not squarely cut to each other, the X will not be accurate in showing the block's center. I ran into that here but it was close enough that I didn't have anything to worry about BUT it's still a good idea to make sure when trimming the block that your cuts are straight and square regardless of the actual dimensions of the block once trimmed.
If possible, adjust the pilot drillbit to the absolute minimum amount it protrudes from the holesaw itself to avoid the pilot bit from going too deep. Before starting, take a moment to set it on the edge of the block and visually see how far down it wil go into the block before the holesaw itself makes contact with the block - NEVER let the pilot bit go all the way through the block itself no matter what when using the holesaw.
OK - place the pilot bit of the holesaw into the indention made by your punch and let it go down until the holesaw itself begins making it's cut. This is where you want to ease up and simply let the holesaw make a small groove only as shown, just enough for the tube to sit in and to give a better seal when soldering/bonding it to the block. You can take the drill and lean it some, using a gentle circular motion to let the holesaw cut the groove itself while keeping the pilot bit from going down further. Just make the groove deep enough for this purpose.
Once done, you can set the tube onto the block to see how well it fits and look down into the tube to see how it fits overall. If it looks good and seems to fit well into the groove, it's ready for it's final prepping before soldering/MIG'ing/bonding.
----------------------------------------------------------------------------------------------------------------
Part two:
OK, the base and tube are ready to undergo final prep for assembly.
If you want to, make some marks with a marker and then use a center punch to create a pattern around the center of the base, using the holesaw pilot bit hole as a centering reference for spacing. Create your pattern around the pilot hole in a circular fashion, remembering to allow for more holes in the outer part of the pattern than you'd have for the inner. The exact size and spacing of these holes is up to you and the depth you drill them to is also up to you BUT remember to keep the drill from going all the way through the block! What I did was I set the drillbit I was using into the pilot hole and marked the bit so that when I reached the same depth as the pilot hole while drilling these, I'd stop.
This way your holes are of a uniform depth and you'll know you won't be drilling too deep, just be aware of how far down you're going. You can always restart the drilling itself but you can't undo what's already been done so take your time to get it right. After this is done, you'll probrably have some slivers of metal sticking out of these holes, either sandpaper or a flat bastage file can knock these off and smooth the surfaces down as needed.
Once you have these holes done, the next step is to get the tube and base ready for bonding together. I highly suggest if using aluminum to get it MIGed but I have used JB Weld to bond the pieces. Just know with my useage, it held up fine to DICE benching but cannot say the same for LN2 use and I strongly don't suggest using JB Weld with LN2. Even with just DICE the potential for thermal expansion/contraction exists and could break the bond.
Once again, be sure the tube sits straight when placed in the groove on the base, if any further leveling of the tube is needed, do it now. Next, you'll breakout your soldering torch and solder, MIG welder or the bonding agent. In my case it was JB Weld used to bond the pieces together, but know there are certain materials you simply cannot solder together and either bonding or welding will be your only options in this case.
In this example, I mixed up the halves of JB Weld and carefully spread it around the inside of the groove in the base, being careful to not get any in the area where the acetone and DICE will be inside the pot. Next, I placed the tube in the groove and make sure the tube was sitting straight up in the base, then I carefull took my finger and spread a layer of it around the outside of the tube where it meets the base. When I did this, I made sure there were no gaps in the layer of JB Weld to help ensure a better bond and of course to eliminate the potential for leaks.
Once I was satisfied with the work done, I let it sit overnight.
Now for the mounting collar itself.
Using a piece of stiff metal would be best since materials such as plexiglass can crack. The metal piece you get should be thick enough not to flex or bent down under the force of mounting up your pot. It must be a relatively stiff piece to avoid that problem.
Place it directly on a flat surface to make the mark you need and it should be OK. Next, make the hole for the tube with the holesaw. Be careful here when the holesaw itself makes contact, use patience and simply let it eat through the material at it's own rate, don't try to force it. A tip would be to get the area being drilled out as close to the clamping point of the vise as possible since this will help reduce any vibration/flexing of the material when drilling.
Now you'd need to make the mounting holes, you can mark these the same way you marked the center of the plate for the tube. Either create a template from the board/boards you intend to use it with or just take a backplate from the board and use that to create your marks with - Then you'll drill the holes themselves.
NOTE: Since making the pot as shown below, I decided that making a plate that sits on top of the tube rather than bonded along it's length as shown is a better method of using the collar. I used a holesaw a size under what was used for making the groove in the base for the tube to make the hole itself after I repeated making a groove for the tube in it by using the same holesaw that made the groove in the base. Made my groove to center the plate onto the top of the tube when placed and then, using the slightly smaller holesaw I made the actual hole.
Worked out great for this purpose.
Leaktesting it was a simple as pouring some acetone in with DICE and watching for leaks around the base. Insulate it afterwards and it should be ready to mount.
In the final pic, it's mounted up and ready for action!
*NOTE: Since the pot was made I've had it MIG'ed and highly suggest this method of bonding the pieces together if it's all aluminum like this one. I'd only use a bonding agent such as JB Weld as a last resort regardless of what it's made from*
Actually it was a bit of luck involved with getting some of the stuff used, esp for the base.
Although it's a piece of aluminum, it's more or less pure aluminum from a worn out wrapper cutting bar that's normally heated to "Cut" plastic pallet wrapping film. Got it and chopped it up into the sizes I needed and luckily I was able to get a piece large enough to make the pot with.
If you are going the Dimastech route, They are EOLing their V2 Dice/LN2 pot. They have their V3 coming out at the end of AUG for $200 USD. If you can still order the V2 from Dimastech web site for $100, Please JUMP on it because when they run out of the V2, your order gets bump up to the V3 at NO additional charge
The review for the EK Dice/LN2 pot was bad It could handle the Dice benching but on LN2 it gave subpar results.
This site uses cookies to help personalise content, tailor your experience and to keep you logged in if you register.
By continuing to use this site, you are consenting to our use of cookies.
")
![20150708_213941[1].jpg](/forums/data/attachments/166/166173-033d3909c5e6c6134f96e035b18d88cf.jpg)
![20150708_213950[1].jpg](/forums/data/attachments/166/166174-247f40b5714a7c55f60e7cd725d1ab8a.jpg)
![20150708_214002[1].jpg](/forums/data/attachments/166/166175-4ee7d6d4bfcedbb683a59c719aa038f9.jpg)
![20150708_214017[1].jpg](/forums/data/attachments/166/166176-24fe86f95ffabc681c6ac0afeb35e720.jpg)
![20150708_214024[1].jpg](/forums/data/attachments/166/166177-d6225fe13830fa7beea108b4826fc783.jpg)
![20150708_214040[1].jpg](/forums/data/attachments/166/166178-4eae0a2caedc169280e6ca4543bef8bb.jpg)