• Welcome to Overclockers Forums! Join us to reply in threads, receive reduced ads, and to customize your site experience!

[Build Log] Phanteks Enthoo Primo Z97

Overclockers is supported by our readers. When you click a link to make a purchase, we may earn a commission. Learn More.

cozumel

Member
Joined
Dec 27, 2014
Location
All over the place
Some pics of the main components:

2 x GTX 970 Blocks and backplates
Alphacool D5 Vario and EK Top
1200x900_1.jpg


2 x Alphacool UT60 360mm
12 x AP-15s
1200x900_2.jpg


Primochill 240mm Tube Res ID½" & OD¾"
Primochill Advance LRT Tubing
A second GTX 970 for my loop (upgrade to the rig in my sig)
1200x900_3.jpg
 
Last edited:
Other bits:
CW611 Lamptron Controller
Distilled Water
PT Nuke
CoolLaboratory CLU
2 x 6-way Y-splitters
2 x Koolance Quick Disconnects
Cable adaptor to control pump via Lamptron


BitsPower
2 x straight stubby ½" barb
12 x straight rotary ½" barb
12 x 45° rotary ½" barb
24 x hose clamps
2 x snake adapters
1 x G1/4 to G1/4 rotary 90° fitting
1 x mini-valve
1 x straight extender
1 x SLI Connector Adjustable 41-69mm
3 x in-line temp sensors

And yes I know it is more fittings than I need but since this is my first build, it gives me flexibility to alter the planned routing as I experiment to see what gives me the best silence to cooling ratio. Also the same reason why I have got so much tubing (10 ft). Oh...and I'm assuming that at least 1 or 2 of the rotaries will either leak immediately or develop leaks some time in the future, so it's good to have spares since I had to have them imported.


- - - Updated - - -

okay water cooled video card... interesting..
Well, if I didn't take a pic of the card someone would have asked why two blocks when only one card in my sig!
 
Last edited:
Hi again,

I've done a few 'not w/cool' related changes to my rig today and now I'm roughly putting the loop inside to see if everything will fit as I had planned. Once I am sure all is good I will drill any mountings as required and install properly. :)

So a question about the UT60s. They come with 12 x 30mm M3s and 12 x 35mm M3 screws. I am assuming the 30mm M3s are for fitting 3 fans directly to the rad whilst the 35mm M3s are to fit the fans outside the case? So since I want to install 6 fans (all inside the case), I've just run down to the local hardware store and picked up a small box of washers as otherwise the push/pull config won't work with the supplied screws. It would probably end up rattling like a snake without them.

Is my assumption correct and is the washer solution what you guys all do? I have to use about 6 washers per screw. I tried using some decoupling foam to fill the space but it looked it a bit untidy

thanks again.
 
I've decided not to use the Phanteks pump mount bracket. I was going to drill new holes and put the their bracket in my chosen location, but figured I might as well use some Velcro to mount the pump directly to the case floor (via the EK mounting plate). I'm thinking (hoping) the Velcro will also act as a decoupler.

I should add that I almost forgot about the o-ring when putting the top on the pump. I had to take the top off again. Only remembered when re-reading the EK instructions to confirm I hadn't missed nothing lol. Kinda reminds me of when I built my very first rig...oh the joy....
 
Last edited:
Hey there!

I'm bleeding the rig but the tube that goes into cpu clock has got air trapped. I've been tilting her a bit and got the worst of it out but there is still a large bubble in that tube.

Is it okay to lay the system on it's side with the pump running to try and shift the trapped air? I was going to lay it on all 5 sides (just not upside down), but first I wanted to check if that is okay. No leaks detected. Pump running now for about 2 hours or so

NB I will be updating build log later on. Kind of got delayed a week when I went fishing/camping instead of rig-building....

Edit: okay...already done...tilted her around 80 degrees (almost on her side) and bubbles now gone!
 
Last edited:
I spoke too soon about there being no leaks. There is one. It is virtually at the lowest point of the loop and is so slight and almost undetectable. A leak is a leak though and it must be fixed :)

The tube from the D5 to the bottom rad. The rotary fitting is leaking at the rad end of this tube. It needs to be replaced as it is faulty. I bought spare fittings as I thought 1 or 2 might leak so replacing is not a problem as far as spares go (I've got 12 spare rotaries just in case)

I'm thinking I could drain say 3/4 liter via the drain port and back in to my squeeze bottle. Then turn the rig on it's side so that the faulty fitting becomes literally the highest point of the loop and replace with a new rotary. That works inside my head. Or is there a better way please?

Thanks.
 
Last edited:
Rotary replaced and leak fixed. I've had the loop running for a few hours now (just leak testing and getting rid of air). So much quieter without air leaking in to the loop via the faulty rotary. Only the gentle whine of the pump instead of a sound reminiscent of the rapids on the Mississippi.
 
Yup. Run a 24 hr leak test with everything else shut off other than the pump running with the components covered.
 
Definitely no leaks!!! YEAH :D:

Important lesson learnt #1: Plug in the awkward motherboard connections before loop is installed. It took my 1 1/2 hours to plug in the mobo ATX4P PCIe power connector as I couldn't get my fingers in there. Oh the joy! And somehow I need to work out how I'm going to plug in three more SATA cables

I've got a basic clean install of Win10 without checking for latest mobo drivers or downloading NVidia drivers and done some stress testing with AIDA just to confirm I had the thermal interfaces okay.

But the reason I haven't bothered doing a proper OS install is due to the second lesson.

Important lesson learnt #2: Check rad fans before filling the loop in case of either one being faulty or blades coming into contact with something or whatever.

Basically two of the push fans are either faulty or the blades are making contact with something. So I have turned two of them off. So now I've only 1 fan on push and three on pull for the bottom rad. I'm still typing this with a smile across my face though. I enjoy learning not to be so dumb lol. I think perhaps I need to drain her again unless I'm very lucky and its a fan cable that is making contact with the blades on the 2 fans. Maybe I could the cable clear with a tiny screwdriver. I'm just happy I decided to include a drain port as part of the build. (I am actually laughing as I type, even though I am incredibly stressed right now). How could I not consider something so fundamental as to double-check fans before filling loop. It just seems so darned obvious. It is not like rocket science or anything lol.

Anyhow, Ill post some pics later on

Yours sincerely,
The Village Idiot AKA The Laughing Fool
 
Last edited:
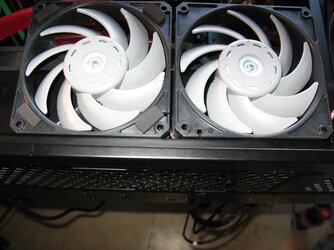
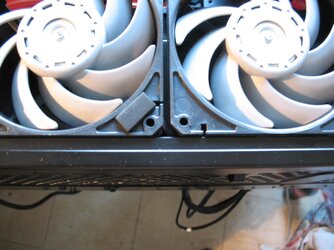
Problem solved. The bottom of the case is ever so slightly flexing, making a type of crescent shape. This causes the two push fans that are closest to the four chassis leg supports, to rub against the chassis. One of them could barely turn at all. I cut out some pieces of foam and stuck them to the push fans to create about 1mm extra room.

fans 1.jpg
fans 2.jpg
 
Yeah, it worked quite nicely. Lovely and quiet now from the GTs. Blades turning freely. For the next build I'll definitely be running a fan spin-up check on an installed bottom rad prior to filling the loop :)

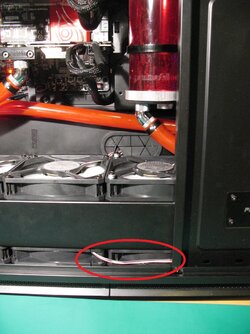
The only real annoyance from having to sort out the fans is that I had the cables routed so they were invisible. Now one of the fan cables is visible as there was no way I could sort that without draining the loop. You can see the cable circled in the pic below (The bubbles in the res came from running the pump with the rig on it's side. It was on it's side for about a couple hours whilst moving the rad, res and pump in order to sort out the fan blade clearances)

Dumb Cable.jpg


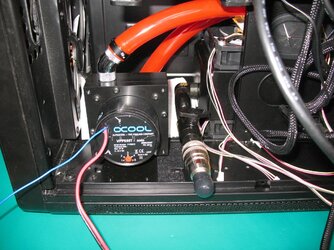
And here is a photo of my D5/EK pump combo and drain port. They're positioned under the drive cages and behind the bottom rad for easy access!

Pump + Drain Port.jpg
 
Photos are a bit out of sync....but never-the-less.....this is meant to be a log...and I forgot to take pics of some bits...and a couple were out of focus so I won't put them up...


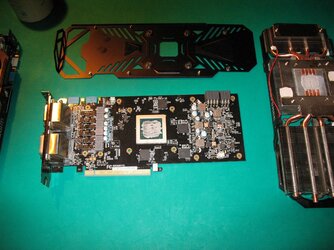
I carefully dismantled the 970s. I always get really scared doing as I broke an ATI card a long time ago and it's pretty darn expensive when you screw up! These coolers on these were really easy to remove. I only needed to apply a tiny bit of pressure and wiggle them about a bit and the things came straight off.

Dismantled 970.jpg

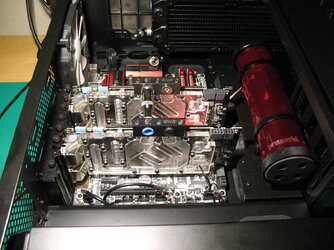
I cleaned them with q-tips and the arctic cleaning kit (no blurry for this) and applied CLU. Did the same for the CPU too. Fitted the blocks and took another snap

970s Installed.jpg
 
Back