-
Welcome to Overclockers Forums! Join us to reply in threads, receive reduced ads, and to customize your site experience!
You are using an out of date browser. It may not display this or other websites correctly.
You should upgrade or use an alternative browser.
You should upgrade or use an alternative browser.
"TheBianch" - Reader's Digest Bench Project
- Thread starter SwartHack
- Start date
- Joined
- Apr 3, 2015
- Location
- Planet Earth
- Thread Starter
- #82
Enter The HackShop...
Ahh, the SwartHack has been a busy boy....
I hope we have not forgot about this project's current questionable activity
We enter the HackShop, where things are weird and can get scary!!!!


So treated both sides with three separate applications.
Each application consisted of 3-4 coats applied 2-3 minutes apart.
Then let dry for 24 hours before next application...
One may notice I ended up tapping of all the caps
Note very deliberate tape lines so that product could cover exposed connections: PCIE brackets and caps...


Freaking Shiny!!!!

All cleaned up and ready to go...

But will it POST!?!?!
Wait till you see what I cooked to run this thing on!!!
Another First for the SwartHack. Should be here Friday...
There is now way back now!!!

Tots Zien
Ahh, the SwartHack has been a busy boy....
I hope we have not forgot about this project's current questionable activity
We enter the HackShop, where things are weird and can get scary!!!!
So treated both sides with three separate applications.
Each application consisted of 3-4 coats applied 2-3 minutes apart.
Then let dry for 24 hours before next application...
One may notice I ended up tapping of all the caps
Note very deliberate tape lines so that product could cover exposed connections: PCIE brackets and caps...
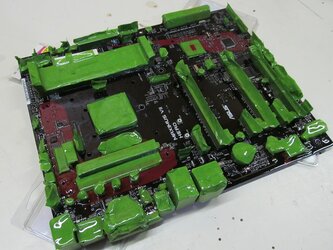
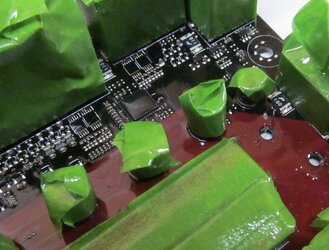
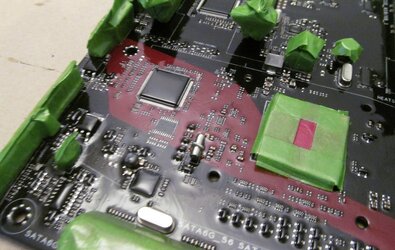
Freaking Shiny!!!!
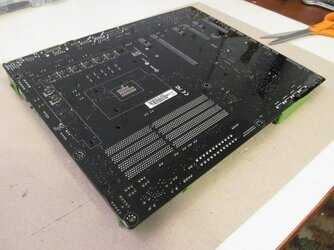
All cleaned up and ready to go...
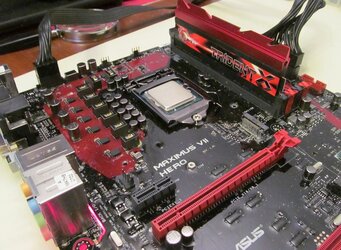
But will it POST!?!?!
Wait till you see what I cooked to run this thing on!!!
Another First for the SwartHack. Should be here Friday...
There is now way back now!!!

Tots Zien
- Joined
- Sep 7, 2013
Jeeze I might coat the new Z170X UD5 board I got just because of how shiny it makes it!!
I wanna see that board in action now swart!
I wanna see that board in action now swart!

- Joined
- Apr 3, 2015
- Location
- Planet Earth
- Thread Starter
- #85
Sub-Zero Prep for Buck ROGers Maximus Hero VII
OK - Watch and enjoy now!
Explanations/question/answers/insults later! I know you all like the soundtrack!!!
Don't sleep on my new-age sub-zero bench shown towards the end.
It's farcking revolutionary!!! Another SwartHack first!!!!
Cheers!!!!
OK - Watch and enjoy now!
Explanations/question/answers/insults later! I know you all like the soundtrack!!!
Don't sleep on my new-age sub-zero bench shown towards the end.
It's farcking revolutionary!!! Another SwartHack first!!!!
Cheers!!!!
- Joined
- Apr 3, 2015
- Location
- Planet Earth
- Thread Starter
- #87
Hardy har - Common Man!! Everybody loves TeTe!!
I got something on the drawing board you may better appreciate...

Its all EK stuff I got from PPC.
http://www.performance-pcs.com/liquid-nitrogen-hardware

Prices seemed reasonable to me, but what would I know.
The inflection point mounting set-up is the shiz, well it seems anyway.
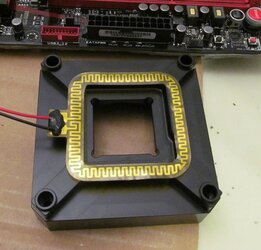
Not sure what to do with those heaters. Was gonna hook them up to a variable fan speed controller...
I got some more to learn before I fire this baby up. I'm gonna have questions, "Like fo' shur"
Hasta
I got something on the drawing board you may better appreciate...

Its all EK stuff I got from PPC.
http://www.performance-pcs.com/liquid-nitrogen-hardware
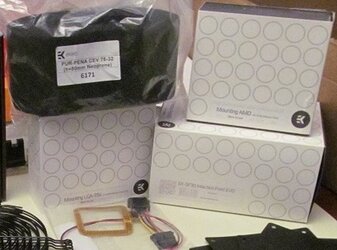
Prices seemed reasonable to me, but what would I know.
The inflection point mounting set-up is the shiz, well it seems anyway.
Not sure what to do with those heaters. Was gonna hook them up to a variable fan speed controller...
I got some more to learn before I fire this baby up. I'm gonna have questions, "Like fo' shur"
Hasta
- Joined
- Apr 3, 2015
- Location
- Planet Earth
- Thread Starter
- #88
Video Fun Time Over
um, er har-har,huhhuh. Sorry about that video. Not one of my best compositions to date, But I do rock that song. Some of TeTe's stuff is pretty good

So question and answer time on this round of pics.
Most of you may know, the original "The Bianch" is a HighSpeed PC "Top Deck Tech Station".
And if you have followed at all, you are aware of all the changes, re-configs and mods The Bianch has been through.
Well I hooked up with [email protected] at HighSpeed PC again and they built this for me!!!
I just provided some instructions and an idea of the concept, few emails later BAMM.
You can read my original review here:
http://www.overclockers.com/forums/...ench-Project?p=7865146&viewfull=1#post7865146
Well I dreamed up this crazy idea one day based on my observations of others and a comment/complaint made by Blaylock some time ago about his, a..er..."setup"...
And somebody told me once just to run on a thick piece of cardboard??!! Barbaric!!


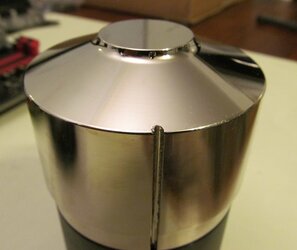
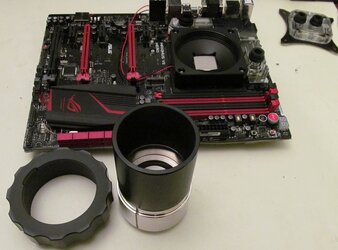
So in essence I now have a second bench for running with a pot. But if you notice two things..
I plan to easily mod the EK inflection point mounts to also work on the cpu block you see off to the right side...
This way the same board can run on The Bianch's cold loops with little hassle.
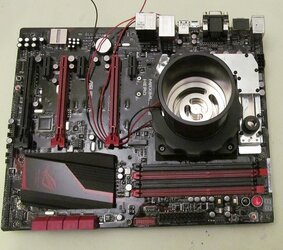
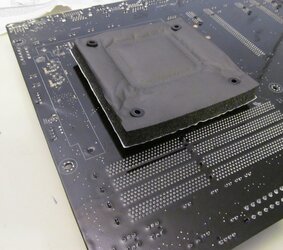
Also note this kit requires removal of stock cpu bracket. The mount make a seal directly with the mobo, hence the supplied pad. Modding for cap locations was required...

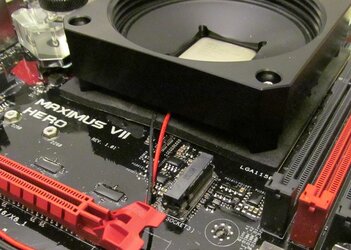
I have also left on the VRM water-block. Is this OK?
It seems its mass should conduct as well as the stock air heat-sink??!! Or not?
I left the back so I could change out easily if necessary.

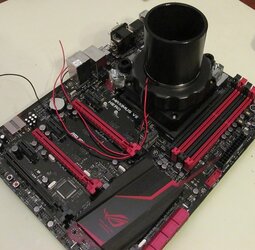
Also fans!! I have noticed on a lot of rig, there are fans mounted on the long/tall pot mounts, kinda pointing down at angles...
I was going to put a fan on one side for the bottom, but still need some assistance in where/how any top-side fans should be located/positioned
For easier reference and astute study, here are most the rest of the pics from the video...
Shake It Off!!!


um, er har-har,huhhuh. Sorry about that video. Not one of my best compositions to date, But I do rock that song. Some of TeTe's stuff is pretty good
So question and answer time on this round of pics.
Most of you may know, the original "The Bianch" is a HighSpeed PC "Top Deck Tech Station".
And if you have followed at all, you are aware of all the changes, re-configs and mods The Bianch has been through.
Well I hooked up with [email protected] at HighSpeed PC again and they built this for me!!!
I just provided some instructions and an idea of the concept, few emails later BAMM.
You can read my original review here:
http://www.overclockers.com/forums/...ench-Project?p=7865146&viewfull=1#post7865146
Well I dreamed up this crazy idea one day based on my observations of others and a comment/complaint made by Blaylock some time ago about his, a..er..."setup"...
http://www.overclockers.com/forums/...te-and-RR-20?p=7837896&viewfull=1#post7837896Blaylock said:I'm trying things a little different this go around and instead of flipping the MB tray and placing it on top of the case for a pseudo bench table I'm going to leave it inside the case. If I have any difficulties though, out she goes.
And somebody told me once just to run on a thick piece of cardboard??!! Barbaric!!
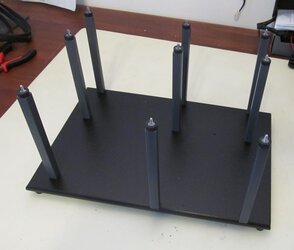
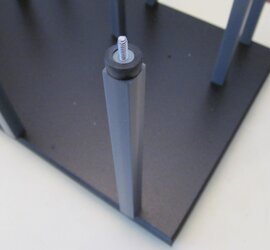
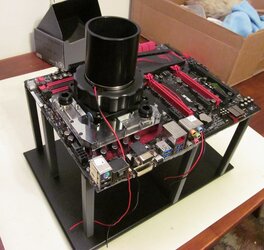
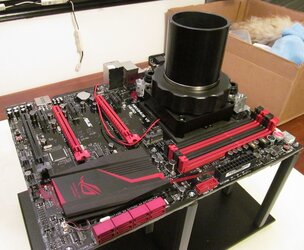
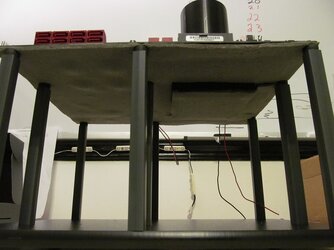
So in essence I now have a second bench for running with a pot. But if you notice two things..
I plan to easily mod the EK inflection point mounts to also work on the cpu block you see off to the right side...
This way the same board can run on The Bianch's cold loops with little hassle.
Also note this kit requires removal of stock cpu bracket. The mount make a seal directly with the mobo, hence the supplied pad. Modding for cap locations was required...
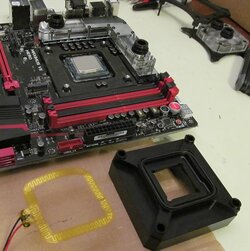
I have also left on the VRM water-block. Is this OK?
It seems its mass should conduct as well as the stock air heat-sink??!! Or not?
I left the back so I could change out easily if necessary.
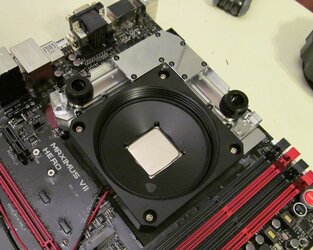
Also fans!! I have noticed on a lot of rig, there are fans mounted on the long/tall pot mounts, kinda pointing down at angles...
I was going to put a fan on one side for the bottom, but still need some assistance in where/how any top-side fans should be located/positioned
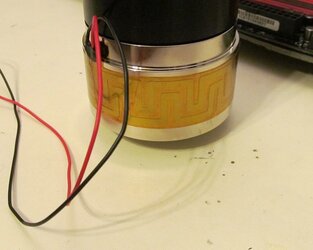
For easier reference and astute study, here are most the rest of the pics from the video...
Shake It Off!!!
- Joined
- Sep 7, 2013
Mmmmm I love crushed EPDM 
You might be ok with the VRM waterblock by its self. I recall a motherboard manufacturer with a waterblock like that and it was advertised to be ok with or without water. You may want to contact the manufacturer of that particular block though.
- Joined
- Apr 3, 2015
- Location
- Planet Earth
- Thread Starter
- #92
This post brought to you by "The Authentic Rubber Chicken"
Please support the sponsors...
Kinda like this? Man I love these benches!!!


Cheers
Please support the sponsors...
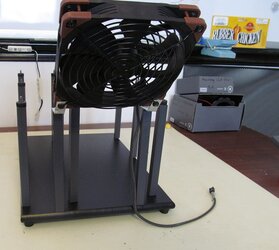
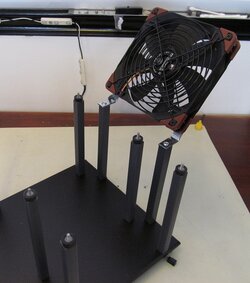
The fans are mounted to blow air up and across the mouth of the pot to keep the cooled gases from settling on the board. This helps slow down the spread of cold on the board and helps keep condensation down.
Kinda like this? Man I love these benches!!!
Cheers
- Joined
- Apr 3, 2015
- Location
- Planet Earth
- Thread Starter
- #94
Dual CPU Cooling Setup- Pot or Block! And away we go!!!
Been a few since I left off here...
Frankly I was very content working on Father Time (sig.) and messing with people in the OverClocktagon...

Actually was going through the paces there with the 980 Ti Hydrocopper, and was moving to re-install the second 980 Ti, and...
Well some know the end to that story, actually ongoing story (Gigabyte giving me runaround, look to thread for updates)
http://www.overclockers.com/forums/showthread.php/780852-Father-Time-Down!!!-Help!!!
So this has given me opportunity to get back to this endeavor, and
BOY-O-BOY, it is a good one!!!
SP - feed the Beavers and crank that handle on your router...
As some may be keenly aware, The SwartHack likes to makes things more functional. Specifically multi-use functional.
So been designing this idea in my head for some time now, and I think it is the shizzz, but I'll wait to say what my valued OCF colleagues think!
First off, been looking for local source of neoprene.
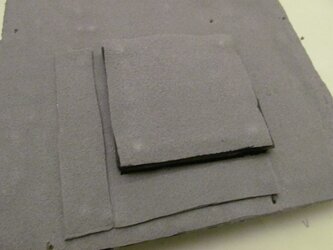
Found this at local Industrial Warehouse, sell by the foot, 36" wide rolls.

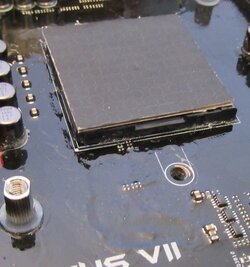
And I had a few things to tidy, specifically this problem

note other affected area, not clearly visible.
I believe I applied a new coat, before the previous one was dry. I was really trying to get a build up around the socket.
So I fixed it up using a Q-tip to apply the product, after spraying enough in a container. I made sure to get product and not just accelerant.
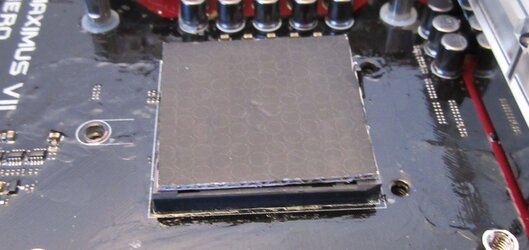
I did three coats. Using gentle heat to set-up the first two layers. I then let the third layer dry overnight. Not too shabby, I would say...
Whoops - cropped out pic of "Q-tip in container".
First Layer

you can really see the layer I built up originally in this pic...

Second Layer

Third Layer


Finished

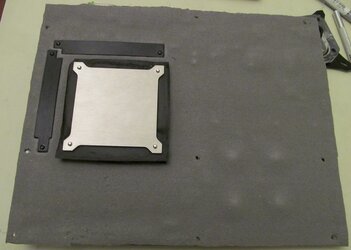
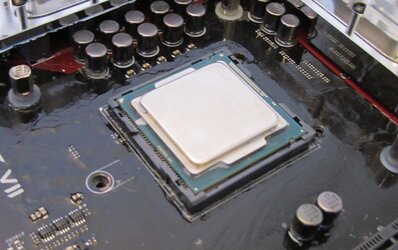
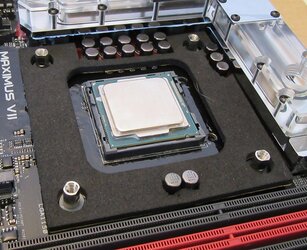
OK, now what? Well here is the setup of the Inflection point mount I got.


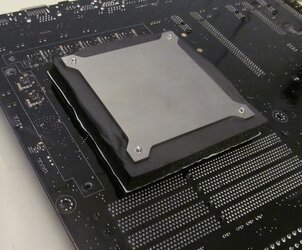
It seals down on the mobo around the socket. And comes off easiliy with four M3 bolts...


But I don't want to be pigeon holed into using the pot always and need the flexability for going cold with gCards eventually!
In comes the reason for the neoprene. Note the perfectly symmetrical corners, and the perfect fit of these little beauties!!!

So we do this...


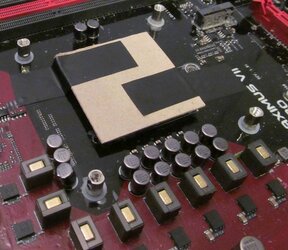
then use some temex tape to tidy things up...
NOTE - pictured is only a mock-up.
QUESTION - How far can I go in on the edges of the CPU with the temex??? Could I go right up to the edge?

And then we put this rig on...

So, I got these parts from my BitsPower CPU block.

The indicated thumb screws am not sure where they originally came from?? Just happened to be hanging around and they just so happen to be PERFECT for this. So I cut down the springs accordingly and this is it!!!!

I am about ready to go on this with cold using "Aqua Pumped", My new designation for the bucket set-up using the Lochekey provided fountain pump. pics next post...
I plan to start off just getting the hang of the process before I start throwing DICE around. I hope to get some advice feedback, as I go, from my valued subscribers
My biggest question is starting up? What is the process for firing up a rig for cold? Besides just hitting the button.
And during, when something crashes and you have to re-start to continue, OR something borks and you have to shut down.
Just what are the things to look for, be careful of, etc.
Any insight into this is greatly appreciated...
I should be running Aqua Pumped with ice-water this weekend, and gonna say goodbye to Enthusiast, and get off the top of the Bell Curve. There are just tooo many of them.
So expect some updates soon showing the set-up all rigged to go...
Tot Ziens
Been a few since I left off here...
Frankly I was very content working on Father Time (sig.) and messing with people in the OverClocktagon...
Actually was going through the paces there with the 980 Ti Hydrocopper, and was moving to re-install the second 980 Ti, and...
Well some know the end to that story, actually ongoing story (Gigabyte giving me runaround, look to thread for updates)
http://www.overclockers.com/forums/showthread.php/780852-Father-Time-Down!!!-Help!!!
So this has given me opportunity to get back to this endeavor, and
BOY-O-BOY, it is a good one!!!
SP - feed the Beavers and crank that handle on your router...
As some may be keenly aware, The SwartHack likes to makes things more functional. Specifically multi-use functional.
So been designing this idea in my head for some time now, and I think it is the shizzz, but I'll wait to say what my valued OCF colleagues think!
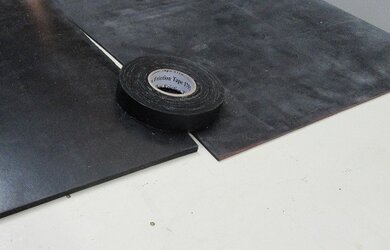
First off, been looking for local source of neoprene.
Found this at local Industrial Warehouse, sell by the foot, 36" wide rolls.
And I had a few things to tidy, specifically this problem
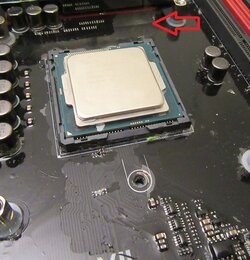
note other affected area, not clearly visible.
I believe I applied a new coat, before the previous one was dry. I was really trying to get a build up around the socket.
So I fixed it up using a Q-tip to apply the product, after spraying enough in a container. I made sure to get product and not just accelerant.
I did three coats. Using gentle heat to set-up the first two layers. I then let the third layer dry overnight. Not too shabby, I would say...
Whoops - cropped out pic of "Q-tip in container".
First Layer
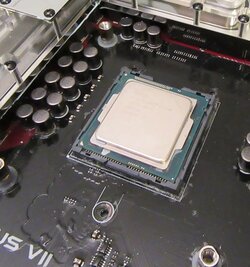
you can really see the layer I built up originally in this pic...
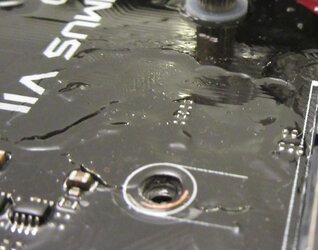
Second Layer
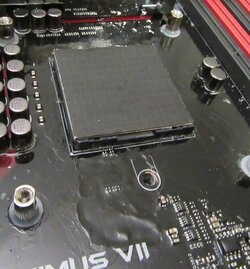
Third Layer
Finished
OK, now what? Well here is the setup of the Inflection point mount I got.
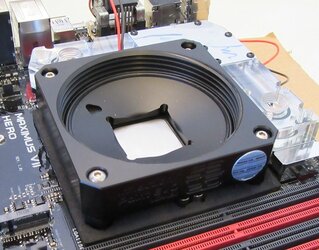
It seals down on the mobo around the socket. And comes off easiliy with four M3 bolts...
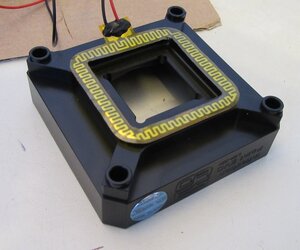
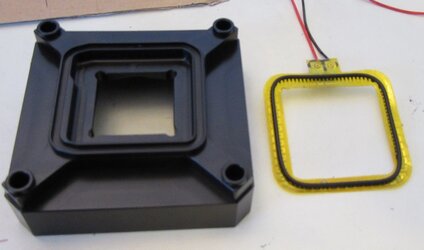
But I don't want to be pigeon holed into using the pot always and need the flexability for going cold with gCards eventually!
In comes the reason for the neoprene. Note the perfectly symmetrical corners, and the perfect fit of these little beauties!!!
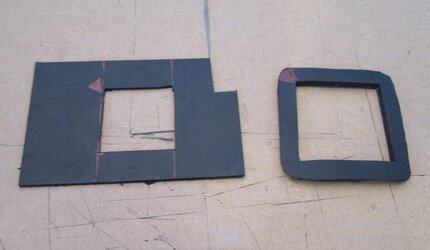
So we do this...
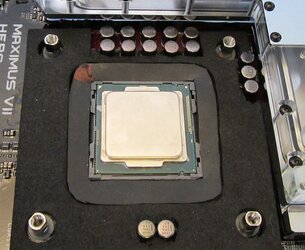
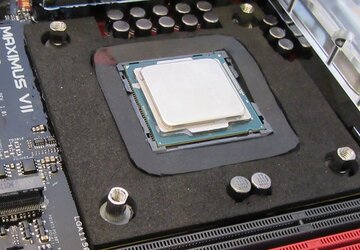
then use some temex tape to tidy things up...
NOTE - pictured is only a mock-up.
QUESTION - How far can I go in on the edges of the CPU with the temex??? Could I go right up to the edge?
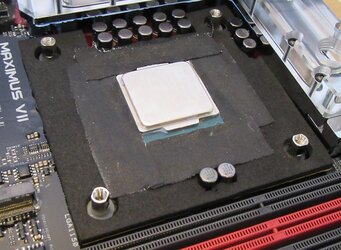
And then we put this rig on...
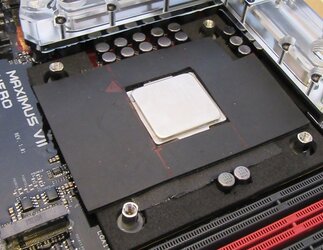
So, I got these parts from my BitsPower CPU block.
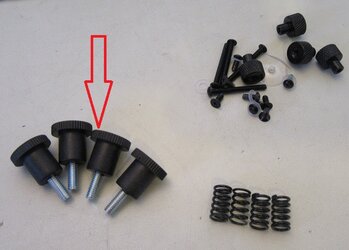
The indicated thumb screws am not sure where they originally came from?? Just happened to be hanging around and they just so happen to be PERFECT for this. So I cut down the springs accordingly and this is it!!!!
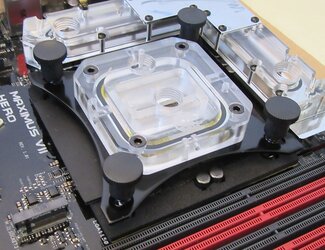
I am about ready to go on this with cold using "Aqua Pumped", My new designation for the bucket set-up using the Lochekey provided fountain pump. pics next post...
I plan to start off just getting the hang of the process before I start throwing DICE around. I hope to get some advice feedback, as I go, from my valued subscribers
My biggest question is starting up? What is the process for firing up a rig for cold? Besides just hitting the button.
And during, when something crashes and you have to re-start to continue, OR something borks and you have to shut down.
Just what are the things to look for, be careful of, etc.
Any insight into this is greatly appreciated...
I should be running Aqua Pumped with ice-water this weekend, and gonna say goodbye to Enthusiast, and get off the top of the Bell Curve. There are just tooo many of them.
So expect some updates soon showing the set-up all rigged to go...
Tot Ziens
Looks awesome Swart! I think that will work great. Heres a few thoughts (you knew i had a few).
Make sure the neoprene is closed cell. I'm not even sure if they make open cell neoprene, but closed cell is essential.
As far as the Temex tape, so long as it doesn't effect the mount of the cooler you'll be good. Just be careful when removing it. Without the cpu latch I'd be leary of damaging pins. If you're careful it won't be an issue.
So booting up you will likely get a variety of opinions. I've heard it's good to boot up before going cold and let the cpu warm up to "set" the TIM. Some people like to get the pot/water cold before booting. I mostly use dice or cold water so I generally add the acetone, fill the pot with dice then boot up. As long as you're not dealing with a cold bug cpu it seems to work fine for me. I don't know if there's a right or wrong way really, just what works for you. My theory is its going to take a few runs to get my best results anyhow so no need to get the pot down to -75c before starting. Once I start getting close to my max then I'll wait to boot and try and get a quick run in and save.
In the event of a borked OS make sure to keep a few "loaded up" SSD's in the ready. Just swap out the booked for a fresh clone.
In the unlikely event of water or ded rig remember to let the pot warm back up before handling. (This is one of the "you'll only do it once" lessons. A -140c pot on bare hands is, uncomfortable. )
I'm not sure what else to say here. Have fun and keep your expectations reasonable for your first few runs. EVERYONE expects more from their first time than they get. Not sure why but it's just the nature of the beast. You get better the more you do it.
Tots
Last edited:
- Joined
- Apr 3, 2015
- Location
- Planet Earth
- Thread Starter
- #96
Make sure the neoprene is closed cell. I'm not even sure if they make open cell neoprene, but closed cell is essential.
This is the stuff used for roofing/constructionTotally closed cell and very dense. Much denser than some "sheets" I have got at hobby store, etc.
As far as the Temex tape, so long as it doesn't effect the mount of the cooler you'll be good. Just be careful when removing it. Without the cpu latch I'd be leary of damaging pins. If you're careful it won't be an issue.
Yep, for sureI have seen/read a few posts about that. In this case, re-using the inflection point mount eliminates the ability to easily remove/mount the CPU bracket

So booting up you will likely get a variety of opinions. I've heard it's good to boot up before going cold and let the cpu warm up to "set" the TIM. Some people like to get the pot/water cold before booting. I mostly use dice or cold water so I generally add the acetone, fill the pot with dice then boot up. As long as you're not dealing with a cold bug cpu it seems to work fine for me. I don't know if there's a right or wrong way really, just what works for you. My theory is its going to take a few runs to get my best results anyhow so no need to get the pot down to -75c before starting. Once I start getting close to my max then I'll wait to boot and try and get a quick run in and save.
In the event of a borked OS make sure to keep a few "loaded up" SSD's in the ready. Just swap out the booked for a fresh clone.
In the unlikely event of water or ded rig remember to let the pot warm back up before handling. (This is one of the "you'll only do it once" lessons. A -140c pot on bare hands is, uncomfortable. )
Thanks for that heads-up!!!!
I'm not sure what else to say here. Have fun and keep your expectations reasonable for your first few runs. EVERYONE expects more from their first time than they get. Not sure why but it's just the nature of the beast. You get better the more you do it. Tots
So just a quick update here....
I was gonna get to asking about the acetone, how much to use?
AND you don't need to use any acetone if doing DICE in a bucket? Or do you?
As far as expectations, B. you know The SwartHack!!!
I don't have any!!!! Gave up being disappointed a long-long time ago
Bwah haa..err...Hardy..err...har...
So quick explain...
Jacking in the rig to The Bianch PSU and cooling!!! Cleaned block, had some residual soapage, so running this entire setup as a cleaning cycle.
Will re-charge the system with the Maximus board hooked in and power up on ambient water. Then get my OS config and SSDs sorted out...
You can't say this isn't extremely Neat-O-Ramma, and very multi-functional, I must say so myself...
Re-did the tape job...
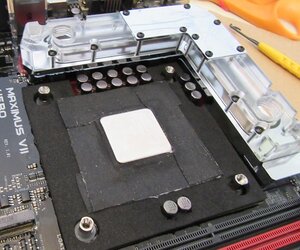
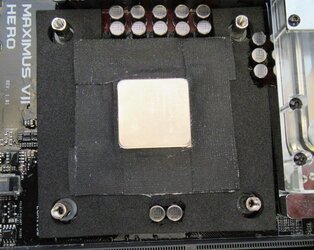
Have both pumps running, jacked into the Predator PWM module
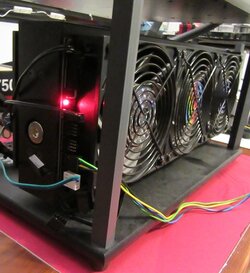
Blood Rigs!!! Sharing the goods. Its cranking in this picture.
Love the transparent block, can really see what is going on
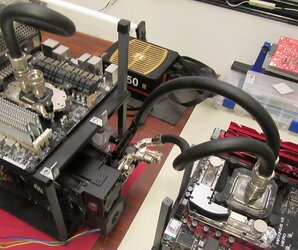
Next "All Jacked Up!!!" ready to go ambient for configurations
Hasta Entonces...
- Joined
- Apr 3, 2015
- Location
- Planet Earth
- Thread Starter
- #97
Shutting It Down
Well it happened, and I am completely devastated!!!! Shattered actually and quite numb. After all the hours, after being soo careful I farcked up my socket. I had actually backed off the plan for no CPU bracket, illustrated previously, because I was concerned about it, and was re-installing the CPU bracket when it happened. It was like a slap in the face, and I am not really sure I can deal with it for a number of reasons...
The first being the literally hundreds of hours I had into this board. The second that I was not taking any pictures or planning to post an update on what I was doing. I actually didn't care about an doing an update, for like the first time!!! I knew this was an alarm bell, but failed to head the warning. Why didn't I care, well at first reflection of The SwartHack, he felt like he wasn't getting the recognition for all his awesome posts and the time and work it takes. Well this made me feel quite guilty and ashamed! As this was not the reason he started doing what he does. He did it because he loved the process and he loved sharing what he learned along the way, as well as what he did wrong. He could have cared less what people thought or did in response, or how they perceived his "antics"?!?! He always attempts to present his work without the "Look at What I can DO" attitude, that permeates the InterWeb. He also strives to share his personality with the community, and provide some level of flavor and humor to an otherwise pretty stuffy environment. Suffice it to say, reading about overclocking and what people are doing can be REALLY BORING!!!
I really wish I would have taken the time to finish a project I was planning. I was going to take the video from last years LN2 fest and dub it up. It hilarious to watch raw as nobody knows what to say, and therefore don't say anything. I had all kinds of voices and stuff ready, ahhh. It could have been awesome!!! Just never had the time and thought some would not really appreciate the humor I was planning...
Who is SwartHack? Where did he come from? Why did he permeate into existence. Why is he so polarizing? Well, I can't say he really knows and neither do I. All I know is he is going away. For just awhile, or maybe indefinitely. In the meantime I will continue to work on my projects with a little less zeal and in privacy and Bench what I can as a team member.
From SwartHack and myself - Cheers!
Eric
This saddens me to read Swart. I do understand the need to walk away sometimes. All I can suggest is that you not take lack or response to your posts personally as many here just like to read and not reply.
I can also say your absence will be missed, even if just by me.
Tots zien my friend.
I can also say your absence will be missed, even if just by me.
Tots zien my friend.
Similar threads
- Replies
- 2
- Views
- 299
