- Joined
- Dec 19, 2012
This has been updated, scrool to the bottom of this post! It's before the last couple of images
Being a bencher and having install ISOs on a flash drive is a must IMO. The problem I was having is that drives are so large these days and ISOs never fill them so the rest of the drive is wasted. I always thought having more than one on it would be more efficient but didn't think it was possible. Until I downloaded some tools to make a USB XP install for the new Z170 intel chipset. Those tools would allow you to put XP and XP64 on the same drive. Now the procedure was a bit more complicated because of driver issues and requiring a ramdisk set up for install but that gave me the idea for what I'm about to explain. My first attempt wasn't completely successful so I had to start again but the second time seems to be the charm.
First thing you'll want to do is gather everything you need in a convenient place. Make sure the ISOs you are about to use have been tested already for functionality and then download a couple of things from the internet.
First one is RMPrepUSB http://www.rmprepusb.com/documents/release-2-0.
I used the last known stable version from that page. Unzip and install the software.
Next you'll want to download the easy2boot files. http://www.easy2boot.com/download/
These files are what makes the drive functional after preparation. You'll want the one labelled E2B+DPMS. This one contains all the drivers you'll need for a windows XP install. Just leave it for now after the download and we'll come back to it after we prep the USB drive.
So find yourself a suitable USB drive of sufficient size. Just remember this drive will be completely erased and formatted so make sure there's nothing of value on it. I went as far as formatting mine in NTFS. The software uses FAT32 but I wanted it to completely format file structure and all when it did it's job. I also used 16Gb since I'm planning to have a few ISOs on it.
Once you have RMPrepUSB installed and your USB drive plugged in it should look like this.
Check that the drive is removable, WinPEv2, FAT32 and Boot as HDD are selected then hit the Prepare drive button bottom left of the GUI.
Once that is finished running hit the install grub4dos button and you'll be greeted with a popup. Select yes/ok and let this run. When finished run grub4dos a second time and this time select no. This will install grub4dos to the MBR and main partition. If it asks about overwrite just say yes.

Next step is to expand the easy2boot files into the root of the usb. I just used 7zip and selected the USB for extraction point. If it creates a folder cut all the files out and paste them to the root of the USB. say yest to all when asked about overwrite. Also delete the folder that 7zip made.

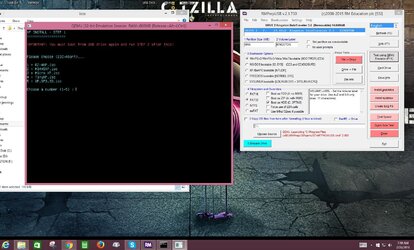
At this point it's a good idea to test the USB. RMPrep has it's own emulator located on the right side of the GUI. Select Test using QEMU if the drive is working correctly you should see this screen when it finishes booting. I opened the utilities folder and ran memtest for a second just to see. Then shut down the trial.

OK just hang in there people we're almost done. It just gets easier now. From here on it's as easy as dropping an ISO in the appropriate folder and running a command from RMPrepUSB after each one. On the USB open the ISO folder and you should see this list of folders which contains the different Windows versions. Copy your ISO into the appropriate windows folder. When the copy is finished go to the RMPrep GUI, click on the Drive header along the top (refer to pic 1) and you'll get a drop down menu. From here select Make all files on this drive contiguous. On my second attempt I did this after each ISO I copied. I don't know if it's necessary but I wasn't taking any chances. Then I ran the emulator again to see if they were appearing on the drive. You can actually test the install as well if you like. Here's a couple more screen shots. The commands are fairly simple and straight forward. Just a couple more notes here. As you can see there are two parts to the XP install. After the first reboot go back into the OS menu and select boot option 2 for XP to have it complete. Also the system will always boot back to the USB unless you change the boot order. It won't interfere with the installation on start another. Simply press F9 to reboot and force you boot from HDD/SSD and the install will continue.

UPDATE
The fellas at Easy to Boot have made this process much easier, download their executable from here http://www.easy2boot.com/download/
When it's been run it'll open a GUI just select Make EasytoBoot (E2B)
It'll format your flashdrive and install all necessary files. Just as before drag the .ISOs into the appropriate folder on the new E2B drive the in the root folder double click on make the files contigious. Easy as pie.
Being a bencher and having install ISOs on a flash drive is a must IMO. The problem I was having is that drives are so large these days and ISOs never fill them so the rest of the drive is wasted. I always thought having more than one on it would be more efficient but didn't think it was possible. Until I downloaded some tools to make a USB XP install for the new Z170 intel chipset. Those tools would allow you to put XP and XP64 on the same drive. Now the procedure was a bit more complicated because of driver issues and requiring a ramdisk set up for install but that gave me the idea for what I'm about to explain. My first attempt wasn't completely successful so I had to start again but the second time seems to be the charm.
First thing you'll want to do is gather everything you need in a convenient place. Make sure the ISOs you are about to use have been tested already for functionality and then download a couple of things from the internet.
First one is RMPrepUSB http://www.rmprepusb.com/documents/release-2-0.
I used the last known stable version from that page. Unzip and install the software.
Next you'll want to download the easy2boot files. http://www.easy2boot.com/download/
These files are what makes the drive functional after preparation. You'll want the one labelled E2B+DPMS. This one contains all the drivers you'll need for a windows XP install. Just leave it for now after the download and we'll come back to it after we prep the USB drive.
So find yourself a suitable USB drive of sufficient size. Just remember this drive will be completely erased and formatted so make sure there's nothing of value on it. I went as far as formatting mine in NTFS. The software uses FAT32 but I wanted it to completely format file structure and all when it did it's job. I also used 16Gb since I'm planning to have a few ISOs on it.
Once you have RMPrepUSB installed and your USB drive plugged in it should look like this.
Check that the drive is removable, WinPEv2, FAT32 and Boot as HDD are selected then hit the Prepare drive button bottom left of the GUI.
Once that is finished running hit the install grub4dos button and you'll be greeted with a popup. Select yes/ok and let this run. When finished run grub4dos a second time and this time select no. This will install grub4dos to the MBR and main partition. If it asks about overwrite just say yes.

Next step is to expand the easy2boot files into the root of the usb. I just used 7zip and selected the USB for extraction point. If it creates a folder cut all the files out and paste them to the root of the USB. say yest to all when asked about overwrite. Also delete the folder that 7zip made.

At this point it's a good idea to test the USB. RMPrep has it's own emulator located on the right side of the GUI. Select Test using QEMU if the drive is working correctly you should see this screen when it finishes booting. I opened the utilities folder and ran memtest for a second just to see. Then shut down the trial.

OK just hang in there people we're almost done. It just gets easier now. From here on it's as easy as dropping an ISO in the appropriate folder and running a command from RMPrepUSB after each one. On the USB open the ISO folder and you should see this list of folders which contains the different Windows versions. Copy your ISO into the appropriate windows folder. When the copy is finished go to the RMPrep GUI, click on the Drive header along the top (refer to pic 1) and you'll get a drop down menu. From here select Make all files on this drive contiguous. On my second attempt I did this after each ISO I copied. I don't know if it's necessary but I wasn't taking any chances. Then I ran the emulator again to see if they were appearing on the drive. You can actually test the install as well if you like. Here's a couple more screen shots. The commands are fairly simple and straight forward. Just a couple more notes here. As you can see there are two parts to the XP install. After the first reboot go back into the OS menu and select boot option 2 for XP to have it complete. Also the system will always boot back to the USB unless you change the boot order. It won't interfere with the installation on start another. Simply press F9 to reboot and force you boot from HDD/SSD and the install will continue.

UPDATE
The fellas at Easy to Boot have made this process much easier, download their executable from here http://www.easy2boot.com/download/
When it's been run it'll open a GUI just select Make EasytoBoot (E2B)
It'll format your flashdrive and install all necessary files. Just as before drag the .ISOs into the appropriate folder on the new E2B drive the in the root folder double click on make the files contigious. Easy as pie.
Attachments


Last edited:
")
