- Joined
- Sep 2, 2016
Hi guys,
So this is my first build and this forum contains some good stuff so I decided to join! (ps: from belgium so I hope my English is fine enough )
)
I will be posting all my work on the forum aswell!
(Added links so you can quickly see the hardware)
END RESULT:

All pictures of the build and shopping list will be added bellow, starting from Update1
I have 3 questions (Sorry they got quite long):
1) Will my complete build fit + is it all compatible?
2) Is my water loop alright from a efficiency point fo view (is my intake and exhaust good, is the loop in the right order, were do I place the drain valve in my loop (RES2 right?) and will it look decent if I place it like this?
3) Are there any generel remarks or things I have to look out for (Should I buy shrouds? how many Stop Fittings will I need?)
I would be gratefull for answers to any of the questions
I will now post all the details from what I decided on (up to now)
First, my core build
Motherboard : ASUS Z170-A
GPU : MSI GeForce® GTX 1080 SEA HAWK EK X 8GB
CPU : INTEL Core i5 6600K 3.5-3.9GHZ 6MB 4 Core 4 Threads
Power Supply : Corsair RM750x
Memory : Kingston HyperX Fury Black 16GB DDR4-2666 Kit HX426C15FBK2/16
SSD M.2 slot : Samsung 950 Pro 256GB M.2
CASE : Phanteks Enthoo Pro M Acrylic Window Edition Antraciet
Now my water cooling stuff (OUTDATED, the correct stuff will be added with UPDATE2): [note: this would also work, it's good stuff but i preferred to get everything from ekwb, just because it would all fit that much more perfect and it looks grait, price was a bit lower aswell]
CPU Block : Koolance CPU-390I Water Block, Acrylic Top - Intel Processor
GPU Block : Included with my GPU
Reservoir 1 : Bitspower Water Tank Z-Multi 250
Reservoir 2 : Bitspower Water Tank Z-Multi 100 (just for looks)
2x Dual Radiators : EK-CoolStream PE 240 (Dual)
Pump : Swiftech MCP50X Extreme pressure Pump
PETG Tube : Bitspower None Chamfer PETG Link Tube OD12MM-Length 1000MM
Fitting : EK-HDC Fitting 12mm G1/4 - Nickel
Angled Adapter : EK-AF Angled 90° G1/4 Nickel and/or EK-CSQ Adapter 45° G1/4 Nickel
Water : Mayhems X1 Blood Red Coolant 1Ltr
I alreay have 2 x 140mm fans with the case and Already bought 4 x Corsair AF120 led 120mm fans for the radiators
That was the hardware, I'm also sleeving but I'll leave that out until the actual build, this is allot already
My loop

And here I tried to make a sketch on how I would make my loop in semi 3D (2 pics)


Note: My reservoirs have different sizes then the those in this picture
Is this achievable with no bending skills? Any other remarks on this?
Please be as hard on me as you can, I wanne do this right!
Thanks anyhow for all the assist!
Cheers
v
From here on I'll try to add shopping lists:
CASE : Phanteks Enthoo Pro M Acrylic Window Edition Antraciet

How cool is it that the actually hidden the accessory box inside a hdd bracket xD
GPU : MSI GeForce® GTX 1080 SEA HAWK EK X 8GB

Also I bought sleeves, coolant, fan rubber to silence them, led bars, leds, wire combs, etc..
For more details on numbers and such look bellow:

I also added stuff to actually do the water cooling bending and cutting, it's also on the list. Here's the contents of the box:

UPDATE 2: More hardware arrived
Shopping list:

Picture time!

The Corsair power supply comes with a bag for the power supply made out of some kind of fabric, the cables also get a more robust bag. The quallity of the packaging is amazing :O

I can start sleeving now!
SLEEVING: The beginning of the end?
So guys, I wanted to start sleeving.. It took me 30minutes to get my first pin out of my PCI-E cable. Just keep doing it, it goes allot faster after that. I use stables for it because the tool I got for it was to big....

JEEJ! I got it.. Happy for a moment, then I tried to remove the 1 square connector.. That thing doesn't move at all.. and then I ran into this:

Whaa daa faa... How am I going to sleeve this..
I started to take a look at my other cables and I seee this massive tumor on my ATX cable.. Is it a ferrite magnet or another capacitor or ...

I don't have a clue on how I should continue. Any tips on this?
So here's my first try on sleeving shrinkless.


This is how I masked the capacitors.. But I'm not sure that I will keep it this way. It looks fine but I think I will just leave them out for my final build.


UPDATE 3: Water cooling arrived!
Shopping list:
Here are some pics:


So the pump turned out to be a very big thing xD I hope I can make it all fit :s
I will start to build tomorrow, no more updates until I finish
So far I ordered from HighFlow.nl for the small stuff, the case is from MindFactory.de and the gpu from hardwarecamp24.de The watercooling stuff came from ekwb directly.
UPDATE 4: Almost done!!
So this was hard! I got everythign and try to assemble it. It didn't seem to fit whatever I tried.. The pump was just to big. My first sketch was trash.. I tried this but it also didn't work.

Sexy radiator is sexy

After a full 4 hours of fitting I went to sleep, figured I'd had to leave something out.. But overnight I thought of something, the next morning I made it like this:

It still had a few problems like the drain valve kept falling down deu to the 90° angle adapters, so I had to make soemthing to hold it:

I made it from 1 of the panels I got from the back of my case.. Didn't need it anyway
Ow this reminds me, don't try to unscrew the fittings with our hand, they are very sharp.. This build really costed me blood, sweat and mantears
You can undo the screws with the end of the back panel you remove for putting in your GPU. So I made an unscrewer from the leftovers of my drain valve pillar
So I continued and I made all the small straight connections. Also I added my cables so I knew were everything went. I got cable combs on my GPU cables, but the 24pin comb broke.. So I tried lacing that cable, turned out pretty well, but this aint the best picture, will add a second one. (Note: the 8pin GPU cable comb didn't fit at all!! I tried everything to make it fit. I end up using a part of the broken 24pin comb...)

Lacing:

Aight! Final part of the build. I tested my cables on my old PC just to be sure. Now only bending remains!
This took me several tries but I ordered enough tubes, still have some left


It's not all perfect, but hey, it's my first try
I also added all the lights. Can't test them atm, but I will make a jumper for my atx soon. I should be filling her up tomorrow, Wish me luck
Some pics of me desk while building


EDIT: I made a jumper to test the leds not connected to my motherboard
Result:

UPDATE 5: The end of building but software is a pain!
Nooooooooooooooooooooooooooooooo!

The bottom of this res was broken.. what a pain.. drained the loop, switched the bottoms of my 2 res and added a deeper going part into the broken res bottom, you can see it on the pictures, this solved my issue, no more leaks. Only problem is, I had to remake the biggest tube, the lenght wasn't good anymore..
But again filling:

This is a nice shot


I should take some more picture in the dark with the glass off, then you really see it all. Will add some later on!
Right now I have an issue.. The GPU isn't working as intended.. It shows me my screen in 800x600 resolution, which is normal without drivers.. But from the moment I instal my drivers.. My screen goes black, stating no signal detected.. My onboard graphics work fine, working on them now.
I tried several things.
My next step will be installing windows 8.1 or 7 to see if it works
The problem is, I can't just pull out my GPU.. I'd have to drain my loop and gone's a weeks of work
Also, in my bios the gpu keeps working, it's not until windows should be loading that it stops working..
Cables and monitors are tested on my other rig.
Dammit xD I wanna play on my new pc xD
Hope anybody knows a solution
So the card was broken, got a new one, plug and play
(Only the plugging took some time xD)
I added some extra led tubes to make the reservoir pop some more.
View attachment 184097
View attachment 184098
Also a small video:
Yeah sorry I failed with the video xD
Cheers!
So this is my first build and this forum contains some good stuff so I decided to join! (ps: from belgium so I hope my English is fine enough
)I will be posting all my work on the forum aswell!
(Added links so you can quickly see the hardware)
END RESULT:

All pictures of the build and shopping list will be added bellow, starting from Update1
I have 3 questions (Sorry they got quite long):
1) Will my complete build fit + is it all compatible?
2) Is my water loop alright from a efficiency point fo view (is my intake and exhaust good, is the loop in the right order, were do I place the drain valve in my loop (RES2 right?) and will it look decent if I place it like this?
3) Are there any generel remarks or things I have to look out for (Should I buy shrouds? how many Stop Fittings will I need?)
I would be gratefull for answers to any of the questions
I will now post all the details from what I decided on (up to now)
First, my core build
Motherboard : ASUS Z170-A
GPU : MSI GeForce® GTX 1080 SEA HAWK EK X 8GB
CPU : INTEL Core i5 6600K 3.5-3.9GHZ 6MB 4 Core 4 Threads
Power Supply : Corsair RM750x
Memory : Kingston HyperX Fury Black 16GB DDR4-2666 Kit HX426C15FBK2/16
SSD M.2 slot : Samsung 950 Pro 256GB M.2
CASE : Phanteks Enthoo Pro M Acrylic Window Edition Antraciet
Now my water cooling stuff (OUTDATED, the correct stuff will be added with UPDATE2): [note: this would also work, it's good stuff but i preferred to get everything from ekwb, just because it would all fit that much more perfect and it looks grait, price was a bit lower aswell]
CPU Block : Koolance CPU-390I Water Block, Acrylic Top - Intel Processor
GPU Block : Included with my GPU
Reservoir 1 : Bitspower Water Tank Z-Multi 250
Reservoir 2 : Bitspower Water Tank Z-Multi 100 (just for looks)
2x Dual Radiators : EK-CoolStream PE 240 (Dual)
Pump : Swiftech MCP50X Extreme pressure Pump
PETG Tube : Bitspower None Chamfer PETG Link Tube OD12MM-Length 1000MM
Fitting : EK-HDC Fitting 12mm G1/4 - Nickel
Angled Adapter : EK-AF Angled 90° G1/4 Nickel and/or EK-CSQ Adapter 45° G1/4 Nickel
Water : Mayhems X1 Blood Red Coolant 1Ltr
I alreay have 2 x 140mm fans with the case and Already bought 4 x Corsair AF120 led 120mm fans for the radiators
That was the hardware, I'm also sleeving but I'll leave that out until the actual build, this is allot already
My loop

And here I tried to make a sketch on how I would make my loop in semi 3D (2 pics)


Note: My reservoirs have different sizes then the those in this picture
Is this achievable with no bending skills? Any other remarks on this?
Please be as hard on me as you can, I wanne do this right!
Thanks anyhow for all the assist!
Cheers
v
From here on I'll try to add shopping lists:
CASE : Phanteks Enthoo Pro M Acrylic Window Edition Antraciet

How cool is it that the actually hidden the accessory box inside a hdd bracket xD
GPU : MSI GeForce® GTX 1080 SEA HAWK EK X 8GB

Also I bought sleeves, coolant, fan rubber to silence them, led bars, leds, wire combs, etc..
For more details on numbers and such look bellow:

I also added stuff to actually do the water cooling bending and cutting, it's also on the list. Here's the contents of the box:

UPDATE 2: More hardware arrived
Shopping list:

Picture time!

The Corsair power supply comes with a bag for the power supply made out of some kind of fabric, the cables also get a more robust bag. The quallity of the packaging is amazing :O

I can start sleeving now!
SLEEVING: The beginning of the end?
So guys, I wanted to start sleeving.. It took me 30minutes to get my first pin out of my PCI-E cable. Just keep doing it, it goes allot faster after that. I use stables for it because the tool I got for it was to big....

JEEJ! I got it.. Happy for a moment, then I tried to remove the 1 square connector.. That thing doesn't move at all.. and then I ran into this:

Whaa daa faa... How am I going to sleeve this..
I started to take a look at my other cables and I seee this massive tumor on my ATX cable.. Is it a ferrite magnet or another capacitor or ...

I don't have a clue on how I should continue. Any tips on this?
So here's my first try on sleeving shrinkless.


This is how I masked the capacitors.. But I'm not sure that I will keep it this way. It looks fine but I think I will just leave them out for my final build.


UPDATE 3: Water cooling arrived!
Shopping list:
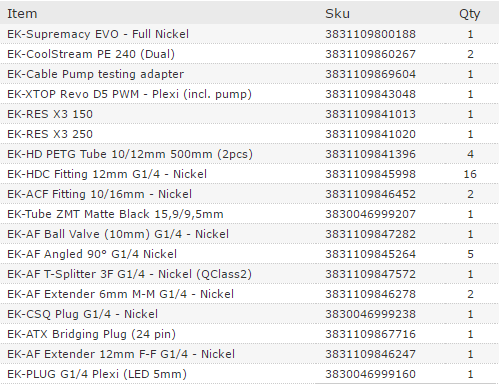
Here are some pics:


So the pump turned out to be a very big thing xD I hope I can make it all fit :s
I will start to build tomorrow, no more updates until I finish
So far I ordered from HighFlow.nl for the small stuff, the case is from MindFactory.de and the gpu from hardwarecamp24.de The watercooling stuff came from ekwb directly.
UPDATE 4: Almost done!!
So this was hard! I got everythign and try to assemble it. It didn't seem to fit whatever I tried.. The pump was just to big. My first sketch was trash.. I tried this but it also didn't work.

Sexy radiator is sexy

After a full 4 hours of fitting I went to sleep, figured I'd had to leave something out.. But overnight I thought of something, the next morning I made it like this:

It still had a few problems like the drain valve kept falling down deu to the 90° angle adapters, so I had to make soemthing to hold it:

I made it from 1 of the panels I got from the back of my case.. Didn't need it anyway
Ow this reminds me, don't try to unscrew the fittings with our hand, they are very sharp.. This build really costed me blood, sweat and mantears
You can undo the screws with the end of the back panel you remove for putting in your GPU. So I made an unscrewer from the leftovers of my drain valve pillar
So I continued and I made all the small straight connections. Also I added my cables so I knew were everything went. I got cable combs on my GPU cables, but the 24pin comb broke.. So I tried lacing that cable, turned out pretty well, but this aint the best picture, will add a second one
. (Note: the 8pin GPU cable comb didn't fit at all!! I tried everything to make it fit. I end up using a part of the broken 24pin comb...)
Lacing:

Aight! Final part of the build. I tested my cables on my old PC just to be sure. Now only bending remains!
This took me several tries but I ordered enough tubes, still have some left


It's not all perfect, but hey, it's my first try
I also added all the lights. Can't test them atm, but I will make a jumper for my atx soon. I should be filling her up tomorrow
, Wish me luck Some pics of me desk while building


EDIT: I made a jumper to test the leds not connected to my motherboard
Result:

UPDATE 5: The end of building but software is a pain!
Nooooooooooooooooooooooooooooooo!

The bottom of this res was broken.. what a pain.. drained the loop, switched the bottoms of my 2 res and added a deeper going part into the broken res bottom, you can see it on the pictures, this solved my issue, no more leaks. Only problem is, I had to remake the biggest tube, the lenght wasn't good anymore..
But again filling:


This is a nice shot


I should take some more picture in the dark with the glass off, then you really see it all. Will add some later on!
Right now I have an issue.. The GPU isn't working as intended.. It shows me my screen in 800x600 resolution, which is normal without drivers.. But from the moment I instal my drivers.. My screen goes black, stating no signal detected.. My onboard graphics work fine, working on them now.
I tried several things.
- Reinstal GPU drivers
- use DDU tool to completely remove de display drivers, reboot, use ccleaner to clean registery, reboot and reinstal drivers
- reinstal windows 10 (I go back to having no drivers and the problem reoccurs)
- set the PCIe in tbios to GEN3
- Set GPU as main driver in bios
- dissable the onboard drivers (needed to reinstal windows because I couldn't get a screen anymore)
- removed a RAM so only 1 is present
- remove all cords from pc and hold power button for aprox 1min
- and several I might have forgotten
My next step will be installing windows 8.1 or 7 to see if it works
The problem is, I can't just pull out my GPU.. I'd have to drain my loop and gone's a weeks of work
Also, in my bios the gpu keeps working, it's not until windows should be loading that it stops working..
Cables and monitors are tested on my other rig.
Dammit xD I wanna play on my new pc xD
Hope anybody knows a solution
So the card was broken, got a new one, plug and play
(Only the plugging took some time xD)
I added some extra led tubes to make the reservoir pop some more.
View attachment 184097
View attachment 184098
Also a small video:
Cheers!
Last edited:
