• Welcome to Overclockers Forums! Join us to reply in threads, receive reduced ads, and to customize your site experience!

Wire Gauge for Corsair RM1000 Modular Cables

Overclockers is supported by our readers. When you click a link to make a purchase, we may earn a commission. Learn More.

iAcorn

New Member
Joined
Sep 26, 2016
Location
Milton Keynes, UK
Hi everyone,

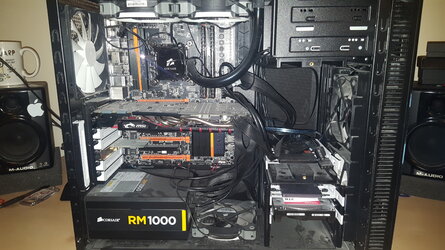
So recently I looked at my horrible attempt at cable management and thought I would try to make it look at least somewhat presentable through the side panel window. I have a pretty decent system if I do say so myself but it just looks so bad... If you don't believe me have a look for yourself:
20160920_205548.jpg

So as I was saying... I want to make it look nice and so I began the journey of cable sleeving... The only problem is I decided to fabricate my own 24 pin, 8 pin and 6 pin connectors but I have no idea what gauge wire I should use. I can see on the wire that came with my PSU that they are using either 16AWG or 18AWG for the 24 pin, but I am not sure. I reached out to corsair's technical help but they said they were, and I quote "unable to disclose this information"... Honestly I am annoyed because the information is printed right there on the darn cable, but it's just too faded for me to read properly.

I know exactly how I should pin it, based on the pin map I created below. Feel free to use it.

Screen Shot 2016-09-25 at 17.09.19.png

But does anyone know what AWG i should be using to fabricate my own connectors for this PSU? 16 or 18?

Thanks for your help!
 
I would go with 16AWG just to be on the safe side. Anything thinner will result in the cable getting warmer as voltage passes through which might melt the coating.
 
Welcome to OC!

Honestly, the first thing I would do is fix the management aspect before changing wires. Knowing how/where they'll be routed will give you a better idea of the lengths needed. All the sleeving in the world won't help that look any better without proper routing. That will also help your cooling. That's an impressive barrier in the airflow path. It would also be a good time to clean things up, dust-wise. My last case looked a lot worse than yours does, though. LOL. Mine looked like a junk drawer in a computer science class.
 
Thanks for the responses. I really appreciate it. I think 50M of automotive wire should do the trick, I plan on buying it from ebay here. Wire is wire right? As long as it carries the current... I'm not an electrician.

Also yes I have completely gutted every single thing! It's basically just a case, Mootherboard and CPU right now. I am moving the H100i radiator to the front and using it as an intake (push config) to get the coolest air I can, so I can OC my 4770K properly. I am debating how to set up my exhaust but I do not want a fan in the bottom of my case. The RM1000 is larger than most so it makes it difficult to have a fan there. Which leaves me with three free spots for other fans. I think having the 2 regular fans exhausting out of the top of the case will be my first test. I am also moving my two SSD's behind the motherboard as I don't need to access them. The HDD will be mounted up top with the optical drive. Leaving the entire front of the case free for airflow. Should make a huge difference!
 
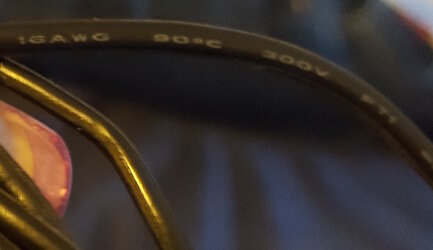
Interesting. This is why I get a little confused as PSU's are not standardised... They really should be. Anyways I think Corsair use 16AWG, looking at this picture from my cables (I got my girlfriend to hold the cable, those arent my nails!):

20160925_170826.jpg

At least it looks like a 16 to me?
 
Checked another PSU....2 different sizes in the harness. 16 and 18 AWG. Both, of which, are rated at the 90c and 300v :shrug:
 
It will depend on the amperage each wire is rated for, which depends on what it feeds and the whims of the engineer. If you want them all the same size, go with 16 awg. When dealing with electricity err on the side of safety. :)

I had a h100i set up to pull air through the rad as an intake for the case. Make sure it's filtered. I cleaned some horrid gunk from between the fins before I passed it on, and temps dropped about 5C average.

Wire is wire-sort of. More strands per wire will make it easier to work with, and I wouldn't use copper coated aluminum for anything but tying my trunk lid closed.
 
Well then I might have to bite the bullet and give up on making my own for now. I would rather not fry anything and I can only find actual pinout voltages for the Corsair 1200I, AX860I, and AX760I. Since these things aren't standard across model lines (let alone manufacturers) this could lead to disaster. Plus aparently my eye for wiring is awful :)

I'm pretty sure a lot of people just use all 16 or 18 gauge for theirs but I have yet to find a case study for my model of PSU. This is very frustrating (but I am still enjoying it).
 
The RM1000, like most units of its capacity, has eight PCIe and two EPS connectors that are all available at the same time. It also features a great number of SATA and peripheral connectors, and all cables are pretty long. While the distance between SATA connectors is good, we would like the peripheral connectors to ideally be 13-15 cm apart from one another. While six of the 24-pin connector's wires are 18AWG, all other are 16AWG. All PCIe connectors, on the other hand, use 16AWG gauges while all others—except for the FDD adapter and, strangely enough, the EPS cables which use 20AWG wires—use the 18AWG standard.

https://www.techpowerup.com/reviews/Corsair/RM1000/2.html
 
That's interesting! I think I may go down the lazy option of buying from Cablemod (or something similar) in the short term. Figuring out where each of those 18AWGs go is not possible with my current cable. Some of the glue was applied over the wire specs so it's impossible to read all the specs of every wire I have. It's unfortunate but in the end I dont mind shelling out and extra £50 from Scan.
 
If you do decide to go with building your own set I would just stick with 16awg wire all around and look for something with a minimum of 16 conductors for better flexibility. I also like to work with slicone rubber coated wires instead of pvc wires as it does not harden up as much over time.
 
Thanks for all your help. I decided to order some pre-sleeved cables. My PC has been in bits for a while now and with work taking up so much time it would take weeks before I have done enough cables to get it back up and running again. Although I will be having a crack at this again sometime in the future on another build. I will keep in mind everything I learned here over the last day or two :) and will post an update when it's all back up and running again.
 
Hello again! I thought I would send my final update on this since I am not sure where else I should post this. The re-build is complete!

So as you saw my mess of wires at the start of the thread, and a pretty ugly colour scheme, I can now say I am 95% done with this build after years of tinkering. I took out a bunch of my stock Corsair RM1000 cables and replaced them with some red sleeved ones from Cablemod. I decided to do this because of several reaons... But mostly because I got impatient and seeing the beautiful Red Beast in pieces for so long was too much.

Whilst everything was in bits I decided to mount my H100i radiator to the front of the case as an intake. Yes I know it means higher ambient temps which will mostly affect my GPU, but it will mean my CPU will get the coolest air possible. More on that later. I also had to remove the other hard drive cage from the bottom of the R4 case and honestly it looks way better like this, and airflow has improved a lot. I tucked my two SSDs behind the motherboard tray with all the cables, and mounted my HDD up with the optical drive.

Next up the motherboard itself! I had a Z87X-OC board... And it was ugly! The red GPU ust didn't fit with the orange accents of the board. Plus it annoyed me anyways. It was overly complex and I was never going to use all the features. So I sold it (surprisingly) and replaced it with an MSI Z97 Gaming 3. I originally got my huge power supply (the RM1000) because later on down the line I was going to run some GPUs in SLI configuration... But it's far too expensive and the cable management... Oh I dread to think how awful it would be in my hands. So I opted for the cheaper, but still good G3 board. Also it's black and red which suits me just fine.

I plonked some new red HyperX Fury RAM in there at 1866MHz because my old vengence RAM was also ugly as sin and of course my fans are a pair of Corsair SP120's (PWM of course). These are plugged directly into the H100i and controlled using Corsair Link. The exhaust fan is a single Fractal fan that came with the case as the back. I tried having two of them on top but one made an awful racket for some reason, and since I have two SP fans pushing air through a radiator, I think one AF fan should do for now. Honestly if I had a little more extra cash I would look at replacing this with a better AF fan with PWM support but it will do for now. I may paint it just for kicks later.

Now onto the pictures!

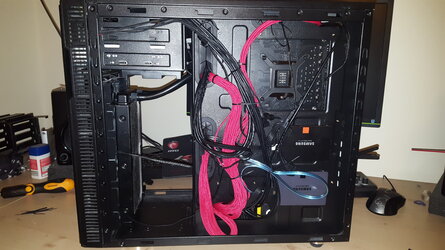
20160928_222633.jpg

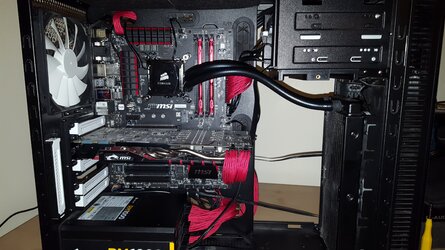
20161003_200612.jpg

My cable management isn't amazing, as there really ins't a lot of room back there when you mount two SSDs to the back of the Motherboard tray. but I am happy with my work. Especially when you compare it to the first picture in this thread.

Now onto the overclocking! I may need to post a new thread specifically for this one, but using the Intel Extreme Tuning Ultility I was able to get a stable OC to 4.3GHz. I can't remember what voltage I used off the top of my head. I think it was 1.17v but I will double check tomorrow. Now I am sure I can push this higher but when I set the clock speed to 4.5GHz with 1.2v the PC just dies... No blue screen or anything... Just POOF to a black screen and then it restarts. if I leave the multiplier alone and change the voltage it also does the same so I really don't know what is going on there. I think I just got really unlucky and got a bad overclocker?

Anyways ithanks for reading! If you have any comments or think I have done something horribly wrong please let me know :)
 
Last edited:
Nice job.

If you want to practice, try sleeving the cables that came with the PSU. That way it doesn't matter if you mess something up. :thup:

For the overclocking, go through the BIOS. Guide is HERE.
 
Last edited:
Very nicely done. Going with the sleeved cables set is the better way. Don't get me wrong, modding your own cables is awesome, I just think just purchasing modded cables takes out the "oops I fugged up" problem ;)
 
Thanks guys. I thought about getting some combs to make it look even better but the more I work in this case (and I've done several builds in both a window and non window R4) the smaller it feels. I just dont think I could have tucked it away properly if it was all straight looking.

I will have a go at OCing in the BIOS at some point. I'd love to push it further than 4.5GHz, but the higher temps would result in more noise, and I think this performs and is nicely quiet at 4.3GHz. it's an 800MHz improvement over stock so I can't complain :) I ust find it odd that every time I have tried to OC (BIOS or not) my PC dies as soon as I save the change. Normally at 1.2v and a reasonable OC of 4.5GHz people can at least boot. So I am not really sure what's happening there.

Anyways I'll continue to work my way through this forum. You've all been super and I'm sure I will have questions later when I try a custom loop water cooled build.
 
Im currently in progress of sleeving my seasonic psu.

The time investment is absolutely massive. I have no idea how people do this as a job, but my god its stressful and takes forever.
 
Back