• Welcome to Overclockers Forums! Join us to reply in threads, receive reduced ads, and to customize your site experience!

PROJECT LOG Blue Fury - Entry for Gigabyte's modding challenge

Overclockers is supported by our readers. When you click a link to make a purchase, we may earn a commission. Learn More.
Update 11/1/2016

Sig_BlueFury.png

Good morning my fellow modders and tech lovers

It’s a new month and with it brings new updates on Blue Fury. First we can start off with a little assembly of the case. I was going to paint the rivets black, but after putting one white one in I decided it looks sharp and fits the theme.

IMG_1391.JPG

Second we turn our attention to the top panel and get the 240 radiator hole/mount cut. Nice and clean cut before cleaning up with files. This will be hidden by the top vent.

IMG_1389.JPG
IMG_1390.JPG

Speaking of the top vent, here’s a shot with the primer base completed. Next is to paint it blue, probably first coat tonight. Came out looking pretty sharp if I say so myself.

IMG_1394.JPG

Then a shot of the GPU shroud painted black and testing the look and fit. I will need to paint those fan blades though somehow. Then we have to get the details painted on.

IMG_1388.JPG
IMG_1392.JPG

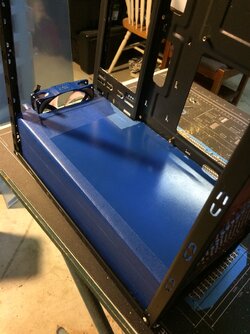
Finally a beginning shot of making the front 360 radiator mount. Hopefully I get all my clearances right.

IMG_1393.JPG


Until next time, Happy Modding!
 
11/3/16 Update

Sig_BlueFury.png

Good morning to all my modders and fans,

Just a quick update this morning to share a bit of progress I was able to get done. Only a week left before I have to get my pictures taken of the final product. I’m unfortunately losing a couple days to get the build done because of a prescheduled trip out of state. I can work on getting everything submitted during that trip since I will have my trusty laptop with me. But let’s get on with the updates.

First we have the mock positioning of the PSU shroud, and I even threw in the motherboard just to show how close the shroud comes to the motherboard. I was super careful with all my measurements so everything should be a nice tight fit. I still have to cut the notch on the front side of the shroud to allow the fans and radiator to fit.

IMG_1407.JPG
IMG_1408.JPG

Speaking of the fans and radiator at the front you can see below is the panel, or scrapped steel if you prefer, that I’m using for my mount. Everything marked out and ready to be cut. I did actually get it cut out this morning and a coat of primer on it, but I forgot to take the pictures.

IMG_1409.JPG

Additionally, last night I finished my 8-pin PCIE extension. Gotta love that heatshrinkless look! I am using my lunchtime from work to try and finish the 8-pin CPU power cable.

IMG_1411.JPG

Other completed updates to the project include marking up the side panel for the window cuts, designing the GPU shroud’s details, and updating the concept inside picture to match my updated parts(except the motherboard).

Blue Fury_Right_New.jpg


Until next time, Happy Modding!
 
11/7/16 Update

Sig_BlueFury.png

Good morning to all my modders and fans,

So I was able to get a bit done over the weekend and wanted to share it with you. Things are coming together and just in time too. Still have some detail work to do still to mask off an paint(tonight’s task) so final assembly can commence. Plan is to take the final pictures on Thursday.

The first thing I took a crack at was trimming the size of the PSU shroud to allow it to fit snugly around the bottom fan. The bottom fan will much be dedicated to providing cool air for the PSU to utilize.

IMG_1424.JPG
IMG_1425.JPG

The top panel, proved slightly interesting. Had to trim down the size a bit to fit better without too much overhang. Remember those two fans that came from the case? They got mounted inside the top exhaust shroud to be hidden from view. One fan is a blue LED fan which should provide a bit of light coming from the top.

IMG_1447.JPG

Then I moved on with the side panels. I was able to get both sides masked off and the window side cut. Then it’s a quick couple layers of primer, let that dry for a day and start laying down thin layers of blue. After I got three coats in, I let it dry. Once it was dry, I began slowly unmasking the sides. As you can see from the close up, ended up with very clean lines. I am definitely happy they came out well.

IMG_1414.JPG
IMG_1416.JPG
IMG_1434.JPG
IMG_1435.JPG
IMG_1436.JPG
IMG_1439.JPG

Second, I shifted my attention to the GPU which took a mask, primer, and coats of white. I think I got pretty good coverage. Got the fans installed back on the GPU also but I’m waiting for the shroud to finish before getting pictures of it.

IMG_1420.JPG
IMG_1422.JPG
IMG_1437.JPG

Next, I took a shot at the front panel. Getting it masked off was a little more difficult given the multiple levels of depth. But low and behold that seemed to come out alright as well.

IMG_1419.JPG
IMG_1443.JPG

Moving forward, I worked on getting the front fan mount in place. I made sure to do several test fits before drilling final holes and getting it mounted properly. Once mounted and secured, I could start getting the fans installed.

IMG_1413.JPG
IMG_1441.JPG
IMG_1447.JPG

Lastly, I did some painting of some detail pieces. Painted the RAM white to contrast the black and blue. The primer’d fan is actually the CPU fan…… I painted it white then realized that it wasn’t staying as I’m throwing in the Corsair H60. Oops. Oh well, my next AMD build will have a nice white CPU fan haha.

IMG_1421.JPG
IMG_1423.JPG

Still left to do is to cut out and paint the white lettering and details. I got the final white pinstripe painted on the GPU shroud this morning. I need to finish mounting the fans and get the H60 in place. Then I can focus on getting all the fans hooked up, motherboard in place. The secret motherboard shroud is the only big piece I have left to do. I just need to do some cleanup trims and paint.

Just a side note, my work provided a couple 3’x5’ sheets of the copolyester that they manufacture to use for my builds. Going to take a small chunk for the window. The rest will get used as I switch gears next week and get back to Project: Military Tech.

IMG_1415.JPG
IMG_1433.JPG

As always, would love to hear what you think!
Until next time, Happy Modding!
 

Attachments

  • IMG_1424.JPG
    IMG_1424.JPG
    1.2 MB · Views: 68
  • IMG_1425.JPG
    IMG_1425.JPG
    1.2 MB · Views: 65
I really like the front panel, side panel and those GPU fans turned out fantastic. I think the top shroud may have turned out a little better with a thicker gauge steel though. Maybe it's just the camera angle but it looks to have a bit of a wave to it.

Over all I'm really digging the theme.
 
I really like the front panel, side panel and those GPU fans turned out fantastic. I think the top shroud may have turned out a little better with a thicker gauge steel though. Maybe it's just the camera angle but it looks to have a bit of a wave to it.

Over all I'm really digging the theme.

Thanks Blaylock. I agree with you on the top shroud for sure. That thin aluminum would've worked better with a thin steel instead. It definitely is a lot more plyable than I'd like. Also, I did make a small error and bend the flaps from the wrong side.... oops. But it still works out :) But the build overall, I'm very pleased with.
 
Update 11/9/16

Sig_BlueFury.png

Good morning my fellow modders and fans,

Just thought I'd share a quick update and preview of things to come. Some good news and bad news. The bad news is I came down with a virus that has put me under the weather but the good news is that means I won't be traveling out of state this weekend and have a few more days to take my time in completing it. Meanwhile, it's lots of fluids and bland foods for me. Anyways back to the build....

I just heard that my 3D printed pieces will be delivered today, so I'll be sanding and painting those awesome pieces this evening. Big thanks to DreamPC4Me for providing the 3D goodness.

I was able to get all my front fans and radiator installed. I do have to address the problem of an upsidedown Corsair logo, but..... that shouldn't be too bad.

IMG_1448.JPG
IMG_1450.JPG

I also got my window cut and mounted. The edge of the side panel cuts weren't as clean as I wanted, going to try to find me some black trim locally to give it more of a professional feel. I think the white rivets really help the build. Black and Blue with just a hint of White. I think it's coming together well.

IMG_1454.JPG
IMG_1455.JPG

Additionally, here's a sneak peek of the GPU with the GIGABYTE mask cut out. I was able to hit it with 4 coats of white between last night and this morning. I should be able to have an update of the GPU shroud and SSD covers tomorrow morning or Friday morning. I can't wait to peel that tape off and see how it turned out!

IMG_1452.JPG

Until next time.. happy modding!
 
Thanks Blaylock! I think you're my most loyal fan lol.

That window material is awesome! The clarity is sharp and the durability for being 1/8" is amazing. I was doing some test cuts/drills this morning before doing the window and I was able to take a cut piece and drill really close to the edge.... while holding it in mid air. Even with all the movement, there wasn't even hairline cracks. I used a jigsaw to cut it and started with my normal fine tooth blade. I then switched to a large tooth blade as suggested by the material technician. It ripped through the material cleanly and smoothly. Overall impressed this morning. I might recut my motherboard shroud into this material.
 
Update 11/10/16

Sig_BlueFury.png


Good afternoon my fellow modders and fans!!

We have more progress completed and even more pictures.

First, I have to thank DreamPC4Me for providing the awesome 3D printed pieces for this build. That front badge would've been a pain to craft without his help. All through the process he was quick to respond and very professional. Currently he is doing a build for the Make A Wish foundation. Show your support for a good cause by subscribing to his YouTube channel or his Twitter feed.
https://m.youtube.com/channel/UCtq5VMDSqQg4YdaJv6ScJYA
https://twitter.com/rbillyguns


Onto our Blue Fury build!

First I unboxed the 3D printed motherload. I enjoyed unwrapping each piece. First the front badge components, then the surprise GIGABYTE in 3 different sizes.

IMG_1457.JPG
IMG_1458.JPG
IMG_1459.JPG
IMG_1460.JPG
IMG_1461.JPG
IMG_1462.JPG


After taking a moment to absorb the awesomeness , then it was time to set up my sanding station. Pieces lined up were 150, 220, and 400. Got everything sanded and hit with a good coat of primer. The cable combs needed a quick once through with the round needle file.

IMG_1467.JPG
IMG_1468.JPG
IMG_1469.JPG
IMG_1470.JPG
IMG_1471.JPG
IMG_1472.JPG


After the sanding and priming, I turned my attention to unmasking the GPU shroud. After confirming that I was satisfied with the end result, I got it installed on the card. Personally, I think it came out well considering the simplicity of design.

IMG_1466.JPG
IMG_1474.JPG
IMG_1475.JPG


Last but not least is the SSD covers, with the H60 radiator installed there will only be room for the one.

IMG_1463.JPG


As always, let me know what you think and offer any suggestions hints you have. Always looking to grow as a modder and builder.

Until next time.... Happy Modding!
 
Update 11/14/16

Sig_BlueFury.png


Good afternoon my fellow modders and DDCM fans!

Well, the build is complete as I promised this weekend. The only thing left to do is to get the final images edited and ready for submission. Hopefully, Gigabyte gets the submission error resolved on time.
But until I get the final pictures ready, here’s some progress shots of the build up until now. Enjoy!

WARNING!! Picture Heavy! Be patient while loading :D

IMG_1477.JPG
IMG_1478.JPG
IMG_1479.JPG
IMG_1481.JPG
IMG_1482.JPG
IMG_1483.JPG
IMG_1484.JPG
IMG_1487.JPG
IMG_1488.JPG
IMG_1489.JPG
IMG_1491.JPG
IMG_1492.JPG
IMG_1493.JPG
IMG_1494.JPG
IMG_1495.JPG
IMG_1496.JPG
IMG_1497.JPG
IMG_1498.JPG
IMG_1499.JPG
IMG_1500.JPG
IMG_1501.JPG
IMG_1502.JPG
IMG_1505.JPG
IMG_1507.JPG
IMG_1509.JPG
IMG_1511.JPG
IMG_1512.JPG
IMG_1513.JPG
IMG_1514.JPG
IMG_1515.JPG
IMG_1517.JPG
 
Looks great! Wish you'd done something with the AIO logo though :)
 
Looks great! Wish you'd done something with the AIO logo though :)

I still plan to haha. My vinyl decal contact fell through last minute and because of the time crunch didn't get anything else done. I do have an idea of making a plate out of the same copolyester as the motherboard shroud and mount it to the AIO with a design. It figures you'd be the one to point that out hehe. I'm surprised you didn't mention the rear fan that I forgot to reinstall :p I was taking the final shots and was saying to myself "Man these pictures are coming out freakin awesome......hey...wait a mi....crap!"
 
Update 11/22/16


Good morning DDCM fans!

So this is the final update, unless I win of course. Below, I have put together a couple Before/After shots of the case. I did this so I have a reminder of exactly how much work I put into the case. I figured since I put them together, I would share with my followers as well.

Additionally, the fan favorite voting has opened up. You can vote for multiple builds once each day. If you liked my build, I ask that you show your support and vote. Thank you.

http://event.gigabyte.us/mod2win/vote/

BeforeAfter1.jpg

BeforeAfter2.jpg
 
That looks really sweet man I voted for you during the competition. Keep it up.

Thanks for the support! I will take what I can get haha, the good thing about the fan favorite pick is the 3 contest winners aren't eligible so i have a 1 in 6 chance to win instead of 1 in 9 lol.

Keep an eye on my military build, I will be starting to push more updates soon.
 
I wish I had the guts to take apart and paint my eLoops. $35 a fan is a lot to screw up.

I really like the theme!

The fans are really simple as it just takes a little pressure to pop the blades out. Then it's just a matter of masking off the motor and paint. I found soda bottle caps fit perfect over the motors(once washed of course).

I'm glad you liked it! Wanna buy it? hehe, I'm actually selling the case and a couple misc fans locally plus offering a hardware swap for $100. Only had a few nibbles so far, no big bites.
 
Back