• Welcome to Overclockers Forums! Join us to reply in threads, receive reduced ads, and to customize your site experience!

TIM testing procedure

Overclockers is supported by our readers. When you click a link to make a purchase, we may earn a commission. Learn More.

Lochekey

Senior Pink Member
Joined
Sep 13, 2015
So I have begun to stockpile a large amount of different TIMS and figured I would try my hand at testing them against each other. Before I go wasting all of my TIM and time I figured I would get peoples input on testing procedures to keep the testing as informative as possible. I will lay out my proposed testing procedure below and I am hoping for some feedback on what is good and what is bad.

I realize that there will be a margin of error based off of my testing procedure and once I have a set procedure I can then determine what that margin of error is and take it into account in my testing.


So testing procedure,


Equipment used

Hardware-
I7-6700K @ 4.7ghz core and 4.4ghz cache running 1.35vcore
Asus MAximus VIII Gene
Corsair Dominator Platinums @ 3600 16-18-18-36 running 1.35v
Radeon X300SE passively cooled running in x4 slot provided by PCH
EVGA 750w G2

Cooling-
EK-Supremacy Evo CPU block with Koolance VL4N QDC
EK D5 pump with EK-XTOP
Swiftech Micro-res
Phobya Supernova 1260 radiator

The motherboard and Ram is cooled with one fan on the front and one fan on the back of the motherboard.


Testing Procedure

Each TIM will be tested under "Low", "Moderate", and "High" pressure. Each pressure will be tested with 3 separate mounts. After each mount the system will be run for 5 hours under the XTU stress test. Core temperatures and Water temperatures will be logged using HWInfo64 at a 1 second interval. Temperature reporting will be done based on the deltaT of the core temp and water temp. A full run graph will be generated using a 30 second running average of the deltaT. An average max temp will be generated from all 3 runs as well as a best max temp, these temperatures will be taken after the "Burn in" period has occurred and will also be based off of a 30 second rolling average. Max variation of core to core temp will also be reported for each run. In the case of an erroneous result(3% out of line with other 2 runs) the run will be dropped and a new mount will be performed.


Each mount will be performed with the TIM being applied in a single "Pea sized" blob placed in the center of the IHS, if time permits I may go back and test manufacturers recommended mounting procedures. Between each mount the IHS and CPU block will be cleaned with Arctic Clean Thermal Material Remover and then 91% Isopropyl alcohol.


That is about what I have for now let me know your thoughts. I would rather have you shoot holes in my testing or theory now then after I go through the time to test all of this material so please do not hold back on the criticism. I am not dead set on my testing procedures and am willing to modify them to best suiut the information the community will benefit from.


Thanks-Lochekey
 
How do you determine Low/Mod/High pressure is the same each time? Does the block have 'stops' for each? Or are we hand cranking and approximating?
Burn in period? Many pastes don't have one.. some (AS5 for example) are a hundred hours. Typically, if there are any changes, its not much.
Pea-sized blobs are huge... "BB/grain of rice" size can cover the IHS of mainstream CPUs well in my experience.

That said, its been covered many times before: http://overclocking.guide/thermal-p...ted-with-air-cooling-and-liquid-nitrogen-ln2/

Its a ton of effort for something that has been thoroughly covered. But I am still interested to see the results.
 
How do you determine Low/Mod/High pressure is the same each time? Does the block have 'stops' for each? Or are we hand cranking and approximating?
The mounting nuts on the cpu cooler take 7 full turns from thread engagement until they bottom out. I have marked each one with were the threads start so I am thinking something like High = 7 turns, Medium = 6 turns, Low = 5 turns

Burn in period? Many pastes don't have one.. some (AS5 for example) are a hundred hours. Typically, if there are any changes, its not much.
I know that full burn in can take a long time and I am not willing to do that much testing:D but some pastes will show a small improvement within the first few hours. Take AS5 for example, it can improve temperature by 4-5 degrees in the first few hours depending on mounting conditions based on Martin's testing here

Pea-sized blobs are huge... "BB/grain of rice" size can cover the IHS of mainstream CPUs well in my experience.
I think that was a poor choice of words on my part, "BB sized" would probably be more accurate on the amount I use.


That said, its been covered many times before: http://overclocking.guide/thermal-p...ted-with-air-cooling-and-liquid-nitrogen-ln2/

Its a ton of effort for something that has been thoroughly covered. But I am still interested to see the results.
I have read that article and it is a good repository of information. I unfortunately do not have the equipment to rival his accuracy in testing procedures. Other than this though there is not a good up to date repository of information to compare against so I was interested to see if his results would be comparable to mine. The other reason I am interested in doing this is talking to some of the guys over at HWBOT it was mentioned that a few of the manufacturers have redone the chemical composition of their existing line of TIMS and I am interested in seeing if this has resulted in a change of performance.
 
ED's observations about how you will determine low, medium and high pressure mounts is one of the same concerns I have and I'm not so sure that kind of data is that much of a concern to most people.

Another concern I have is your plan to use XTU as the stress testing software and the five hour runs. XTU is a good enough stress tester for determining overclock stability but it doesn't produce very high temps. I would think you would want to use something that would drive temps up closer to TJmax so that your deltas will be larger and the differences between TIMs will be easier to see. I would suggest using IBT on the "very high" or "extreme" setting and run it for 5-10 iterations which will not take nearly so much time. IBT drives temps up to their max levels quicker than any stress test I know of. This will make your testing more efficient from a time standpoint. Just allow 10 minutes or so between runs to allow temps to return to baseline.

But I'm with ED as well when he questions the usefulness of this project. There are very small differences in cooling performance from product to product when comparing the name brand TIM choices. And testing of this nature has been many times by many people and there is already a ton of data available.
 
Last edited:
Good point on the XTU vs IBT Trents, I will look at loading that program up instead I may push my OC slightly as well to really push the thermal margin. As to this testing being done before, Yes I agree that this testing has been done before but most of the repositories are out of date. I would also like to be able to test new TIMs as they come out in the future and to do that I need to have a repository of tests to compare them against.
 
IBT will require you to install Netframework 2.0 but it will prompt you automatically. Just a heads up.
 
Noted on the mounting pressure, best you can do. :)

Your link for as5 shows like 1C for burn in.. or to 20 hours...Unless I'm reading wrong on my phone?

It was from late 2015. Otherwise not much has changed. If they changed the makeup and it performs notably better, you'd think they would mention it!

Top to bottom with reasonable tim is 1-2c... it's haRd to be accurate enough to really isolate Tim differences.

Last but not least... you will more than likely need to give more than 10 mins to have your loop and water temps come back down to idle. On an air cooler or small aio that may be ok... but not for a custom loop.

I also suggest you normalize starting temperatures.. meaning everything is based off a set starting ambient temp, say 22C like our reviews, and note your starting and ending ambient temps when testing.

PS - answering within a quote make it brutal to reply to the reply easily. My reply is in order still though. :)
 
If you check the link again with the AS5 and look at the moderate pressure chart you will see there is a drop from 79 to 75ish degrees over the first few hours.

I agree I do not expect to see a large difference in the TIM except for a few outliers on either side. It would be interesting to use this to do a value chart of the TIMS based off of MSRP though.


I am trying to hold my ambient at 22c but am basing my temps on the deltaT between the cores and the water temp to help remove that as a variable. As far as cool down goes, with my oversized rad and fans running 100% my water temp stabilizes very quickly between runs.
 
Ok.. I see it!! You do notice the proper mount and poor mount show almost no difference though...that should tell you it was a function of the mount and not the product. ;)

There was a value comparison done recently with these as well...take a look by googling roundups. :)
EDIT: it's in my link..

I got you now with DeltaT.
 
Last edited:
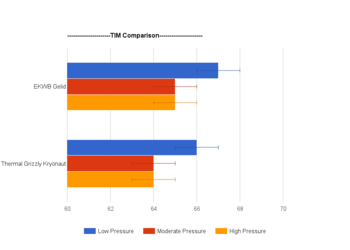
So Now that the holidays are over I have had a chance to complete some more testing and I have some results for Thermal Grizzly Kryonaut and the Gelid paste that came with my EKWB cpu block. I settled on a final testing procedure of 6700k @ 48x core and 44x cache with 1.4 vcore. Mounting pressure is controlled by 2, 4.5, and 7 turns of the waterblock thumbscrews. Testing is done using 10 passes of IBT at "Very High" setting(4gb ram).

I am stating a margin of error of +/- 1 degree. I am basing thios off of the cpu temp being +/- 0.5 degrees due to rounding and an additional +/- 0.5 degrees for rounding of the water sensor. Over multiple runs I have come to trust the repeat-ability of the sensors as I have been able to duplicate my results multiple times.

So here is a preliminary chart of results for the above 2 TIMS, I have more work to do to make this information worthwhile but that will come in time. Please excuse the crappy chart I threw it together quick just for reference.

image (4).png
 
Ehm, Not to be harsh but testing TIMs with high end cooler is not the best idea as it shows less improvement over each TIM than if you would use a mid-end or low-end cooler.
 
Ehm, Not to be harsh but testing TIMs with high end cooler is not the best idea as it shows less improvement over each TIM than if you would use a mid-end or low-end cooler.
??????????

It really doesn't matter. At all, actually. So long as the cooler doesn't change in the testing, it doesn't matter if it's a brick on top... ok, well, a brick is a different story...point is the heatsink doesn't matter here.
 
Ehm, Not to be harsh but testing TIMs with high end cooler is not the best idea as it shows less improvement over each TIM than if you would use a mid-end or low-end cooler.

I do not see how these correlate. Can you explain this differently.
 
I do not see how these correlate. Can you explain this differently.

High end cooler=Less heat
Low end cooler=More heat
This means if TIM#1 conducts the heat effectively 95% and TIM#2 conducts the heat effectively 92% then on the low end cooler it will make more difference than on the high end one.


Say low end cooler gets to 95c with one TIM and 92c with another TIM, And the high end cooler is cooling twice as better than the low end cooler then it will be 48.5c on one TIM and 46 on the other TIM, Less of a gap.
 
I might would recommend using a benchmark maybe that isnt so hard on temps. might get to see more variation in temps between pastes. When using the hottest test I would think that it might push temps rather close. Just a guess on my part though.
But nice work so far. And it is appreciated
 
I might would recommend using a benchmark maybe that isnt so hard on temps. might get to see more variation in temps between pastes. When using the hottest test I would think that it might push temps rather close. Just a guess on my part though.
But nice work so far. And it is appreciated

I discussed this with Trents earlier and my thinking is as follows. Assume TIM "A" is 95% efficient and TIM "B" is 90% efficiency . If we run Benchmark "1" and produce 60 watts of heat TIM "A" will move 57 watts to the heatsink and leave 3 watts behind to cause heat rise, TIM "B" will move 50 watts of heat and leave 6 watts of heat behind. Now assume we run IBT and produce 100 watts of heat. TIM "A" will move 95 watts of heat and leave 5 watts behind where as TIM "B" will move 90 watts of heat and leave 10 watts behind. My supposition is that the 5 watt heat differential from scenario B will cause a larger heat rise than the 3 watt heat differential in scenario A. This larger temperature differential should be easier to read and differentiate at the higher wattage levels then.

High end cooler=Less heat
Low end cooler=More heat
This means if TIM#1 conducts the heat effectively 95% and TIM#2 conducts the heat effectively 92% then on the low end cooler it will make more difference than on the high end one.


Say low end cooler gets to 95c with one TIM and 92c with another TIM, And the high end cooler is cooling twice as better than the low end cooler then it will be 48.5c on one TIM and 46 on the other TIM, Less of a gap.

I could see this effecting things in your example if I tested with the high end cooler at a lower core temp. I am pushing the cores to right around 90c though to open up the temperature variation as much as possible. The temperatures I reported above are the differential temperature between max core temp and water temp. My water temp was sitting at 23c so you can see that the core temp would have ranged from 87-90c. The other advantage of the high end cooler is the adjust-ability and repeat-ability of the mounting system, these allow me to adjust mounting pressure and reliably repeat my mounts for consistent tests.

I will post a new graph with better explanations of the values.
 
Last edited:
High end cooler=Less heat
Low end cooler=More heat
This means if TIM#1 conducts the heat effectively 95% and TIM#2 conducts the heat effectively 92% then on the low end cooler it will make more difference than on the high end one.


Say low end cooler gets to 95c with one TIM and 92c with another TIM, And the high end cooler is cooling twice as better than the low end cooler then it will be 48.5c on one TIM and 46 on the other TIM, Less of a gap.
it doesn't work like that. The goal in this type of testing is to eliminate other variables. So it doesn't matter if it's 90c, or 60c, the variation should be the same if the only variable is the TIM.

Same thing with using a different stress test. The difference won't be more or less, % wise, than what you saw at the higher temp. That delta or % difference is what should be taken away from this testing.
 
Back