- Joined
- Sep 13, 2015
Today we will be delving into a first look at Vostok V1, a newly developed thermal compound coming to the market by Vostok Thermal Compounds. Vostok V1 is intended as a budget-focused compound that will be a direct replacement for old stock thermal interface materials on non-overclocked systems. Vostok will not be a familiar name to most people as it is a new home-grown UK-based startup company that was founded in 2016. V1 is the company's first attempt to break into the thermal compound market and intends to follow up with 2 other compounds. The manufacturer has stated that these future formulas will be targeted towards the Overclocking and Enthusiast markets. More information on the company and their ongoing development can be found on the Facebook page located here(https://www.facebook.com/VostokUK/).
Moving forward we will look at the description and specifications of the V1 TIM as provided by the manufacturer.
“V1 is the first in a series of compounds designed by UK based new start Vostok specifically for CPU and APU. V1 is an Aluminium compound utilizing particles of Aluminium in the 1 Micron range and purpose made as a value product for use with hardware in the lower end of the performance spectrum.
Vostok V1 is a compound you can depend on for all basic home and office system machine builds of 2017”
Currently, the only listed specifications for the V1 compound is the Freezing/Boiling point and they are included below.
Freezing Point: -59°C
Boiling Point: 188.2°C
V1 will be available on the market shortly through the manufacturer's facebook page and will be sold in 8-gram quantities which is equivalent to about 4.4cc of material. In the coming months, the manufacturer is also pursuing sales through Amazon and Ebay.
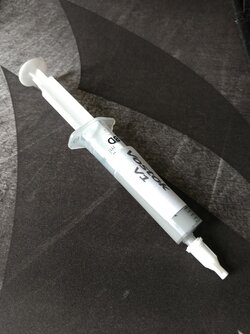
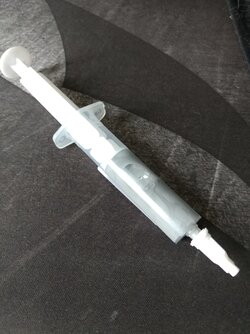
As I received a non-retail version of the product. I can not currently comment on the final product packaging that will be used for a retail product. I will include a few pictures of my sample for reference though.


Testing of any Thermal Compound has an inherent margin of error due to variations in each mount and ambient conditions. To negate this variation in my testing I have set down a specific set of testing guidelines and have applied this across the board in my TIM testing. Even with this, my results will have a stated margin of error of +/- 1°C.
Testing Setup
Hardware-
I7-6700K @ (Stock) 4.2 Ghz core and 4.1 Ghz cache running 1.20 Vcore
(Overclocked) 4.8 Ghz core and 4.4 Ghz cache running 1.4 Vcore
Asus Maximus VIII Gene
2x8 GB Corsair Dominator Platinum @ 3600 16-18-18-36 running 1.35 v
PNY Geforce 8600GT
EVGA 750w G2
Cooling-
EK-Supremacy Evo CPU block with Koolance VL4N QDC
EK D5 pump with EK-XTOP
Swiftech Micro-res
Phobya Supernova 1260 radiator
The motherboard and RAM are cooled with one fan on the front and one fan on the back of the motherboard.
Testing Procedure
Each TIM will be tested under "Low", "Moderate", and "High" pressure. Pressure setting is obtained by adjusting the waterblock thumb screws to 2/4.5/7 turns after thread engagement. Each pressure will be tested with three separate mounts. After each mount, the system will be run for 15 minutes of Intel Burn Test on the “Very High” preset to stabilize the system. The system is then subjected to 10 passes of Intel Burn Test on the “Very High” preset while the core and water temps are logged for comparison using HWInfo64 at 1-second intervals. Core temperatures and Water temperatures will be logged using HWInfo64 at a 1-second interval. Temperature reporting will be done based on the deltaT of the core temp and water temp. These temperatures will be reflective of the peak deltaT temperature of the coolest of the 3 mounts.
Each mount will be performed with the thermal paste being applied in a single line placed in the center of the IHS. Between each mount, the CPU and waterblock will be cleaned with Arcticlean Thermal Material Remover and then 91% Isopropyl alcohol.
Each mount will be subsequently tested once each with the thermal material pre-spread to test for possible improvements. Lastly, the “Burn In” of the compound will be tested by a single mount at “High” pressure. The burn in period will consist of 8 hours of Intel Burn Test on the “Very High” preset broken into sixteen individual 30-minute runs that are separated by a 5-minute cooldown period.
Throughout the testing, the room temperature will be held at 21°C which will result in a water temperature of about 23°C. By reporting peak temperatures based on the DeltaT between the core and water temps, I will attempt to mitigate any variation in the test results due to differences in the ambient temperatures. I also hope to mitigate variation due to relative humidity through the same control scheme. As I do not have a conclusive way to test this assumption I can not verify the effects that variations in relative humidity may have on my results.
Physical Composition and Mounting
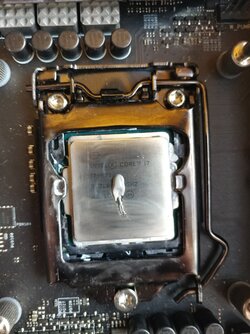
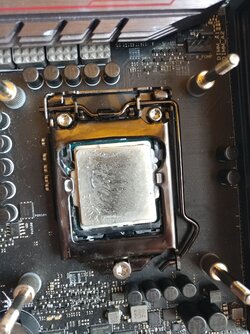
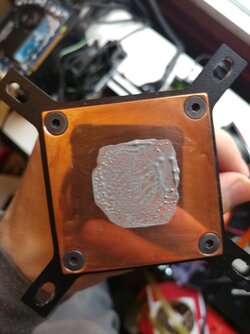
In working with the V1 compound I find that it is easy to get good consistent mounts once you get a feel for working with the paste as it spreads slightly differently from a normal compound. The paste displays a slightly odd elastic property meaning you almost have to cut off the bead when applying it to the CPU otherwise it will try to lift away from the CPU when the syringe is removed. The elasticity also makes trying to pre-spread the compound difficult as it wants to pull back on itself away from the edge of the CPU. Both of these anomalies can be seen in the below picture. With this being said, the elastic nature of the compound actually makes for a consistent mount each time as it will spread predictably every time.


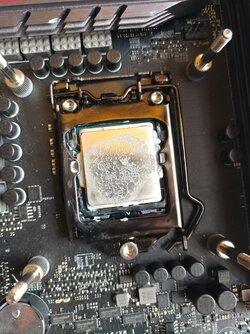
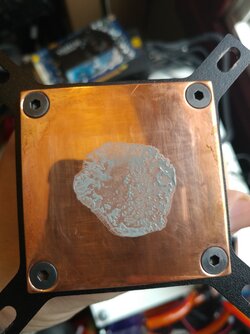
I have included pictures of the compounds spread at each mounting pressure. You will notice the Shiny and slightly “Wet” nature of the material. This appearance remained even after my “Burn-in” test and the compound retained its elastic nature as I could see the beads of material swell as it pulled the residual compound back in on itself.
Low Pressure


Moderate Pressure


High Pressure


Results
So we finally come to the part everyone is waiting for, the results. I have broken the results down into three separate charts. First. let's take a look at our stock results. We find that at our stock settings the V1 compound is performing between 1-2°C behind the more standard pastes such as Arctic Silver 5 and Cooler Master Ice Fusion. There is an exception to this in “Low” pressure mounts versus both the AS5 and the Ice Fusion, neither of these pastes seems to like a “Low” pressure mount. If we looked at a more “Enthusiast” grade product in the Gelid GC-Extreme we find that the V1 is falling behind by 2-4°C. I have included results in this chart for a bare mount without any thermal compound to show the difference that thermal paste will make, please note that I did not include a “Low” pressure mount for this as the temps got too far out of hand.

Moving on to the overclocked results we find the margin between the V1 compound and the competition opening up to 2-3°C. We continue to see the same results from AS5 and Ice Fusion at the “Low” pressure mount so oddly enough we find the V1 coming out on top at this pressure. When going up against the Gelid GC-Extreme we find that the gap is now 5°C. This larger variation is not unexpected as it is showing the V1 compound holding a proportional differential against the Arctic Silver 5 and Gelid GC-Extreme when compared against the stock results.

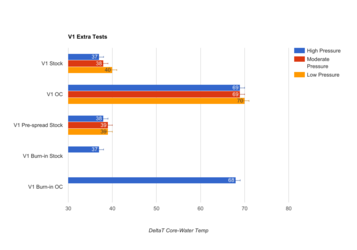
Our last graph has us taking a look at the V1 compound results versus itself when subjected to the material being pre-spread or burned in. Looking at the results for the pre-spread compound we see that there is a slight improvement in the “Low” pressure but a worse result at the”High” and “Moderate” pressure. Evaluating the results of the compound after the burn-in period we see that the results only improve by 1°C at the overclocked settings and show no improvement at the stock. Due to the fact that the difference in temperature for both mounting variations is within my stated margin of error, I will conclude that the gain or loss is significantly irrelevant and therefore an end user should not expect to see any improvement over an initial standard mount.

Conclusions
Based on the time I have been able to spend testing and playing with the V1 compound I find that I have mixed feelings on this product. I admittedly would not normally take this much time looking at a paste that bills itself as “Budget-Oriented” as this is outside my normal realm of interest. The prospect of being able to get in on early product testing as well as the first chance to review a new compound before it came to market drew me into dedicating hours to testing multiple iterations of this product. It is not often we see a new kid on the block when it comes to thermal compounds so it will be interesting to see how this new competitor fares against the established markets.
Starting with some of the positives I have found while working with this compound:
-The V1 compound shows a very reliable and predictable mount.
-The compound displays an adequate temperature profile across all mounting pressures.
-The purported price/quantity ratio will make this compound ideal for shops servicing a large number of low/moderate powered systems.
With the performance of this product lagging slightly behind the established market it will really need to be priced competitively to target the market as a “replacement” instead of an “upgrade” for old thermal compounds. As this product has not currently been listed for retail sale I can not directly comment on whether or not the manufacturer has hit this mark.
The manufacturer has stated that they will have an aggressive pricing scheme though, that will directly target the market spot that Arctic Silver 5 currently occupies.
Moving on to some of the negatives to be aware of while working with the V1:
-Applying the compound requires a slightly different technique as compared to a typical thermal paste and pre-spreading the compound is not worth the trouble.
-Cleaning this compound off of the CPU can take a little more work than I am used to and I find myself going through a lot more swabs to remove all of the residues.
-Usage of this compound should be relegated to non-overclocked systems that are not pushing the bounds of the CPU thermal margin.
Ultimately, working with a budget-oriented product was a new experience for me and made me step back and really ask myself what I expect from a thermal compound. My initial reactions to this product as an enthusiast overclocker were mixed and at the end of the day, I walked away with a bleak outlook. After taking the time to step back and look at this product objectively, I have to say the new kid on the block has hit their mark for producing an entry-level paste as long as they can hit their price target when the product comes to market. Ultimately this product does not jump out of the pack of thermal pastes on the market so I have to give it a big “MEH”.
Moving forward we will look at the description and specifications of the V1 TIM as provided by the manufacturer.
“V1 is the first in a series of compounds designed by UK based new start Vostok specifically for CPU and APU. V1 is an Aluminium compound utilizing particles of Aluminium in the 1 Micron range and purpose made as a value product for use with hardware in the lower end of the performance spectrum.
Vostok V1 is a compound you can depend on for all basic home and office system machine builds of 2017”
Currently, the only listed specifications for the V1 compound is the Freezing/Boiling point and they are included below.
Freezing Point: -59°C
Boiling Point: 188.2°C
V1 will be available on the market shortly through the manufacturer's facebook page and will be sold in 8-gram quantities which is equivalent to about 4.4cc of material. In the coming months, the manufacturer is also pursuing sales through Amazon and Ebay.
As I received a non-retail version of the product. I can not currently comment on the final product packaging that will be used for a retail product. I will include a few pictures of my sample for reference though.
Testing of any Thermal Compound has an inherent margin of error due to variations in each mount and ambient conditions. To negate this variation in my testing I have set down a specific set of testing guidelines and have applied this across the board in my TIM testing. Even with this, my results will have a stated margin of error of +/- 1°C.
Testing Setup
Hardware-
I7-6700K @ (Stock) 4.2 Ghz core and 4.1 Ghz cache running 1.20 Vcore
(Overclocked) 4.8 Ghz core and 4.4 Ghz cache running 1.4 Vcore
Asus Maximus VIII Gene
2x8 GB Corsair Dominator Platinum @ 3600 16-18-18-36 running 1.35 v
PNY Geforce 8600GT
EVGA 750w G2
Cooling-
EK-Supremacy Evo CPU block with Koolance VL4N QDC
EK D5 pump with EK-XTOP
Swiftech Micro-res
Phobya Supernova 1260 radiator
The motherboard and RAM are cooled with one fan on the front and one fan on the back of the motherboard.
Testing Procedure
Each TIM will be tested under "Low", "Moderate", and "High" pressure. Pressure setting is obtained by adjusting the waterblock thumb screws to 2/4.5/7 turns after thread engagement. Each pressure will be tested with three separate mounts. After each mount, the system will be run for 15 minutes of Intel Burn Test on the “Very High” preset to stabilize the system. The system is then subjected to 10 passes of Intel Burn Test on the “Very High” preset while the core and water temps are logged for comparison using HWInfo64 at 1-second intervals. Core temperatures and Water temperatures will be logged using HWInfo64 at a 1-second interval. Temperature reporting will be done based on the deltaT of the core temp and water temp. These temperatures will be reflective of the peak deltaT temperature of the coolest of the 3 mounts.
Each mount will be performed with the thermal paste being applied in a single line placed in the center of the IHS. Between each mount, the CPU and waterblock will be cleaned with Arcticlean Thermal Material Remover and then 91% Isopropyl alcohol.
Each mount will be subsequently tested once each with the thermal material pre-spread to test for possible improvements. Lastly, the “Burn In” of the compound will be tested by a single mount at “High” pressure. The burn in period will consist of 8 hours of Intel Burn Test on the “Very High” preset broken into sixteen individual 30-minute runs that are separated by a 5-minute cooldown period.
Throughout the testing, the room temperature will be held at 21°C which will result in a water temperature of about 23°C. By reporting peak temperatures based on the DeltaT between the core and water temps, I will attempt to mitigate any variation in the test results due to differences in the ambient temperatures. I also hope to mitigate variation due to relative humidity through the same control scheme. As I do not have a conclusive way to test this assumption I can not verify the effects that variations in relative humidity may have on my results.
Physical Composition and Mounting
In working with the V1 compound I find that it is easy to get good consistent mounts once you get a feel for working with the paste as it spreads slightly differently from a normal compound. The paste displays a slightly odd elastic property meaning you almost have to cut off the bead when applying it to the CPU otherwise it will try to lift away from the CPU when the syringe is removed. The elasticity also makes trying to pre-spread the compound difficult as it wants to pull back on itself away from the edge of the CPU. Both of these anomalies can be seen in the below picture. With this being said, the elastic nature of the compound actually makes for a consistent mount each time as it will spread predictably every time.
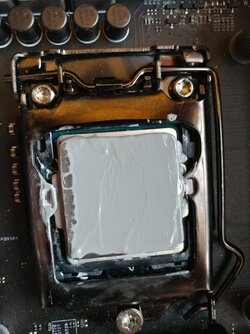
I have included pictures of the compounds spread at each mounting pressure. You will notice the Shiny and slightly “Wet” nature of the material. This appearance remained even after my “Burn-in” test and the compound retained its elastic nature as I could see the beads of material swell as it pulled the residual compound back in on itself.
Low Pressure
Moderate Pressure
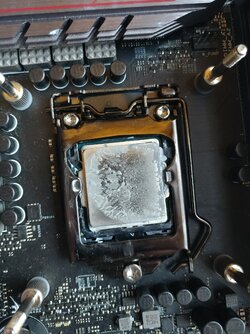
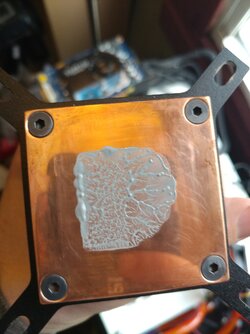
High Pressure
Results
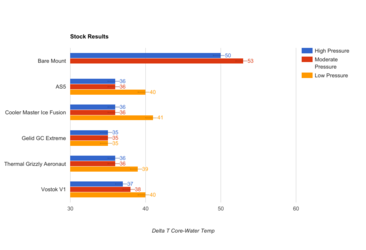
So we finally come to the part everyone is waiting for, the results. I have broken the results down into three separate charts. First. let's take a look at our stock results. We find that at our stock settings the V1 compound is performing between 1-2°C behind the more standard pastes such as Arctic Silver 5 and Cooler Master Ice Fusion. There is an exception to this in “Low” pressure mounts versus both the AS5 and the Ice Fusion, neither of these pastes seems to like a “Low” pressure mount. If we looked at a more “Enthusiast” grade product in the Gelid GC-Extreme we find that the V1 is falling behind by 2-4°C. I have included results in this chart for a bare mount without any thermal compound to show the difference that thermal paste will make, please note that I did not include a “Low” pressure mount for this as the temps got too far out of hand.
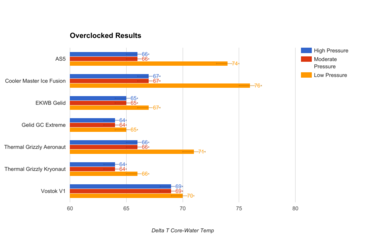
Moving on to the overclocked results we find the margin between the V1 compound and the competition opening up to 2-3°C. We continue to see the same results from AS5 and Ice Fusion at the “Low” pressure mount so oddly enough we find the V1 coming out on top at this pressure. When going up against the Gelid GC-Extreme we find that the gap is now 5°C. This larger variation is not unexpected as it is showing the V1 compound holding a proportional differential against the Arctic Silver 5 and Gelid GC-Extreme when compared against the stock results.
Our last graph has us taking a look at the V1 compound results versus itself when subjected to the material being pre-spread or burned in. Looking at the results for the pre-spread compound we see that there is a slight improvement in the “Low” pressure but a worse result at the”High” and “Moderate” pressure. Evaluating the results of the compound after the burn-in period we see that the results only improve by 1°C at the overclocked settings and show no improvement at the stock. Due to the fact that the difference in temperature for both mounting variations is within my stated margin of error, I will conclude that the gain or loss is significantly irrelevant and therefore an end user should not expect to see any improvement over an initial standard mount.
Conclusions
Based on the time I have been able to spend testing and playing with the V1 compound I find that I have mixed feelings on this product. I admittedly would not normally take this much time looking at a paste that bills itself as “Budget-Oriented” as this is outside my normal realm of interest. The prospect of being able to get in on early product testing as well as the first chance to review a new compound before it came to market drew me into dedicating hours to testing multiple iterations of this product. It is not often we see a new kid on the block when it comes to thermal compounds so it will be interesting to see how this new competitor fares against the established markets.
Starting with some of the positives I have found while working with this compound:
-The V1 compound shows a very reliable and predictable mount.
-The compound displays an adequate temperature profile across all mounting pressures.
-The purported price/quantity ratio will make this compound ideal for shops servicing a large number of low/moderate powered systems.
With the performance of this product lagging slightly behind the established market it will really need to be priced competitively to target the market as a “replacement” instead of an “upgrade” for old thermal compounds. As this product has not currently been listed for retail sale I can not directly comment on whether or not the manufacturer has hit this mark.
The manufacturer has stated that they will have an aggressive pricing scheme though, that will directly target the market spot that Arctic Silver 5 currently occupies.
Moving on to some of the negatives to be aware of while working with the V1:
-Applying the compound requires a slightly different technique as compared to a typical thermal paste and pre-spreading the compound is not worth the trouble.
-Cleaning this compound off of the CPU can take a little more work than I am used to and I find myself going through a lot more swabs to remove all of the residues.
-Usage of this compound should be relegated to non-overclocked systems that are not pushing the bounds of the CPU thermal margin.
Ultimately, working with a budget-oriented product was a new experience for me and made me step back and really ask myself what I expect from a thermal compound. My initial reactions to this product as an enthusiast overclocker were mixed and at the end of the day, I walked away with a bleak outlook. After taking the time to step back and look at this product objectively, I have to say the new kid on the block has hit their mark for producing an entry-level paste as long as they can hit their price target when the product comes to market. Ultimately this product does not jump out of the pack of thermal pastes on the market so I have to give it a big “MEH”.
Last edited:
