• Welcome to Overclockers Forums! Join us to reply in threads, receive reduced ads, and to customize your site experience!

Raystorm Experimental Modification

Overclockers is supported by our readers. When you click a link to make a purchase, we may earn a commission. Learn More.

Silver Surfer

Member
Joined
May 8, 2011
Location
Darlington, South Carolina
With my chilled water cooling setup I use regular CPU water blocks to actually cool the CPU itself I had an idea to experiment with modifying an already great performing water block to see if it's cooling could be improved and since it has turned out to be successful I am going to share it here with you all.

When I first got my EK Supremacy EVO water block it was to replace my XSPC Raystorm water block because reviews confirmed and reported the EVO was a better cooling performer which turned out to be true, with only swapping out the water block in my overclocked machine changing no settings, the EVO beat the Raystorm by 5c hottest core under Intel Burn Test load stress testing.

I basically shelved the Raystorm as a backup block for over a year then decided it was time to pull the EVO and clean it, but before I did that I opened the Raystorm up to make sure it was clean and ready to be mounted, when I did that and visually inspected the fin grid cut into the copper base plate I was not pleased with what I saw, the fin grids were flat on top and super tight together and 2 of the fin grids were actually touching each other.

So I broke out a razor blade to separate the grids touching each other and got them aligned, took a magnifying glass and after further inspection decided I had to do more than that, IMO, the cooling fins could possibly be improved to allow better coolant flow through them.

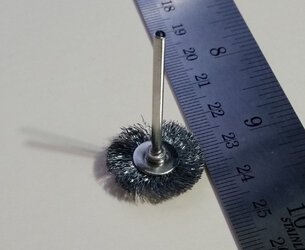
I broke out my Dremel tool and used a stainless steel rotary brush and very carefully, and painstakingly, spent close to an hour using it to widen the gaps of the fin grids, the stainless steel brush worked absolutely fantastic, it actually rounded the flat tops of the fins, widened the channels, and cut the copper slots a little deeper.

The stainless steel is much harder than the copper and it will cut the copper so you have to be careful and stay away from the flat copper edge where the rubber gasket runs, don't get scratches over there or the block will leak when reassembled.

Which I learned the hard way!, and ended up using a very thin layer of marine grade silicon to seal the water block, but if you don't scratch the gasket seal area you won't have a problem with any leaks.

Once the modified water block was confirmed as being leak free I swapped it out with the EK EVO and instantly under the exact same testing even with a fresh application of Artic Silver 5, (which we all know AS5 requires cure in time), the Raystorm actually beat the EVOs cooling performance by 2c.

So the fin grid modifications in the copper base plate have actually improved the Raystorms thermal cooling performance enough to surpass the EVOs cooling performance.

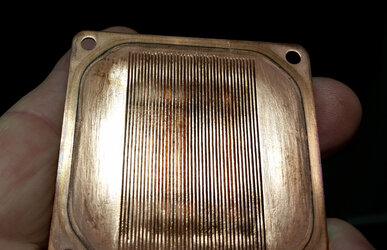
I truly wish I had taken before and after pictures but I did not even know this was going to work at all, my thoughts were simply if I mess it up well I am not using it right now anyway, I do however have a picture of the copper base plate after the modification was completed, and the stainless steel brush I used in the Dremel tool.

ATTACH]


ATTACH]


After seeing the picture the cell phone took which is pretty amazing for a cell phone I will probably take it back apart and further modify the fins as they still look rough in the picture that's why I wish I had taken a before picture as they were almost closed up they were so tight.

Anyway FYI, the Raystorms cooling performance did improve from the modification to the fin grids.

Ryan
 

Attachments

  • Base Plate.jpg
    Base Plate.jpg
    1.5 MB · Views: 703
  • Brush.jpg
    Brush.jpg
    370.7 KB · Views: 634
Just gotta be careful not to overdo it. The thinner the material the more resistance it will have and make the heat transfer lower. However, I can see where widening the channels a bit could improve performance, and certainly reduce flow restrictions.
 
I see areas in the picture I would like to refine further but I keep hearing my dad in the back of my mind, he used to always tell me I couldn't leave well enough alone, and he was 100% correct.

I did what I did holding the copper base plate in one hand and the Dremel tool in the other, and it was very hard to maintain control that way.

The stainless steel brush looks kinda ratty and missing some bristles, it had been previously used before this endeavor, I will get a new stainless steel brush and mount the plate in a stationary holder of some type and go at it again.

When I do that, I will have the posted picture in this thread as the before picture.

As the old saying goes, "Curiosity killed the Cat", hopefully my curiosity doesn't kill the water block or it's performance.

Keeping in mind this was an experiment from the beginning that I had no idea was even going to work in the first place.
 
Last edited:
Picked up some new rotary stainless steel brushes yesterday of various types some are the same and some have finer bristles also have some brass brushes for polishing up the grooves afterwards.

Still need to snag a small vice or some type of clamping mechanism to hold the base plate secure and then I'll go at it again.

Will keep this thread updated with the progress, whether good or bad.
 
Spent close to 2 hours swapping out brushes and cutting until finally finding just the right stainless steel brush to work with , Oh and FYI don't even touch it with a brass brush, it took 30 minutes to correct the damage it caused. The picture below is at the point I though I was done?
Thought I was finished with the brushing.jpg

I then took 1,000 grit wet/dry paper and lapped the copper contact face the plastic ring seal seats against. Once that was completed the tops of the lands were almost all back flat again, :sly: so I had to break out the brush and fine tune it further.
After Lapping.jpg

You can see towards each end the actual flat top of the lands and they are way past the edge of the jet plate so I left them like you see them, as the coolant is already porting out before that point anyway. The base is now ready to reinstall the water block acetal top.
Ready To Reinstall.jpg

After I run some more tests I'll post the temperature numbers but that will be at least a week as I have something else I have to take care of.

Overall however it has been a successful experiment.

I will say though you'd best have some good modding skills under your belt to undertake this modification, plenty of patience, and protective glasses as the stainless steel brush will occasionally throw a bristle, did I mention plenty of patience!

You absolutely cannot rush this without screwing up the copper base. Ryan
 
Whay happened with the brass brush?

The brass brush was stiffer bristle and a thicker mass and stayed on top of the lands and did not drop into the grooves like the stainless steel brush would, it also burnished the copper which took about 30 minutes to undo with the stainless steel brushes.

I'm sorry but I don't have any pictures of what the brass brush did, once I saw what it was doing, it instantly turned into an "Oh Crap" moment, and I was only concerned with undoing what had happened.
 
These modifications did improve the cooling performance of the Raystorm from it's completely stock factory shipped state. (under chilled water cooling)

However do not expect miracles here as the differences I measured, was run with a below ambient chilled water cooling setup.

Which I have total control over my coolant temperature to run my comparative tests at a 9.0c coolant temperature.

What I am saying is the chilled water cooling is not dependent on fluctuations of ambient room temperature to run the tests at a certain temperature level, and you may or may not see significant temperature changes with traditional radiator water cooling that is totally dependent on ambient room temperature.

At this time I do not have a 100% ambient radiator cooling setup to test the Raystorm modifications under, to see what the changes may have produced.

I do know the temperature differences are worth it to me especially running a 5.2ghz overclock on my 7700K of which 2c ~ 3c load temperature makes a difference, but since some cannot even reach a 5.2ghz stable overclock at all with ambient water cooling.

So 2c ~ 3c may not mean a thing to you simply because you are forced into running a lower overclock that the ambient cooling will actually support.

So as far as modifying your water block, you do it at your own expense as you can irreversibly screw it up! (I almost did that myself, Twice!)

Still have more temperature tests to run, the wife and I just got back home from Florida and one place we went was the Kennedy Space Center, my most awesome excitement was from seeing the actual Space Shuttle Atlantis suspended in flight like it was in space for all to see, it was a fantastic sight to see!

Ryan
 
Last edited:
These temperature tests were run under the same clock circumstances and the only inconsistencies were they were run using IBT (Intel burn Test) and IBT does not run a constant load but fluctuates it's load application, granted P95 would have given me more solid numbers but the data I already had on the EK Supremacy EVO had been run on IBT so I averaged the core results of 3 standard 10 run tests.

The tests were run on an Intel i7-7700K with Hyper Threading Enabled at 5.2ghz at 1.405v using LLC5 (Load Line Calibration Level 5).

EK Supremacy EVO (Not Modified)--Core 0 = 75.3c, Core 1 = 70.3c, Core 2 = 78.0c, Core 3 = 65.0c, Total Core Average = 72.1c.
XSPC Raystorm (Modified)-----------Core 0 = 73.3c, Core 1 = 70.0c, Core 2 = 74.6c, Core 3 = 67.6c, Total core Average = 71.3c.

These are not earth shaking numbers but IMO at least the modifications brought the Raystorm into a competitive temperature range of the EK Supremacy EVO, even though the Raystorm won on some of the cores it did not on core 3, but my pleasure is on core 2 as so far it has consistently been the hottest core on my CPU.

I hope if this was not helpful to others it was at least entertaining! Ryan
 
Your testing supports mine.
I find that on my chiller, a more 'open' block indeed nets you slightly better temps across pretty much all platforms. ;)
 
For some crazy reason I thought this was the end of my experimentation and had the bright idea of lapping the base of the EK Supremacy EVO, but it ended in No Joy!

The EVO lapped out just fine, perfectly flat, but when mounted to the 7700K when in the past the EVO could hold the temperatures at 5.2ghz rock solid stable, it no longer could.

Which was a little baffling as no mounting pressure changes affected it what so ever, but it all made sense when I pulled the EVO and inspected the thermal footprint of the TIM.

There was no actual contact in the center of the heat spreader anymore as the 7700Ks heat spreader is concaved inward and the lapped EVO was simply riding the outer edges of the heat spreader.

This is the part in Apollo 13 when Toms Hanks says, "Houston we have a problem!"

I did some research regarding the heat spreader and found the most information came from those that delidded their CPUs with most going back with either Cool Laboratory Liquid Metal Pro or Ultra under the heat sink and some other type of TIM above.

One guy used the Liquid Metal on both and was extremely upset at his end result temperatures, well to me it made perfect sense as the liquid metal TIM is very thin and could not fill the gap of the top of the heat spreader.

I still have not delidded my CPU but I lapped the 7700Ks heat spreader this morning and remounted the XSPC Raystorm which was already on the machine and it's performance after lapping the heat spreader improved, Core 0 = 69c, Core 1 = 64c, Core 2 = 69.6c, Core 3 = 59c, Total Core Average = 65.4c.

Lapping the heat spreader has made a difference, the progress pictures below are to show you just how much it took to get the 7700Ks heat spreader lapped flat.

You can clearly see why there is not good thermal contact in the middle area, every stage of completion pictured below was done with 800grit wet/dry 3M automotive sandpaper.

After the last picture shown when the center was finally level I switched to 1,000 grit and continued further.

A.jpg B.jpg C.jpg D.jpg E.jpg F.jpg G.jpg

Obviously from this point I will mount the lapped EK Supremacy EVO and test it, and also lap the Raystorm flat as well and retest it.
 
the 7700Ks heat spreader is concaved inward


This is actually why the Supremacy EVO base is convex but you prob already know that anyway.

In fact the jet plate affects the amount of 'bowing' that occurs.

Lapping both is definitely required (IHS + Block).

Here is an old pic of my block with jetplate #01 installed...

EVO Block.JPG


Kudos on modifying your Raystorm block...:thup:

What you will find though is the highest gains are achieved from delidding the cpu and replacing the TIM (I used Coolabaratory Liquid Ultra only between the IHS and die).

When I did my 6700K I achieved a drop in temps of around 15C which is quite typical for those cpus.
 
Last edited:
What you will find though is the highest gains are achieved from delidding the cpu and replacing the TIM (I used Coolabaratory Liquid Ultra only between the IHS and die).

When I did my 6700K I achieved a drop in temps of around 15C which is quite typical for those cpus.

Thanks for the Kudos!

A 15c drop is very tempting to me with my chilled water cooling I could possibly reach 5.3ghz on the 7700K, but if and when I do delid the 7700K?

I will be shooting for a bare die mounting of the water block, but that would require pulling the motherboard and fine tuning the block fit on the CPU with spacers to keep the block from applying too much pressure on the die, which means I am definitely considering it!

The warranty on the CPU is already gone anyway from lapping it, so the only thing I really have to loose is the time it will take to get it all done, which doesn't sound like a big deal but at this time of the year it is for me.

I had in the past bought a bare die mounting kit for the 3770K but never used it, and it won't work for the 7700K as it will hold the water block too high, but it at least gives me a starting point in discovering a perfect alignment and pressure on the 7700K bare die.
 
How can the jetplane affect the bow?
I cannot answer that for sure, but I do know that the O ring makes a difference on the bow.
Many manufacturers offer different O rings for more or less bow on their blocks.
 
How can the jetplane affect the bow?

The EK Supremacy EVO blocks use jetplates which have different thickness. There are two variables on the jetplates... The size of the slot (only affects water flow) and their respective thickness which affects the amount of bowing on the base.

Some others as mentioned rely on o-ring thickness.
 
The EK Supremacy EVO blocks use jetplates which have different thickness. There are two variables on the jetplates... The size of the slot (only affects water flow) and their respective thickness which affects the amount of bowing on the base.

Some others as mentioned rely on o-ring thickness.

Obviously the insert has an effect as well when it comes to bowing the water block base as either jet plate will interchange with either insert but if each suggested pairing obviously produces EKs end desired results.

The EK Supremacy EVO installation manual does not go into any detail as to the actual purpose of the insert and jet plate controlling the bow of the copper base just one configuration for AMD and one configuration for Intel.

And though after researching it makes perfect sense now, since I am considering delidding my 7700K I'm glad I lapped the base of the EVO because you would not want any base bowing with a flat die contact.

Thank You Flat-6 for this enlightenment, it does however open new doors of concern as to when EK released a direct die mounting with the i7-3770K there was not additional instructions relating to the bowing of the base of the block and it's possible negative affect on the raw die surface of the 3770K.

That may explain why some actually cracked their dies, which reading about that possibly happening kept me in fear of actually doing it and using the mount.

That said, I now feel more confident in my delid simply because I know 100% for sure the base of the water block is now flat and will mate flat to the CPU die.

Thanks again Flat-6! Ryan

- - - Updated - - -

Hmmm. Interesting.

ROFL When you wrote jetplane, I thought we were fixing to get a great joke from you! :)
 
Back