• Welcome to Overclockers Forums! Join us to reply in threads, receive reduced ads, and to customize your site experience!

ps3 liquid cooling

Overclockers is supported by our readers. When you click a link to make a purchase, we may earn a commission. Learn More.
Sorry for the lack of response. Yesterday was rather busy.


I would recommend either 3/8 ID 5/8 OD or, if you're not going to have tight bends and bend radius isn't an issue, 3/8 ID 1/2 OD tubing. The thinner wall of the latter will make it kink easier if there are bends but it should shave off a bit of space to fit better.


The main concern I think would be the fittings. I'd recommend going barb fittings instead of compression fittings (they tend to take less room) and see if you can find any low profile ones. From a quick search, I found that the blocks you're planning to use are shorter than my block and the Koolance 90 deg rotary barbs are also shorter than the Bitspower ones I used.


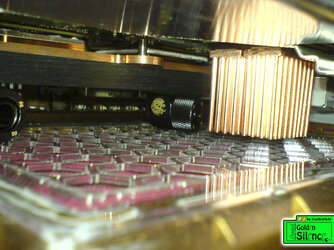
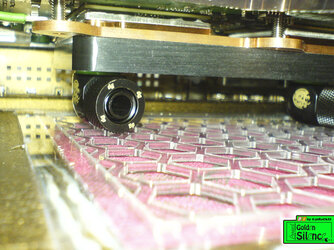
I wish I'd taken a measurement of the space available between the bare chips and the bottom of the PS3's case, but if you can find that info anywhere online or take it yourself that would greatly help your planning.


You may be able to shave a few more mm if you went with 1/4 ID 3/8 OD, but I honestly don't know if the restriction would negatively affect your loop. Hopefully somebody else can chime in.
 
well here is how my fan layout would look i would also add some 30mm fans blowing in the front vent


also a upgraded power supply will work and help with heat because they are more efficient let me explain the launch date ps3 60gb with the model number CECHA like mine had a ZSSR5391A power supply installed the should i say "newer ps3 60gb " with the model number of CECHC had the newer power APS-226 supply which ran much cooler because of its more efficient ac to dc conversion and will work because it creates the same amount of power as the original but is just more efficient and the only thing new about the new ps3 60gb CECHC is it had a new power supply it still guzzled the same amount of power it just ran cooler

so if i install the power supply off the new ps3 60gb the APS-226 which i can get off ebay it should run much cooler in my liqued cooled setup


the only power supply's that failed do to increased demand was the ones that where fully encased in in black plastic any silver metal power supply will work

but i was wrong about the black plastic APS-231 working :facepalm: they will not keep up with the power demand and the way i see it the only good upgrade is the APS-226


skorpien also the reason your ps3 power supply probably runs so hot is because it is the ZSSR5391A if you install the APS-226 it would run much cooler and generate the same amount of power


i had to lazy rewrite this becose my computer crashed :bang head:bang head:bang head:bang head
 

Attachments

  • 067.JPG
    067.JPG
    1.1 MB · Views: 222
  • 069.JPG
    069.JPG
    1.2 MB · Views: 221
  • 072.JPG
    072.JPG
    1.5 MB · Views: 221
Last edited:
Teaser pics! :p I can't wait to see this complete :) and thank you for that information about the power supply. I may just have to upgrade my PSU. I'm still not comfortable with how hot it gets even though my fan mod seems to keep it cool enough to not shut down on me mid-game. Really appreciate it. I'll have to check some eBay listings now...
 
well I sent you a psn friend request now all you have to do is accept it :D


I also managed to get the aps 226 for 15 dollars on eBay with free shipping you can probably get one yourself for 20 or 30 or maybe even cheaper
 
This might be an upgrade for when I teardown and flush. OCF is so not good for my wallet...


Oh, I apologize beforehand but I may not be online much. It's getting more and more difficult finding time to game, though I did accept the friend request :)
 
do you happen to know any quiet 30mm fans as I will probably need some


if you want you can also make the power supply external it will help with temp


would you recommend changing the thermal pads as I know it would help with temp if you use some higher quality ones but what thickness would you use if you would replace them


also what coolant did you use in your ps3


also when you do that teardown take some photos :)


well if you can ever play I will try and chime in

by the way the aps 226 power supply can use 120 or 220 volt if you have the right power outlet plug ;)
 
Awesome, thanks for the clarification. I saw on a site that it accepted 220-240 volts and was worried it was the European version, but it probably has a voltage switch (either manual or automatic).


The best pads I've come across are Sekisui Thermal Tape. I bought mine off eBay to hold the ramsinks I used. I can't remember the thickness, though from a quick search it seems 1.5mm thick pads would work with the aluminum shield. I cut my shield to accommodate the ramsinks so you may need thicker? If you're taking it apart, try and measure a thermal pad to know for sure.


As for the fans, I can't say I know of any, sorry. If the power supply you're using for the fans has both a 12V and 5V rail, you can see if doing a 7V mod for the fans will work. Some fans require a full 12V to start up so it may not depending on the fan. If that's the case you could try a fan controller that has a 12V boost at start up. To be honest, most sites I order from don't even carry 30mm fans so I can't really recommend any brands I normally use.


For the coolant I used distilled plus biocide (it's the mantra of the WC forum) and used blue tubing to add color. If you're going to use dyes, you'll probably need to perform a flush and teardown more regularly as the dye could fall out of suspension and clog things.


I'll definitely post pics of the teardown and upgrade and let you know :) Can't promise it'll be soon though :p Hopefully in the early new year...
 
what is the point of a liquid cooling teardown anyways it doesn't get dirty


also what did you use to cut the holes in the back for the tubing


here is a link to a compression chart about power supply's


http://community.us.playstation.com/t5/PlayStation-General/Is-the-PS3-dual-voltage/m-p/41240451

as you can see the ZSSR539IA power supply sucks in 100V-240V 6.0Amps and outputs 12V 32Amps

the aps226 sucks in 100V-240V 4.8-2.0 Amps and outputs 12V 32 Amps


as you can see that the output voltage is the same on the newer power supply thanks to the aps226 more efficient ac to dc conversion

and since the aps226 draws less energy and produces the same amount of output power it also produces less heat

as you can see the ZSSR539IA sucks 100v 6.0 amps and only outputs 12v 32 amps which is the same as the aps226 the extra power that is not used in the ZSSR539IA is output as heat since the aps226 draws 4.8-2.0 Amps that's less power then the ZSSR539IA and outputs the same amount of power it generates less heat because it draws less power
 
Last edited:
The teardown is to make sure everything is clean on the inside. Even with using biocide and distilled, there may still be buildup (plasticizer from tubing, possible biological growth, etc.). It's a preventative measure more than anything. Some have reported running their loops for years without issue, but if one does crop up it's better to catch it early.

I just used wire cutters to cut the plastic grate at the back and fed my tubing through really. Not exactly an elegant solution but it works. Most of the builds I had seen fed the tubes through a hole cut around the block in the bottom of the PS3 but I opted to use 90 deg fittings and bring them through the back.

Makes sense that chart, thanks. It would definitely reduce the risk of mine overheating. Someone else had suggested making the power supply external but I wouldn't know how to make it look half decent sitting out of the case. That and I'd be worried about the safety of it all.
 
exactly how did you mount the water block to the back of the motherboard just some nuts :confused:


honestly there is quit a bit of space without the stock heatsink so I think if I use a rotary 90 degree fitting with compression and small tubing I should be able to get away with it


this one guy did a pretty good job


he used the same waterblocks I was going to use

looks like as long as I use small tubing I should be able to squeeze everything through

and a really don't like using barbs as I am afraid thy will leak any seconded :shock:
 
Last edited:
It's really a matter of preference. Both are safe if used correctly. I was merely recommending the barbs for saving space, but it seems like compressions will fit too :)


My block came with mounting screws, so I just used the two hold down plates (brackets?) that held the stock heatsink on and used the screws that came with the waterblock to hold it down.


I think you'd be able to use the screws that come with your blocks, and if they're too narrow, just use a washer or something.


Here are the hold down plates I'm talking about:
http://d3nevzfk7ii3be.cloudfront.net/igi/OLZ2uFatyPysN2qo


Edit: The screws are circled in red, but what they're screwed into is what I mean.
 
it seems that the person who made golden silence barley got the compression to fit the bottom without modification I am assuming that the Plexiglas he added was the same length away as the stock bottom plastic so barley fitting is good enough for me now I just have to find out what size tubing he used

although since the block I was going to use is shorter I should have more space on the bottom


I also saw you skorpien on ps3hax :cool:
 

Attachments

  • ps.jpg
    ps.jpg
    173.4 KB · Views: 177
  • ps3.jpg
    ps3.jpg
    187.7 KB · Views: 176
I knew I recognized that project name! I never did see how Golden Silence turned out, I should go check. He's the guy that suggested the external PSU. That honeycomb acrylic looks nice. I gotta go check it out :p


Those don't look like rotary fittings either, that saves a lot of room. I got the rotaries since they allow you to change the direction they face.
 
the only thing in my case is I will have to use rotary fittings to connect the two water blocks but is should not mater since my water block mounts much more flush with the motherboard then the liquid extasy ones I added some photos

the photos do not belong to me


by the way did you have any problem removing the ribbon cable on the bluray drive I heard some horror story's about some people breaking the thing on the motherboard that locks the ribbon cable in place and having to jam cardboard to keep it in place :(
 

Attachments

  • GPU1.jpg
    GPU1.jpg
    68.5 KB · Views: 168
  • ps3.jpg
    ps3.jpg
    187.7 KB · Views: 167
I didn't have any issues with the Blu-ray cable at all, though I did come across some horror stories online. People usually only write about the bad experiences, so that's all you get when you're searching :p Just be careful and don't use excessive force.

Actually, come to think of it I think I kept the ribbon attached to the motherboard and only disconnected it at the Blu-ray drive. The cable can be fed through the hole when you're removing the shield, and so long as you don't kink it I think it should be good.

All you need to do is keep track of EVERYTHING that comes out and where it goes (I got a divided plastic crafts bin to help with that). And if you're following a guide, follow it exactly. That way you can just go through the guide in reverse and assemble it all afterwards.
 
I will probably use the koolance ERM-3K3UC Liquid Cooling System, Copper Rev1.1 because the exos has a lot of aluminum which will led to corrosion and I don't really know how to make a custom loop look good outside a computer case so that's why am going for a all in one unit
 
That price! Oof! Sure looks great though, but man... Not to mention it's way overkill for a PS3.

I kludged together a rad stand for mine. Doesn't look anywhere near that nice, but it works :p
 
well I wish I could whip up a custom loop but do to space limitation I cant and will have to go for a all in one for four times the price :-/


and know to think of it how would one apply thermal compound to those giant cpu and gpu chips
 
It'll look fantastic for sure. The waterfall reservoir (when stood upright) is a great feature. I'm a sucker for waterfalls and watercooled builds that incorporate them.

If I remember correctly, I used a thin line arranged in a cross pattern (plus sign) with one dab near each corner to cover anything that might be missed when the thermal paste is spread by the block. (Thanks to Conumdrum for the suggestion.)

I tried following guides that say to spread it with a credit card but that didn't work as well and I had to reapply the paste. I think that method also introduces air bubbles which can inhibit the thermal transfer.
 
do you know of any tape that you can use to hold down the temp probe on the water block


and do you need a fan attached to the motherboard as to make it boot up as I know some computers will not boot if there is no fan connected to the mother board
 
Back