- Joined
- Nov 11, 2010
So...I finally decided to start the process of designing then 3D Printing my SFF HTPC Case, hence the name, "Print Server" (lame pun, I know...)
Some pre-requisite info is in order
I am not particularly skilled in "Design", let alone in Computer Aided Design so my build is probably gonna look like *** without your feedback.
Now...with these pre-requisites stated, the features I'm looking for are:
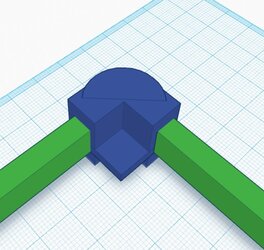
Now...with all that said here's a pic of my prototype Multi-joint corner piece. It serves as the "foot" of the case; It allows connection to 2 "support beams" that make up part of the "frame" of the case; And, it provides a connection point for the trick motherboard tray I have bouncing around in my head...which I'll share later...
Some pre-requisite info is in order
I am not particularly skilled in "Design", let alone in Computer Aided Design so my build is probably gonna look like *** without your feedback.
- Plastic is not as strong as steel, so there are design considerations which must take that fact into account.
- Read #2 again. Twice. There are some things I just won't be able to do, design-wise, with PLA plastic because it simply lacks the strength of steel/Aluminum. Drive Cages are an example which illustrates that fact nicely.
- My 3D Printer build area is about 11.5x6x6.5. This is smaller than the mITX form factor calls for. Therefore, I have to be creative in my design since I can't simply print a 6.7"x6.7" motherboard tray.
- PLA Plastic, while stronger than ABS, is far more "brittle" so the joints where different pieces meet must be designed with this in mind. It does no good to have a kick-*** looking case that breaks when you pick it up or bump it.
- Currently, my plan is to use a mITX based motherboard and use the integrated graphics. While it would be nice to throw something together that can take the latest GeForce GTX Titan Black or R290X for an uber gaming experience, I'm trying to keep the design small. That necessitates the use of a Pico-ITX Power supply, which isn't up to the task of powering a Titan or 290X.
- The process of making a case out of a material like steel is seemingly more simple than it would appear for at least a couple reasons, off the top of my head:
- Bending it in certain ways allows one to strnegthen the piece while keeping weight to a minimum.
- Riveting two or more pieces together lets one join different pieces while maintaining strength at the joint.
Now...with these pre-requisites stated, the features I'm looking for are:
- 4K Resolution support as well as normal 1080p (I use a 50" Seiki in the Living Room)
- 10/100/1000 Networking (wired)
- BlueTooth (connectivity for Keyboard/Trackball & my Tablets)
- Good Sound Card (May use the expansion slot for that, but good integrated is preferred)
- Wi-Fi (Optional)
- USB 3.0 (for external BluRay RW connectivity and TV Tuner connectivity)
- (2) Mounts for Drives (SSD for OS and Media Drive, up to 4TB)
Now...with all that said here's a pic of my prototype Multi-joint corner piece. It serves as the "foot" of the case; It allows connection to 2 "support beams" that make up part of the "frame" of the case; And, it provides a connection point for the trick motherboard tray I have bouncing around in my head...which I'll share later...