• Welcome to Overclockers Forums! Join us to reply in threads, receive reduced ads, and to customize your site experience!

Project FlameCube

Overclockers is supported by our readers. When you click a link to make a purchase, we may earn a commission. Learn More.
7 more hours of work and here's where things are.

7_fb.jpg
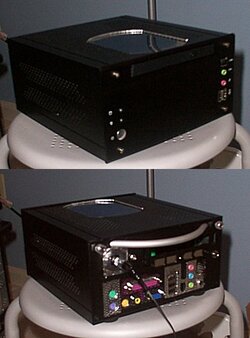
1. Vented mesh I/O cover in rear (3 hours of work)
2. External power jack for EL cable (the only cable in the pic, 2 hours of work)
3. Soft aluminum accents on power button and rear of case (30 min.)
4. Rewired Intercom unit to allow others to penetrate my "auditory bubble" (1 hour of work)
5. Putting it all back together for the 20th some-odd time (30 minutes of work)

The external power jack will connect the EL cable inside the keyless keyboard, to the inverter that's mounted inside of the case. This will allow me to construct the keyboard more compactly.
In order to prevent the AC current from arcing from the jack to the case I had to cut out the standard fan intake and make a mounting plate out of ABS plastic. To which the external power plug is securely mounted.
I tested this beforehand with the multimeter and when connecting the external power plug while hot, the AC current arc at upto 900 VAC. Seeing as I don't want that flying through my case, the extra time spent of the plastic mounting plate will make me more confident in my machine receiving no harm if I were to accidentally disconnect the keyboard lighting while the machine is turned on.

Oh, and making that I/o plate was a pain. I had to use my dremel bits in a power drill because I lost my dremel's chuck somewhere in the garage. I went through 6 different etching bits before I got it and the mounting bracket completed.

Next up, the Red LED cluster lights and the keyless keyboard.
 
Yay! The raw material for the keyless keyboard arrived yesterday so I'll be starting on it this afternoon. still have another piece on order but I'll still be able to make progress on it.

Basically I'm going to scan the underside of the original key-face, create a custom B & W keyface, then print the key kayout onto an 11x17 transparency. That will label the keys and cover the carbon contacts while still leaving all the underlying circuitry exposed.

The anticipation is killing me! :eek:
 
Grr, why can I not find a place to order a pentium 4 itx motherboard when you have one in your hands? Got any linkage for people to take a look at where to get it?
 
Krusty said:
Grr, why can I not find a place to order a pentium 4 itx motherboard when you have one in your hands? Got any linkage for people to take a look at where to get it?
www.caseoutlet.com
Offers the Commell LV670-LVDS (Intel 845GE), which is what I'm enjoying.

They also offer a mini FlexATX board with an AGP slot. It's available as a barebones option with the C137.
 
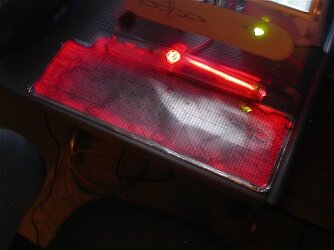
Yazoola! 8 hours of work and I'm nearly finished with the keyless keyboard. Spiral-wrapping the cord alone took about 4 hours. The rest was all fabrication. Now that it's in one piece it looks even weirder than I expected...
7_keyless.jpg
All that's left to do is the key-label sheet and LEDs.
That may take another week of waiting but it won't be too big of a deal. I'll have more pics when it's complete.
 
Last edited:
So that is working except you don't know were the keys are?

Either way that is awsome... I don't think it's all that weird, just freaking awsome.
 
CrashOveride said:
So that is working except you don't know were the keys are?
I can type with it just fine but I get weary of hitting the wrong key for some reason. I want to label them for my own peace of mind.
 
You should keep it not labed... just for the OOOOs and AAAAHHHs of the less computer savvy, you get used to it - I used too look at my keys (even though I could type without it) until I made my keyboard 1337 (it took a few weeks of looking at an M that was really an N and hitting 7 instead of T though)
AnyKeys.jpg

KeyBoardLeft.jpg

KeyBoardRight.jpg
 
TheFrag said:
can you show a pic of the keyboard in regular light? It sounds tight...
I'm reworking it at the moment to make it stiffer, and generally a more impressive piece of workmanship. The picture above is simply the working prototype.

I would still prefer to label the keys, especially since I can have them printed anyway I want to. And if my plans work out I can have the option of seeing the letters or not.
I've already replaced all of the status lights on the keyboard with UV, and the back of the key-label sheet will be sprayed with Neon-Glow paint. So whenever I toggle scroll-lock the key-label sheet will glow red, making the keys easier to see.
 
Captain Slug said:

I've already replaced all of the status lights on the keyboard with UV, and the back of the key-label sheet will be sprayed with Neon-Glow paint. So whenever I toggle scroll-lock the key-label sheet will glow red, making the keys easier to see.

Words cannot describe the awesomeness of that idea. You just blew my mind - I will not be able to work for the rest fo the day. If I were able to do this with a logitech cordless keyboard, I could die happily on the spot.

You are a blessing to this board. Thank you, and keep the pics coming.

*Is now officially a Captain Slug groupie*
 
:cry: I killed it while fiddling around with it plugged in. Fried the circuits somehow and it won't come on anymore. :cry:

so...

Cons
1. lost 10 hours of work
2. wasted $16 in materials
3. frustration
4. have to spend more time on a new version
5. I have to spiral-wrap a completely new cable

Pros
1. I now have the courage to make a mini version with a spare 88-key keyboard I have
2. The mini version will be easier to construct since it has a less-annoying membrane-to-IC interface
3. it'll be alot smaller (12" x 5")
4. I can use a standard size scanner and standard size transparency when making the key-label sheet
5. the cord won't be 6 freakin' feet long

I'm off to Home Depot to get a new sheet of polycarbonate. I'll have pics of it finished in less than a week now that I don't need to order specialized sheets of transparency film.

*sigh
I've already swapped out the fugly green LEDs for UV ones, so that's atleast a start.
 
Last edited:
Well, I've burned 2 fingers, cut 2 others, and now I have a mean sinus cold and swollen and/or infected toenail.

I'm going to hold off on these projects until I can get the right tools and my workshop setup.
 
Wow that keyboard idea sounds awesome! I dont know how you come up with some of your ideas... Too bad the first version of your keyboard died.. :( The next can only be better since you now have some experience doing the mod to the 1st one. :)
 
That keyboard owns all other keyboards... Too bad it died... :(

I, for one, would be very interested in a tutorial on how to make one... *hint* *hint* ;)

Edit:

Master Slug, you have enlightened me...
I took apart a keyboard I had laying around and saw exactly how you made your keyless keyboard. In fact, I now have my own "l33t keyboard" (because you have to be l33t to use it ;) )

1337keyboard.jpg


As you can see, it's thinner than my mousepad :D

Don't worry, the ghetto scotch tape holding the layers together is just a temporary thing. I plan on making a tray of some kind for this, probably acrylic, with LEDs and a separate switch for them. Unfortunately, that keyboard is PS/2 and not USB, so it's not exactly backward compatible...

Or maybe I'll just leave it as it is, to confuse people who try to use my computer :)
 
Last edited:
I have pictures of how far I got in the process before it died, but looking at them makes me queezy.
And as you'll eventually figure out, the most challenging part of building one is keeping the membrane and circuit board properly mounted onto eachother.
Luckily the source keyboard for the second version uses a plug-in ribbon cable instead of an annoying surface contact.

I just put in my harbor freight order for a bandsaw, 4" tablesaw, and 5-speed drillpress. So next week should be fun.
 
Last edited:
Back