- Joined
- Feb 2, 2014
- Location
- North Okanagan BC Canada
Overclockers Build Log
Hello everyone. Long time reader, 1st time poster. I’ve been checking out a lot of peoples Watercooling Builds, and I’ve decided to update my existing systems to new. A little history. I haven’t had an air-cooled computer since my Coppermine 600. Yup. I’ve been into water-cooling for quite some time. 1st system was a gong show. Comercial water block, Heating Core from a 1984 Chevette, and a 12v Bilge pump locked into a shiny chrome cylinder. These will be my 6th and 7th water-cooling builds since I’ve started.
Think I’ll call them R-Cubed. Reduce Reuse Recycle. Yup, at least 75% of these 2 builds will be with my existing equipment. I’ve decided to go with Rigid Acrylic tubes, so I’ve updated lots of my tools, and my cooling loops to say the least. Also, this will be the 1st time that I have decided to take my time and build things how I want them built, not build them fast to get back into gaming. I’ve decided to use my Macs for my general day to day computing until this project is done.
So, if you don’t mind a “Rookie Build Logger” using recycled equipment, then tag along! I’m sure it will be fun!
Rig 1
1st Rig is dear to my heart. It’s housed in a modded Lian-Li PC67 that my wife bought for me back in 2001 / 2002. I love that case. Sleek aluminium (Yes I say and spell it properly even though I’m Canadian) I’ve done a fair bit of modding to it in the past. She’s going to house a 750 Watt Antec Power Supply, Asus ROG Crosshair IV Formula, AMD Phenom 1080. I think that’s the model number. We’ll have to see when I boot her up. I do know it’s the HexaCore one. 8Gb Corsair Dominator RAM, XFX Radeon HD 4890, and a 512Gb SSD drive. I’ll likely get a Bluray optical drive for it as well because I do like having the optical drives, and I do nice things with them. It’s all going to be cooled by a Swiftec HX220 kit that I bought many moons ago for it. All the components still work perfectly, and it’s more than enough to cool this machine, and make it silent. Swiftec Apogee CPU Block. This will be a generic household computer for the whole family to use, and when buddies come over and want to PC game, we can use it as a 2nd machine.
Rig 2
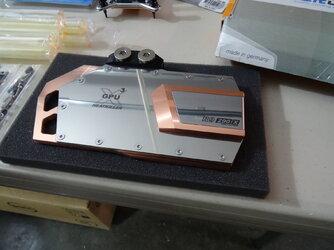
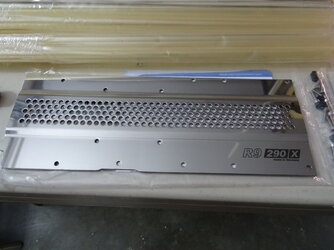
Rig 2 was actually built 3 or 4 years ago for a client. I knew him well, so when he come to me for the build consultation, I went ahead and ordered all the stuff and was going to bill him the cost of the components at the end of it all. Lesson learned on that one. He reneged on it all, and I wound up biting the bullet on the cost of that. Oh well, at least I got a pretty good gaming machine out of it. It is a Lian-Li PCX900 case, 1200 Watt Silverstone Strider modular power supply, Asus ROG Rampage III Extreme playing host to an Intel 980x Hexacore, 8Gb of Patriot Sector 5 RAM, a pair of XFX Radeon 5970 Black Editions, an LG BluRay burner, Intel Pro/1000 PT Dual port NIC, and a pair of Corsair 512GB SSDs ( I haven’t used a standard HD in about 5 years now) This system will also be cooled by primarily Swiftec components. Dual 120 Rad, MPC655-B pump, and a really nice Swiftec CPU block of which I can’t currently remember the model. It’s 01:26AM and I’m a bit tired.
So, I started things off with Rig 2. Yeah, I want it done first so I can get back to gaming when I have time. Titanfall will be out soon. ;0)
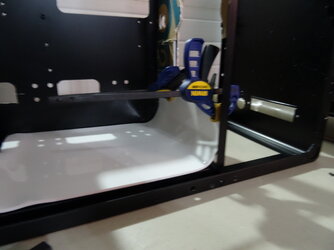
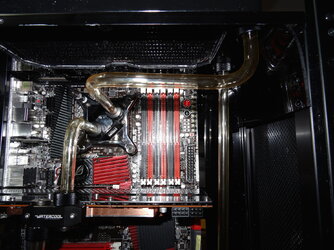
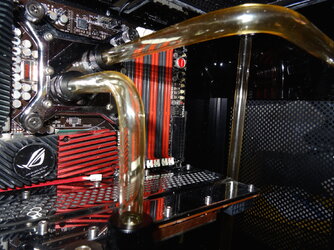
All pictures on this post are the BEFORE PICTURES. They are the crap old build.
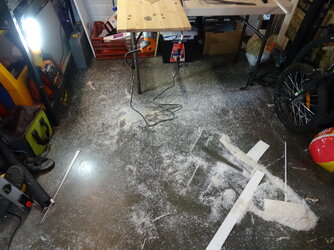
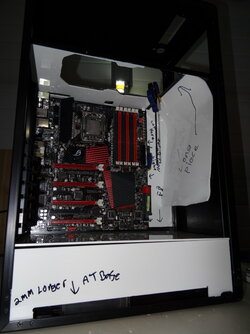
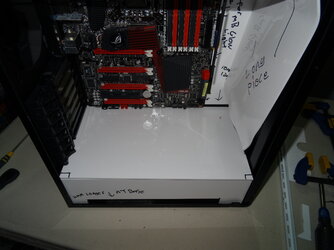
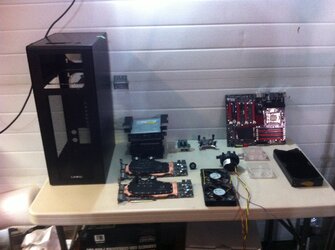
As you can see from the Before Pictures, she’s a pretty darn ugly build. I was in a bad mood when I built it and I just wanted to get it working so I could play games on it to make myself feel better. I drained the loop, and stripped her down completely. Every screw that could come out came out, every removable piece is also gone. Took that opportunity to clean it up. I had a lot of Gorilla Tape (black) in there to help hold wires where I wanted them, etc. I was too lazy/impatient at the time to custom length the cables and such. So a couple of hours, and lots of grease from my elbows, I had all the tape residue off, and was left with a super nice shiny clean case. Then came the planning phase. I sat down and stared at this rig for quite some time, going over different placements in my head over and over. What worked from the last build, what didn’t, what I wanted changed, and what if anything I wanted to stay the same. One thing I like to do in my builds is stealth things. I like sleepers. Previously, I had the radiator at the front of the case with the fans in behind sucking cool air in through the rad, over the GPUs, and motherboard heatsinks, and then exiting out the top / back. This works well for the most part, but I had about 18 Microns of clearance between my fan housing, and the edge of my GPUs. This is a big case, but it’s not very deep. With what I had planned for this build dictated that I move some stuff around. More planning, deliberating, and finally coming up with my final Radiator location. As you can see from the pictures, it’s at the top of the case. I’ll be crafting up some custom ducting so the fans on the rad will be pulling fresh cool air in from the front, and top back, blowing it into the main case housing, and then out the exhaust port on the back of the case, and out through the PSU. It’s going to make for a super clean looking install, but it is going to be hell getting that ducting work done.
1st order of business….. Dremel time! I whipped out my handy dandy Dremel tool, and started hacking away at the things I wanted / needed gone. Extended the ports in the motherboard tray for my SATA cables, Power Cables, and anything else I could want to port over to the back and then out of site. Created a 2nd port for cabling to go through. Next up was the radiator’s home. I created a template of my radiator, and placed it in the case where it was going to be. Dremeled out the template, and had a near perfect fit for the rad. The grooves and notches all lined up perfectly. I instantly jabbed a screwdriver into my hand to ensure I was awake, and this wasn’t some wild dream. Nope, I bled. I’m awake, and it worked out perfect 1st time round! Wooo hoooo!.
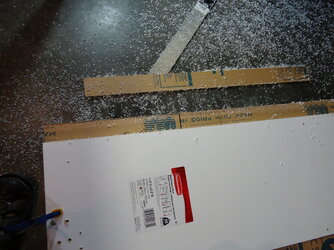
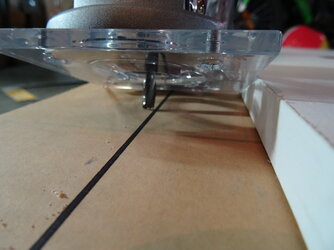
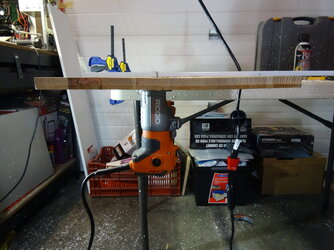
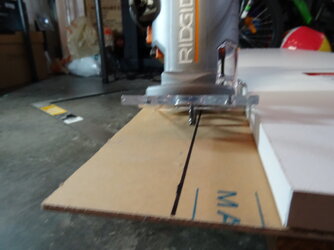
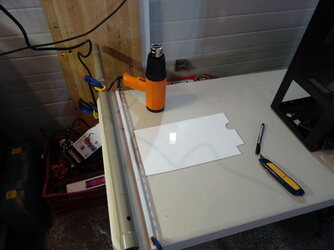
After the radiator was squared away, I started on the front ducting work. I removed key pieces of metal, and in about 5 minutes the front ducting work had a good foundation. I’m going to be building the final duct work out of acrylic sheets, and will be custom bending the sheets with a bending table that I’m constructing. Hey, I might get some customers out of these build logs, so I might as well do it right, and repeatable. ;0).
As I like to have optical drives, the 5 1/4” bay had to go. Drilled out the rivets, and removed the while cage. Since I only want the 1 drive, I did some additional Dremel work to it, and got it all squared away nicely. Mounted the optical drive where I wanted it in the cage, and put it aside for later in the build.
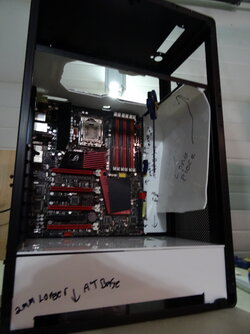
My focus then turned to what was happening in the main case area. I’m a visual guy, so I mounted my motherboard, and power supply in there, and planed out the cooling loop in my head. It was at this point where I decided that I wanted to clean up the interior. I’m not being a blowhard or anything of the sort, but I owned a 2009 Aston Martin DB9 for a couple of years, and I was in love with the cockpit. Actually, I was in love with the entire car. Glossy black, Aluminium, Carbon Fiber, and soft supple white LEDs for the cluster lighting. Simple, elegant……. I miss that car. I miss it a lot. Inspiration!!!! I’m taking the glossy black, aluminium, and white LEDs, and incorporating that into this case. I still have some left overs from owning that car, and I’m going to incorporate them into this build.
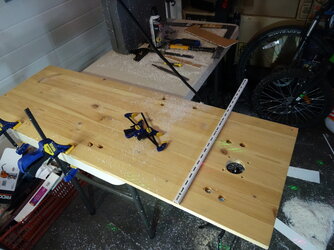
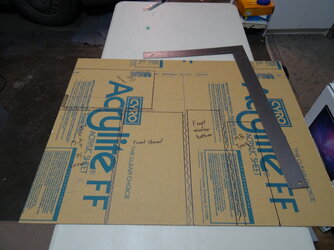
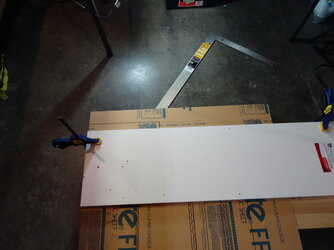
I immediately set to work planning the interior. Glossy black acrylic all round, with subtle touches, and highlights. Crafted up some templates out of cardboard that is 1/8” thick (just like the acrylic), and pieced together a fantastic puzzle that will not only look amazing when finished, but it will help with the rest of the build as well.
OK Plan is made, a shopping list put together, and just over $800 later at FrozenCPU (between all my orders) I’m patiently waiting for my components to show up, so I can get into the thick of it!
I hope I didn’t ramble on too much, and I hope to a piqued some interest for the rest of this build. Like I said earlier, I’m an utter NOOB for doing build logs, and I’ve taken some video and pictures along the way. Stay tuned!
Hello everyone. Long time reader, 1st time poster. I’ve been checking out a lot of peoples Watercooling Builds, and I’ve decided to update my existing systems to new. A little history. I haven’t had an air-cooled computer since my Coppermine 600. Yup. I’ve been into water-cooling for quite some time. 1st system was a gong show. Comercial water block, Heating Core from a 1984 Chevette, and a 12v Bilge pump locked into a shiny chrome cylinder. These will be my 6th and 7th water-cooling builds since I’ve started.
Think I’ll call them R-Cubed. Reduce Reuse Recycle. Yup, at least 75% of these 2 builds will be with my existing equipment. I’ve decided to go with Rigid Acrylic tubes, so I’ve updated lots of my tools, and my cooling loops to say the least. Also, this will be the 1st time that I have decided to take my time and build things how I want them built, not build them fast to get back into gaming. I’ve decided to use my Macs for my general day to day computing until this project is done.
So, if you don’t mind a “Rookie Build Logger” using recycled equipment, then tag along! I’m sure it will be fun!
Rig 1
1st Rig is dear to my heart. It’s housed in a modded Lian-Li PC67 that my wife bought for me back in 2001 / 2002. I love that case. Sleek aluminium (Yes I say and spell it properly even though I’m Canadian) I’ve done a fair bit of modding to it in the past. She’s going to house a 750 Watt Antec Power Supply, Asus ROG Crosshair IV Formula, AMD Phenom 1080. I think that’s the model number. We’ll have to see when I boot her up. I do know it’s the HexaCore one. 8Gb Corsair Dominator RAM, XFX Radeon HD 4890, and a 512Gb SSD drive. I’ll likely get a Bluray optical drive for it as well because I do like having the optical drives, and I do nice things with them. It’s all going to be cooled by a Swiftec HX220 kit that I bought many moons ago for it. All the components still work perfectly, and it’s more than enough to cool this machine, and make it silent. Swiftec Apogee CPU Block. This will be a generic household computer for the whole family to use, and when buddies come over and want to PC game, we can use it as a 2nd machine.
Rig 2
Rig 2 was actually built 3 or 4 years ago for a client. I knew him well, so when he come to me for the build consultation, I went ahead and ordered all the stuff and was going to bill him the cost of the components at the end of it all. Lesson learned on that one. He reneged on it all, and I wound up biting the bullet on the cost of that. Oh well, at least I got a pretty good gaming machine out of it. It is a Lian-Li PCX900 case, 1200 Watt Silverstone Strider modular power supply, Asus ROG Rampage III Extreme playing host to an Intel 980x Hexacore, 8Gb of Patriot Sector 5 RAM, a pair of XFX Radeon 5970 Black Editions, an LG BluRay burner, Intel Pro/1000 PT Dual port NIC, and a pair of Corsair 512GB SSDs ( I haven’t used a standard HD in about 5 years now) This system will also be cooled by primarily Swiftec components. Dual 120 Rad, MPC655-B pump, and a really nice Swiftec CPU block of which I can’t currently remember the model. It’s 01:26AM and I’m a bit tired.
So, I started things off with Rig 2. Yeah, I want it done first so I can get back to gaming when I have time. Titanfall will be out soon. ;0)
All pictures on this post are the BEFORE PICTURES. They are the crap old build.
As you can see from the Before Pictures, she’s a pretty darn ugly build. I was in a bad mood when I built it and I just wanted to get it working so I could play games on it to make myself feel better. I drained the loop, and stripped her down completely. Every screw that could come out came out, every removable piece is also gone. Took that opportunity to clean it up. I had a lot of Gorilla Tape (black) in there to help hold wires where I wanted them, etc. I was too lazy/impatient at the time to custom length the cables and such. So a couple of hours, and lots of grease from my elbows, I had all the tape residue off, and was left with a super nice shiny clean case. Then came the planning phase. I sat down and stared at this rig for quite some time, going over different placements in my head over and over. What worked from the last build, what didn’t, what I wanted changed, and what if anything I wanted to stay the same. One thing I like to do in my builds is stealth things. I like sleepers. Previously, I had the radiator at the front of the case with the fans in behind sucking cool air in through the rad, over the GPUs, and motherboard heatsinks, and then exiting out the top / back. This works well for the most part, but I had about 18 Microns of clearance between my fan housing, and the edge of my GPUs. This is a big case, but it’s not very deep.
With what I had planned for this build dictated that I move some stuff around. More planning, deliberating, and finally coming up with my final Radiator location. As you can see from the pictures, it’s at the top of the case. I’ll be crafting up some custom ducting so the fans on the rad will be pulling fresh cool air in from the front, and top back, blowing it into the main case housing, and then out the exhaust port on the back of the case, and out through the PSU. It’s going to make for a super clean looking install, but it is going to be hell getting that ducting work done.1st order of business….. Dremel time! I whipped out my handy dandy Dremel tool, and started hacking away at the things I wanted / needed gone. Extended the ports in the motherboard tray for my SATA cables, Power Cables, and anything else I could want to port over to the back and then out of site. Created a 2nd port for cabling to go through. Next up was the radiator’s home. I created a template of my radiator, and placed it in the case where it was going to be. Dremeled out the template, and had a near perfect fit for the rad. The grooves and notches all lined up perfectly. I instantly jabbed a screwdriver into my hand to ensure I was awake, and this wasn’t some wild dream. Nope, I bled. I’m awake, and it worked out perfect 1st time round! Wooo hoooo!.
After the radiator was squared away, I started on the front ducting work. I removed key pieces of metal, and in about 5 minutes the front ducting work had a good foundation. I’m going to be building the final duct work out of acrylic sheets, and will be custom bending the sheets with a bending table that I’m constructing. Hey, I might get some customers out of these build logs, so I might as well do it right, and repeatable. ;0).
As I like to have optical drives, the 5 1/4” bay had to go. Drilled out the rivets, and removed the while cage. Since I only want the 1 drive, I did some additional Dremel work to it, and got it all squared away nicely. Mounted the optical drive where I wanted it in the cage, and put it aside for later in the build.
My focus then turned to what was happening in the main case area. I’m a visual guy, so I mounted my motherboard, and power supply in there, and planed out the cooling loop in my head. It was at this point where I decided that I wanted to clean up the interior. I’m not being a blowhard or anything of the sort, but I owned a 2009 Aston Martin DB9 for a couple of years, and I was in love with the cockpit. Actually, I was in love with the entire car. Glossy black, Aluminium, Carbon Fiber, and soft supple white LEDs for the cluster lighting. Simple, elegant……. I miss that car. I miss it a lot. Inspiration!!!! I’m taking the glossy black, aluminium, and white LEDs, and incorporating that into this case. I still have some left overs from owning that car, and I’m going to incorporate them into this build.
I immediately set to work planning the interior. Glossy black acrylic all round, with subtle touches, and highlights. Crafted up some templates out of cardboard that is 1/8” thick (just like the acrylic), and pieced together a fantastic puzzle that will not only look amazing when finished, but it will help with the rest of the build as well.
OK Plan is made, a shopping list put together, and just over $800 later at FrozenCPU (between all my orders) I’m patiently waiting for my components to show up, so I can get into the thick of it!
I hope I didn’t ramble on too much, and I hope to a piqued some interest for the rest of this build. Like I said earlier, I’m an utter NOOB for doing build logs, and I’ve taken some video and pictures along the way. Stay tuned!
Attachments
-
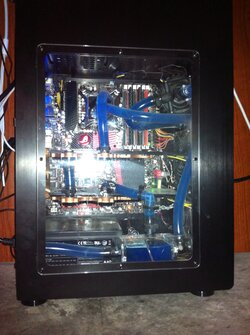 image.jpeg682.1 KB · Views: 311
 -
![image[1].jpeg](/forums/data/attachments/138/138809-becd0845831d4606ab4d0ad7f748ff58.jpg) image[1].jpeg504.8 KB · Views: 307
image[1].jpeg504.8 KB · Views: 307 -
![image[3].jpeg](/forums/data/attachments/138/138810-57f055570d92c60473a53427da9bd4b6.jpg) image[3].jpeg758.6 KB · Views: 302
image[3].jpeg758.6 KB · Views: 302 -
![image[7].jpeg](/forums/data/attachments/138/138813-7d137926d37a51f8d76574695edd94c7.jpg) image[7].jpeg805.8 KB · Views: 301
image[7].jpeg805.8 KB · Views: 301 -
![image[5].jpeg](/forums/data/attachments/138/138812-df502afa283818d3439b9cc63df4657f.jpg) image[5].jpeg532 KB · Views: 307
image[5].jpeg532 KB · Views: 307 -
![image[4].jpeg](/forums/data/attachments/138/138811-3a381d8d49d8595cd080c3b9acba9a17.jpg) image[4].jpeg660.8 KB · Views: 303
image[4].jpeg660.8 KB · Views: 303 -
![image[8].jpeg](/forums/data/attachments/138/138814-8d5d121c91c71a1aac10302caa74c637.jpg) image[8].jpeg687.7 KB · Views: 296
image[8].jpeg687.7 KB · Views: 296 -
![image[9].jpeg](/forums/data/attachments/138/138815-32802314a9e636115d8dcc8315b4a7ba.jpg) image[9].jpeg574.4 KB · Views: 295
image[9].jpeg574.4 KB · Views: 295 -
![image[10].jpeg](/forums/data/attachments/138/138816-a2415883ed9d98b126334db1340dccb3.jpg) image[10].jpeg556.4 KB · Views: 297
image[10].jpeg556.4 KB · Views: 297
![image[1].jpeg](/forums/data/attachments/138/138830-7d3fe99da994a524a5fbebc193e0d3f4.jpg)
![image[3].jpeg](/forums/data/attachments/138/138831-4033ccf56b9ec6f5a782154b6b675ea6.jpg)
![image[4].jpeg](/forums/data/attachments/138/138832-4aa2c1ccf8e44f45e2792f66f6680c0f.jpg)
![image[5].jpeg](/forums/data/attachments/138/138833-f66d6376be551aac417f9d68bc9266e4.jpg)
![image[9].jpeg](/forums/data/attachments/138/138836-9395fe73edae288935f84a7fe8409d22.jpg)
![image[8].jpeg](/forums/data/attachments/138/138835-b7c4104dcd2a6acc15c9864e3f1e8a2e.jpg)
![image[6].jpeg](/forums/data/attachments/138/138834-f20f865e6d03a52ce3c18e99e8ec91e5.jpg)