Alright, so I managed to get my QX6850 past 3.5ghz, and with a lower voltage. (I did a vdroop mod while I was setting up my WC loop )
So, now I can hit 3.6Ghz with 1.32v (which I think is AWESOME) but, I would like to see how far the chip can go, now that I feel safe pushing it, with my temperatures under control.
I have gotten it stable with 400x9 with slightly more voltage (can't remember off the top of my head) and is currently at 360x10 @ 1.32v. I would like to hit 3.75 or 3.8ghz..
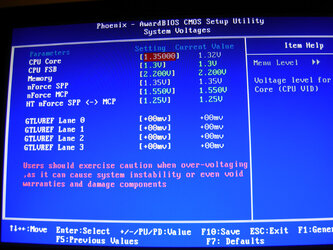
heres a pic, since im lazy and didn't feel like writing my voltages down...
Try increasing the MCH and vtt values. Read below for more info .
CPU VID Control – The processor vcore, I’m not sure why DFI calls it “CPU VID Control” but whatever. From here on out, I’m going to call it Vcc since technically, the term VID is an entirely different concept (see this document, page 14 for more if you have an interest).
DRAM – The memory vcore.
SBCore – Southbridge vcore (might be called ICH in your board).
NBCore – Northbridge vcore (might be called MCH in your board).
VTT – Reference voltage (might be called FSB Termination voltage in your board). It’s used to terminate data lines between the MCH and CPU.
Some motherboards give the option for GLT reference controls. If you enable this you’re adding three additional variables to the mix and making your life more complicated. Unless you’re an extreme overclocker wanting to squeeze every single MHz out of your system, my advice is not to enable the GLT options. I’d also caution you not to enable this option since there is tons of misinformation out there about these undocumented features.
If you must, here a few links that might help you understand how it works and give you some starting points, but I won’t be using them in this guide:
There are several approaches you can use to arrive at a stable, minimized set of vcores. I recommend that you start with lower vcore values and work your way up. Lower values will fail much faster than higher values thus making the process a bit quicker for you.
To start with, select a set of vcores that are kinda low and see if you can POST. How do you know where to start? Use trial and error at this point unless you know someone else’s settings to use as starting points. When in doubt, I’d recommend that you start near the bottom of the scale. Here are some rough guidelines for setting your VTT:
1.2-1.3V - for a FSB of ~400 MHz. 1.4-1.5V – for a FSB of ~420-440 MHz (exceed 1.4V at your own risk with a 45nm chip)! 1.6V – for a FSB of ~440-475 MHz - use at your own risk with a 45nm chip!
You should be aware that newer 45nm fab chips are MUCH less tolerant toward high VTT than their 65nm predecessors. Anantech published their experience frying a QX9650 with high VTT’s as an example.
Vcc – Initially, set within 200-400 mV of where the auto setting used (remember that you need a little more in the BIOS compared to what CPU-Z told you). Remember to consult Intel’s processor finder to know where the upper-end of safety is for your processor (I believe the figures there correspond to the values CPU-Z is displaying, not what you set in the BIOS.).
DRAM – What ever the RAM manufacture recommends is a good starting point. Unless you’re really overdriving them, they shouldn’t need more.
SBCore – I’ve always used the lowest setting, but I typically don’t push my systems that hard (20-25 %). You’re on your own here.
NBCore – Start off low, 1.33 or 1.37 and see if you need more. Also, a little bit can go a long way. My system is unstable @ 1.330V here but stable @ 1.370V which is a difference of only 40 mV (0.04V).
Here are the levels my Q6600 @ 9x333 uses to run stable: Code:
Memory Voltage=2.100V
CPU VCore=1.2625V
FSB Termination=1.200V
NB Vcore=1.25V
SB Vcore=1.50V
ICH Chipset=1.057V
Here are the levels my X3360 @ 8.5x400 uses to run stable: Code:
Vcc=1.12500V
SB 1.05V=1.070V
NB Core=1.370V
SB Core/CPU PLL=1.550V
CPU VTT=1.310V
Here are the levels my X3360 @ 8.5x333 uses to run stable: Code:
CPU Vcc=1.00000V
SB 1.05V=1.070V
NB Core=1.330V
SB Core/CPU PLL=1.550V
CPU VTT=1.100V
Note that I haven’t refined these last settings (for 8.5x333) and don’t plan to For example, I think it would work with a lower Vcc and NB, but I don’t care enough to test it (these are good enough).
I show those only to give you an idea, not all hardware is the same, and really, those values are personal to my chip, RAM (and RAM settings), MB, etc.!
Once you select a baseline set, that will complete a POST, you’ll want to start a more vigorous evaluation by changing the MB vcores one-at-a-time moving forward. If you change too many variables at once, you’ll never be able to arrive at the stable settings. Confused? Don’t be, just read on and after you see the examples, I think the process will seem clearer to you.
The basic process is to try different Vcc values keeping the other vcores constant. Run p95 at a given Vcc and record what happens after an arbitrary time point (10 to 15 min is good to start with). If Vcc level is stable for 15 min of p95, reboot and lower it a little and repeat. The goal is to find the minimum level that gives errors, then increase it until it’s stable, then extend that time out to say 2-4 h. If it’s still stable, further extend it to 10-14 h. You can probably call it “stable” if you can run p95 for 24 h. If a setting fails after 4 h, increase it one notch or so and repeat until it’s stable out to 24 h. You can then come back knowing this Vcc and try to lower one of the other vcores repeating the process. Yes, it’s time consuming and yes, it’s tedious, and yes, that’s a load of rebooting, but it works.
The key to this process is keeping a detailed record to help you achieve a stable system and troubleshoot which vcore to change – p95 errors are NOT always the fault of a low Vcc! Without these data, you’ll have a tough time. So what do you keep track of here?
1) The MB vcores you’re using
2) The Vcc values you’re testing
3) Which core failed (prime95 tells you) and how long it took to fail
4) Any observations or comments you want to record for yourself
Here are two examples minimizing vcores using my X3360/P35-based system. The data presented aren’t fabricated to help illustrate the method; rather, they are the real data I used to arrive at the stable system. Also know that to really really do this right, you’d need to do several runs at the various levels; doing it just once as I am is the quick ‘n dirty approach and can cause you to draw an incorrect conclusion or two as you will see.
Example 1: 8.5x400
Hardware specs for your reference: Quote:
X3360 running @ 8.5x400, DFI LT P35-T2R (BIOS 3/17/2008), Ultra-120 Extreme, Corsair TWIN2X4096-8500C5DF 2x2 GB @ 5-5-5-15 running at 1,000 MHz (4:5) on 2.10V, 620HX power supply.
I set up my MB vcores and began testing Vcc starting low (I chose 1.12500V somewhat arbitrarily).
Keeping the motherboard vcores constant, I varied the Vcc starting out low and working up high. You may or may not get a stable system on your first set of iterations (probably not actually). If you do, you’ll probably want to repeat keeping your stable Vcc but optimizing (minimizing) for one of the other vcores such as NB or VTT, etc.
Code:
Overclocking log, Iteration Set 1
Comments: Initial try
DRAM 2.100V
SBCore 1.55V
NBCore 1.37V
VTT 1.200V
Vcc/Prime95 success or failure
1.12500V Failed on core 3 ~ 5 min
1.13750V Failed on core 0 ~ 28 min
1.15000V Failed on core 2 ~1 h 18 min
1.16250V Failed on core 1 ~ 4 h 4 min
Looking at the data, we see there that multiple cores have failed as I increased the Vcc. That’s suggestive of one of the other voltages lacking and thus needing to be increased. There are two likely causes for my instability: NBCore and VTT. In my next Iteration set (below), I chose to raise the NBCore several notches keeping the rest of the MB vcores constant.
For discussion’s sake, let’s say the same core failed repeatedly. This scenario is likely caused by a low Vcc (although it doesn’t have to be). For you quad core users, cores 0/1 and cores 2/3 should be treated the same, so if you get some core 0 and core 1 failures, treat them like a single core failure as you consider this analysis.
So, I increased the NBCore a few notches and tried a few higher Vcc settings just to see if it was enough:
Code:
Overclocking log, Iteration Set 2
Comments: Added some NBCore
DRAM 2.100V
SBCore 1.55V NBCore 1.41V
VTT 1.200V
Vcc/Prime95 success or failure
1.16250V Failed on core 2 ~2 min
1.17500V Failed on core 1 ~3 min
Again, I got two quick failures across the entire chip. Ideally, you might want to collect more data points, but I took a hunch that 1.45V should be plenty for 8.5x400, and next added some VTT keeping the newer, higher NBCore constant – remember to only change one of them per iteration set!
Code:
Overclocking log, Iteration Set 3
Comments: Added some VTT and kept the higher NBCore
DRAM 2.100V
SBCore 1.55V
NBCore 1.41V VTT 1.310V
Vcc/Prime95 success or failure
1.17500V STABLE 15 min
1.16250V STABLE 15 min
1.15000V STABLE 15 min
Now, with the higher VTT, I didn’t get a single failure for at least 15 min at the three Vcc values I ran. I concluded that the VTT gave me the stability. To test this hypothesis, I kept the higher VTT, but lowered the NBCore back to 1.37 and repeated in the 4th iteration:
Code:
Overclocking log, Iteration Set 4
Comments: Kept the VTT, lowered the NBCore
DRAM 2.100V
SBCore 1.55V NBCore 1.37V
VTT 1.310V
Vcc/Prime95 success or failure
1.15000V STABLE 2 h
1.13750V STABLE 30 min
1.12500V STABLE 1 h
1.07500V crashed p95 (n=2)
1.09375V crashed p95 (n=1)
1.10625V BSoD after 1+h
1.11875V STABLE 11 h
1.11250V Failed on core 0 ~ 1 h 8 min
Now I got some stable runs. After evaluating the data, I was able to nail down both my NB and VTT in only 3 iteration sets, arriving at what I thought was the stable Vcc in the 4th (I was later wrong).
It’s a little easier to visualize if you sort the Vcc from low to high. If you keep your log in a spreadsheet, you can easily sort them, here are the same data sorted by Vcc:
Code:
Overclocking log, Iteration Set 4
Comments: Kept the VTT, lowered the NBCore
DRAM 2.100V
SBCore 1.55V NBCore 1.37V
VTT 1.310V
Vcc/Prime95 success or failure
1.07500V crashed p95-program exited (n=2)
1.09375V crashed p95-program exited (n=1)
1.10625V BSoD after 1 h
1.11250V Failed on core 0 ~ 1 h 8 min
1.11875V STABLE 11 h
1.12500V STABLE 1 h
1.13750V STABLE 30 min
1.15000V STABLE 2 h
It would seem as though 1.11875V was the winner. I could have stopped right here and repeated extending the time out to 24+ h with these settings, but I elected to further optimize and targeted the VTT since I thought I could do better having jumped from 1.20 to 1.31 and skipping 5 sub levels in the process. This time through, I held the Vcc constant and varied, VTT:
DRAM 2.100V
SBCore 1.55V
NBCore 1.37V Vcc 1.11875V
VTT/Prime95 success or failure
1.250V Failed on core 0 ~ 2 h
1.260V Failed on core 2 ~ 1 h 20 min
1.280V Failed on core 0 ~ 18 h 22 min
1.310V Failed on core 1 ~ 1 h 20 min
This one is a little puzzling since the 3rd run (VTT=1.280V) lasted for over 18 h, yet the 4th run with a higher VTT died in under 1-1/2 h. My thinking was that VTT wasn’t the problem, and that I had been mislead on the Vcc. I was also getting a little anxious for this to be finished and I broke my own cardinal rule for the next iteration set by upping two variables at once: Vcc to 1.12500V and VTT to 1.310V.
Code:
Overclocking log, Iteration Set 6
Comments: 1.11875V seemed flaky, so upped the Vcc and kept the higher VTT.
DRAM 2.100V
SBCore 1.55V
NBCore 1.37V VTT 1.310V
Vcc/Prime95 success or failure 1.125000V STABLE 21 h 34 min
Okay! So maybe it was the Vcc after all since it ran for over 21-1/2 h before I stopped it. You could argue that there’s no difference between 18-1/2 h and 21-1/2 h and you would have a valid argument. This underscores the need to collect multiple data point per level as I mentioned in the beginning of this section (I told you it was quick ‘n dirty)!
Finally, I set out to essentially repeat my Iteration Set 5 minimizing the VTT with the slightly higher Vcc.
DRAM 2.100V
SBCore 1.55V
NBCore 1.37V
Vcc 1.12500V
VTT/Prime95 success or failure
1.250V Failed on core 0 ~ 1 h 3 min
1.280V Failed on core 1 ~ 1 h 0 min
1.310V STABLE 34 h 41 min
Apparently VTT needs to be 1.310V on this system.
For example 2, I just wanted a REALLY quick n’ dirty slower setting for my PC that I could use for non-CPU intensive computing since it’s summer now and I wanted a setting that would minimize the heat output for general computing. I’ll reboot into 8.5x400 if I want the faster speed. As such, I didn’t follow my own rule about changing only one variable at a time in the final iteration as you’ll see.
Example 2: 8.5x333
Hardware specs for your reference: Quote:
X3360 running @ 8.5x333, DFI LT P35-T2R (BIOS 3/17/2008), Ultra-120 Extreme, Corsair TWIN2X4096-8500C5DF 2x2 GB @ 4-4-4-12 running at 667 MHz (1:1) on 1.91V, 620HX power supply.
Initially, I kept the Vcc from my 8.5x400 run knowing it should be stable for less clock (stock in this case) and wanted to see if I could run a lower VTT. I also chose the lowest NB core.
Code:
Overclocking log, Iteration Set 1
Comments: Initial try
DRAM 2.100V
SBCore 1.55V
NBCore 1.30V
Vcc 1.1250V
VTT/Prime95 success or failure
1.170V Stable 15 min
1.100V Stable 15 min
As you can see, the lowest VTT was stable for 15 min. I went right to the Vcc using these values.
Code:
Overclocking log, Iteration Set 2
Comments: minimizing vcc
DRAM 2.100V
SBCore 1.55V
NBCore 1.30V
VTT 1.10V
Vcc/Prime95 success or failure
1.00000V Stable 15 min
0.96250V Stable 15 min
0.93125V BSoD (wouldn’t get into Windows)
0.93750V “
0.94375V “
0.97500V Stable 15 min
So here you can see that 0.97500V ran just fine for 15 min. At this point I figured I would also see if I could drop my memory vcore since 2.1V is required for >1,000 MHz and that 667 MHz should require less. Honestly, I should have let this run for 8-12 h before changing another variable.
Code:
Overclocking log, Iteration Set 3
Comments: minimizing dram core
SBCore 1.55V
NBCore 1.30V
VTT 1.10V
Vcc 0.97500
DRAM Vcore/Prime95 success or failure
1.91V Stable 15 min
1.80V Failed on core1 after 35 min
As you can see, 1.80V wasn't enough (or it could be that my previous settings weren't enough since I only ran them for 15 min)! I decided again to break my own rule about change more than one variable since I don’t really care to find the absolute minimum set of vcores for the stock setting. I upped the NBCore from 1.30V to 1.33V, and also added back some Vcc from 0.97500V to 1.00000V and kept the 1.91V on the DRAM for the final set:
Code:
Overclocking log, Iteration Set 4
Comments: changed several things!
DRAM 1.91V
SBCore 1.55V
NBCore 1.30V
VTT 1.10V
Vcc/Prime95 success or failure
1.00000V Stable 18 h
I stopped it after 18 h since I won’t be using this setting for CPU-intensive stuff. This stock level is just to have a lower heat/lower energy mode for web browsing/general computing.
In any case, those examples should serve to illustrate the method you need to use to attack the task.
To summarize, using a stepwise approach and documenting your runs, you should be able to arrive at a stable system (assuming your hardware can operate at the level you choice). It probably goes without saying that you will need to repeat this process if change your operating conditions (multiplier and FSB).
I have read and re-read that thread, and upping my nb and vtt don't seem to help at all. my NB voltage options are in .5v increments and go up to 1.55, I've gone as high as 1.50, and vtt only goes up to 1.5, and is in .1v increments (my mobo labels vtt as FSB Voltage),
I've gone all the way up to 1.5 with this one... and raising the vcore into the 1.4v+ range does not help at all with stability. I've tried running different dividers on my memory, and relaxing timings on my memory..
Then you might want to find the max FSB for the CPU, as well as the max frequency for the RAM to eliminate FSB bottleneck. So lower the muti to its lowest and see how high it goes. After that's done, try running your RAM ~1200mhz.
If you can reach a FSB of 550mhz and RAM speed of ~1200mhz, without changing MCH or vtt voltage, that's great! This may mean you need a higher vcore or, you have reached a FSB hole.
I know my fsb can hit 400+ (i don't know if the quad will make 500fsb.. let alone 550 lol)
but i will drop the multi to 6 and see how far I can go. It does 400x9 at <1.4v actual.
I have not tried to overclock my ram, but at 550, it would need to be 1100mhz for a 1:1
I'm at work right now
but I will try and see what I get when I get home.
I made 475 with a vtt of 1.3v any higher and I don't post
And now attempting to get 3.75ghz, 417x9 stable... I can't, doesn't matter how much vtt or nb or vcore I try. I have incrementally stepped up from 1.35v in bios to over 1.5v in bios vcore... You think it's just a wicked fsb hole? I tried 425x9 and 375x10, same deal
I hate the triple post.... (sorry)
but come on, this thing has got to have more. I've got so much vcore and temp headroom... I still can't get this thing past 3.6ghz. I would like to hit at least 3.8ghz, 4 would be awesome. I'm going to try for some higher multi's (maybe 13 or 14) and see what happens. If anybody has any ideas at all, I would greatly appreciate your help!
This site uses cookies to help personalise content, tailor your experience and to keep you logged in if you register.
By continuing to use this site, you are consenting to our use of cookies.
 )
)