• Welcome to Overclockers Forums! Join us to reply in threads, receive reduced ads, and to customize your site experience!

New System - Finally

Overclockers is supported by our readers. When you click a link to make a purchase, we may earn a commission. Learn More.

Parvic

Registered
Joined
Jul 28, 2011
Location
Denmark
Hello All,

i've been browsing and nagging on these forums for a while. And i thank all who've given me some inputs.
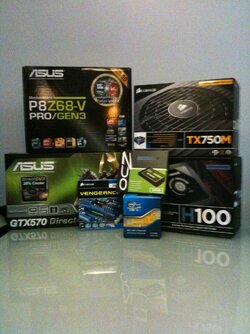
I've finally got it together and ordered parts. Below is what i went with:

ASUS P8Z68-V PRO/GEN3

i5-2500K

H100 cooler

Corsair Vengeance, DDR3, 1600MHz 8GB

Corsair TX750M 750w

ASUS GTX570 Direct CU II

Seagate Barracuda 500GB, 7200RPM, 16MB

OCZ Agility 3 60GB

CM 690 II Adv., USB 3.0


Now im eagerly waiting on the parts to arrive.
But at the same time, im actually beginning to get a little nervous :eh?:
-as this is gonna be my first build.

Any tips, pointers, comments are very welcome!

b.rgds.
Parv
 
Read the sticky post at the top of this forum, then go to Newegg and watch the video clip of the guy there, showing how to build a PC.

Keep a few things in mind:

1) Static kills electronics! So does dirt, hair,coke,and even dirty hands. Before you work on your build, wash your hands, and touch something that will ground you (I work on a counter near a sink, so I touch the stainless steel sink), immediately before you handle the board. Don't walk around carrying the board, handle the board by the components attached to it, or drop anything on the board. Handle the boards by the edges like your hands were the jaws of a gentle vise, coming together.

A static wristband is not out of order, and worth every penny. NEVER wear either wool, or synthetic clothes (rayon, nylon, etc.), when building a computer. They're famous for huge static buildups, as are carpets with either of these kinds of fibers.

2) Take your time. Rush nothing! It's not a race. Only work on it, when you can concentrate on it, without big distractions. Keep the screws (which will probably be in little baggies), inside their separate baggies, except when you're working with them. Don't mix them up.

3) Don't force anything - you may have the right size screw going into the standoff of the mobo, but it may have the wrong thread - the bigger headed screws (6x32) are for the card slots. The smaller 6x32 screws, are for the standoffs. The big headed screws have coarse threads, and the smaller headed screws (which are for the standoffs), have fine threads. If you force the coarse screws into the standoff, you can do it - and you'll wreck the fine threads in the standoff.

Right now, I'm working on an aluminum case, and according to the instructions, the top can be lifted off, after removing two screws. Didn't work, though - came part way off, and stopped. My version of the case, has another two screws that needed to be removed, that you can't see without removing the face of the case, first. If I had forced it, that aluminum panel top, would have folded up like a soda can will, when you squeeze it.

Don't force anything!

4) The little battery on the mobo is likely to explode if you put it in, backwards. It will already be installed in your mobo, but if you ever need to take it out - be SURE you put it back in, with the correct orientation!

5) Your mobo will have pins which may have jumpers on them, that can be removed, depending on the options for your board. Once the jumper has been removed, the pins look like you should plug in a connector - maybe a fan or something -- that will short out your board, if you do it. BEFORE you connect anything to the mobo, double check and know EXACTLY where it goes. Especially, do not connect any wires to these jumper pins, whether they are closed with a jumper block on them, or open and have no jumper block on them.

6) Use a power strip with a breaker (or fuse), (normal is 15 amps), between the PC and the outlet in the wall. If there is a short, a fuse 5 ft away will shut off the power a LOT quicker than a 20 amp breaker in a panel 50 ft. away. A good one will also remove some spikes before they can damage your computer.

7) Remember to use a TIM (thermal interface material), like Arctic five, etc., on top of your cpu, before you put on the heatsink (your heatsink may already have TIM on it, check it, and remove the clear plastic tape, if present, before you attach it. An amount the approx. size of one pea, is about right - don't let the TIM ooze outside the heatsink.

8) Check your memory sticks twice for the notch (female) at the bottom, being in the right place, lined up with the notch (male), in the connector, before you squeeze them down into place.

9) Get everything working right, before you quit. Take breaks as needed, of course, but don't procrastinate on getting it done. Later on, you won't remember half of what you know as you're building the PC.

10) Wash your hands again, when you finish each session. Boards have lead, and you will get some of it on your hands.

11) Before you apply power, double check everything. Connections should be tight fitting - never wibbly-wobbly. Make sure all your RAM sticks are all the way down, and the "ears" on the connectors, have closed up on the sticks. Never open up a power supply.

12) Dogs, cats, kids, phone calls, snacks, etc., are all unwelcome interruptions around the build. Tell them "later", and close the door, if possible.

Long winded, ain't I? :blah: :blah:
 
Parts arrived and ive made my try :)

Pics attached.

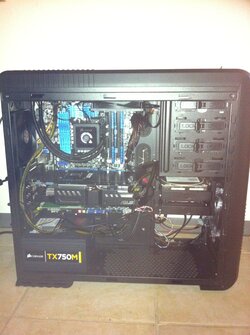
The H100 caused some problems, as screw seemed to be too long.
But i mounted it anyway :eek:

Then the CPU pwr to the MB was in the way of 1 of the fans. couldn't fit it nomatter what i tired, so ended up mounting the fans as 1 push and 1 pull. Dunno if that was foolish? but that was the solution i could come up with..
so 1 fans pulls 1 half of the H100 and the other fans pushes the other half.

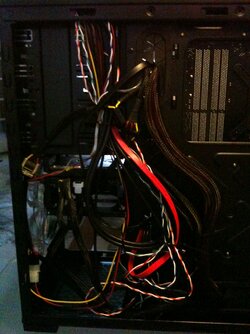
Tried to do what i could with the wiring, i find it decent for a fisrt build with limited lenght.

Please do comment and advice me further:)
 

Attachments

  • foto (1).JPG
    foto (1).JPG
    985.7 KB · Views: 60
  • foto (2).JPG
    foto (2).JPG
    762.3 KB · Views: 57
  • foto.JPG
    foto.JPG
    995.8 KB · Views: 57
Downloaded CPU-Z and attached screenshots.
 

Attachments

  • CPU.bmp
    491.6 KB · Views: 71
  • MB.bmp
    491.6 KB · Views: 70
  • MEM.bmp
    491.6 KB · Views: 70
  • Graphic.bmp
    491.6 KB · Views: 69
That CPU power connector.. Can you not run it along the back up behind the Mobo tray up to the top? The long connector that currently runs across everything.

Having the H100 setup like that isn't ideal. If you can; swap the other fan on the other side up top. It's best to have them both on the same side. It doesn't really matter if they're pushing or pulling (depending how you want it set up), but try to keep both fans on the same side..

But for your first build; not bad. =). Cable management is a process of learning. ^^.

Cable ties are invaluable here. Use them to clump cables together as much as you can. It also helps to flatten them (the cable ties that is) so it all sits neater. You can never have too many cable ties :p. You can buy a pack of 200 for like 2 bucks? Or less? Lol. You can always clip them off if you need it ^^. (I mean the cheap ones; doesn't have to be the fancy re-clipable ones)

Also: With your newest post. Your RAM is rated for 800mhz. You could change that in the bios by changing the multi on the RAM. Currently its running at 1333mhz, not 1600mhz =).

Got a bunch of cableties, but only used like 3 :p
The abck is a mess, i think. but was too drained to try and reconnect stuff to get i neater.
The CPU power connector, cannot reach round the back. Well, not the way i tried, there is most likely something i did not think about :)

Should i run a stresstest on the CPU to ensure the cooling is working optimal?

Ok, so todo list:
move fan to the otherside of the H100 so both pulls.
Adjust ram in bios.

Will probably have to wait a couple of days, im all worn out, haha :p
 
to mount the H100 at the top, i allso removed a 200mm fan.
Should i place it somewhere in the chassis?
Currently its just lying in a bos doing nothing.
But i was uncertain if i placed it in the bottom to pull air in, if it would "crash" with the airflow from the front fan?
 
Haha no worries. But yes I would definitely run a stress test. Prime95 for about 30minutes on blend should be fine. Just to test your max temps; to make sure the mount is solid. (do this now; then when you swap the fans back; run another and see if there's a difference).

With the CPU power connector; if it cannot reach; you can run it under the GPU, between the gap between the PCI-E slot and the actual case itself. There's a small gap there; often this is what people do. Just so it's not right in your face. There shouldn't be any risk in doing so.

EDIT: 200MM? I don't believe a full 200MM fan will fit anywhere else in that case.. Oh; just checked the site. It's a 140mm fan that comes with the top. You might be able to pop it somewhere else.. But you probably won't need it TBH.
140mm ofcourse, doh :screwy:

i'll leave it in a box for now then :)

Hmm, where to get prime95 from, googeling gives loads of odd results.
 
after 30min Prime95
-just realized afterwards that H100 was only set to medium.
But results seem decent?
 

Attachments

  • Prime95 30min 070112.bmp
    1.2 MB · Views: 72
Yeah for sure. Great temps. Take it up to 4.5-4.7ghz! Those temps are awesome lol. My i7 930 idles near those temps (24/7 4ghz OC). Its a hotter chip, and my ambients are high; but still.

After you work out the fans and what not; and set up the RAM properly. (And perhaps some cables. Remember; any cable that's not tucked away can potentially affect overall airflow. It may not mean a lot; but it's also better for how dust accumulates as well if things are clean/clear)

Go read the Guide here.

http://www.overclockers.com/forums/showthread.php?t=693613

That should get you to 4.5ghz no problem. I honestly doubt your temps would pass 70 degrees with your setup. Even at 4.5ghz.
 
Mjolnir, thank you Very much for your Post-build support!
Much appreciated, and i'll most likely bother you at some point if need some poiners :)

In regards to moving the other fan so the boht pulls, i've encountered a bit of an issue, as i cant acces 1 of the screws, due to the H100 CPU "pad" is blocking the way.
So im kindda stuck there now.

Allso, i chaged the RAM to 1600mHz, but it seems i somehow allso enabled the Asus 'auto-turbo' so the CPU is running at 3.7gHz now.
Ran a short Prime95 and temps, with the increase, also increased, topped at approx 54'c (as far as i recall) -and still H100 set to mid.
But the voltage also seemd to be around 1.33, with the auto-turbo thingie.
 
Looks good. Right now you have one fan above and one below the radiator right? I think he meant put both above the radiator.

The cables won't reach down to the bottom will they? That spot right in front of your psu would be perfect.

I replaced my stock corsair fans on my h100 with cougars so running on high is not to noticeable. I installed the corsair fans into a friends machine as front intakes connected to mb power and damn those things are loud when allowed to run free so had to use a fan controller. Not sure how bad they get with the h100 controlling them on high but it performs much better on high.

You probably won't see much heat increase with a manual oc to 4.5 vs the auto oc.
 
Back