• Welcome to Overclockers Forums! Join us to reply in threads, receive reduced ads, and to customize your site experience!

drain line?

Overclockers is supported by our readers. When you click a link to make a purchase, we may earn a commission. Learn More.

phil178821

Member
Joined
Mar 27, 2008
I finally decided to revisit my WC pc. After college, I just left it at my parents house to collect dust.

I have shortened my loop and I am actually considering adding a drainline using a delrin-T and fillport. I was wondering, will having this drain line impede my flow? It really is not necessary since I can just turn the case upside down to drain, however, I think it does make things slightly easier. Although, if it impedes performance, I will not use it.

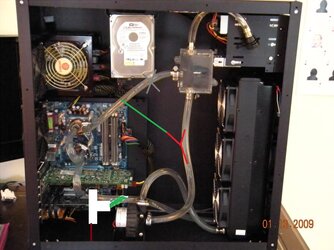
The picture below is my old loop (the new one is fairly similar, just shortened). I have drawn in where I would put the T connector and drain port. Sorry it is so rough; I am trying to quickly do it in paint at work.

The white is the T connector, which connects to the graphics card line out and goes straight down to the fillport, which screws into a hole in the bottom of the case. The port coming out of the right side of the T, (green), runs back to the radiator. Hopefully this is clear enough.

My other thought is to rotate the T connector 90degrees counter-clockwise and put the fillport out of the back panel. However, the back panel is my motherboard tray, which would be a pain to remove with a fillport in it.


Untitled.jpg


Thanks,
Phil
 
Agreed. The extra fittings will add some resistance, but not nearly enough to show up in temps.


Everybody does the same thing, BTW. In such a rush to get it going, they forget the means to drain it for maintenance...me included.
Older and wiser eventually catches up! Sometimes. :D
 
I would remove the reservoir from the flow of the loop with a "Y" connector or just remove it completely.
I hope you don't trap air in the radiator with the barbs on bottom like that. I'm sure you can work them out by flipping the case over.
 

Attachments

  • Untitled.jpg
    Untitled.jpg
    129.1 KB · Views: 152
It's doing what reservoirs do, no need to remove it. It's plumbed correctly.
And yeah, the rad's upside down to my tastes. The only time I install the way you have is when using a res/rad with a fill port opposite the barbs.
Not impossible, just time consuming though.
 
I wish that I had added a drain line. I had to drain the system 3 or 4 times while building the system, getting all the water out was a huge pain in the :censored:. I finally got the system together with no leaks so hopefully I wont have to drain it again for a while.

This was my first WC system so I am sure that a lot of my mistakes have to do with a lack of experience :)
 
Thanks for the input. I used to go with a t-line, but I found the res easier for bleeding. As well, I oriented the radiator like that because of the bleed screw at the top, which i thought made up for the difficulty in bleeding that way (? i am not sure).

Anyways, any other thoughts? Its time to drill some holes; should I go with the drain port in the bottom or the back panel?

Thanks for the input. Its nice to revisit the system after a 2 year break.
 
Oh it's got a bleed screw? NO problem then. :thup:

I'd put the drain into the bottom. That way you can just set it to straddle the sink when it's drain time, and you don't interfere with the right side panel (if it removes, most do).

I know what you mean about being back. I've been hanging steady on that mITX rig in my sig for ages, and now I'm setting up a whole new system with abbynormal cooling included! I'm even overclocking again, that Intel board (below) has zero OCability. :duh:
 
The holes are drilled. I am just waiting for the second fillport and a few more barbs to come in before I can finish it. I will put a pic up once I am done.

Thanks again
 
That's an old PA 120.3 rad with shroud, looks just like mine! Has the 17mm fan spacing. A bleed screw is nice to have, my other rad also has a bleed screw, I have barbs facing up, so draining the system is easy.
 
That's an old PA 120.3 rad with shroud, looks just like mine! Has the 17mm fan spacing. A bleed screw is nice to have, my other rad also has a bleed screw, I have barbs facing up, so draining the system is easy.

you are correct, the oldie but goodie.

So everything is wire and tubes are run, I am just waiting for the last couple of barbs for my T and the top fillport. I wish I had ordered a 90degree piece to make the run down to the drain port easier, but this will do since I do not feel like waiting on shipping. Also, dont worry, the system is wired but I will use a second psu to power the pump only for the leak test. :thup:

Side note, is there a way to get rid of the white film inside the reservoir? I figured its the plasticizer leaching from the tygon.

thanks.
 
Parially fill with 2 or so tablespoons of uncooked rice, bit of dishsoap shake for 5 minutes, rinse, check. If you use the rice too long it will begin to soften and not work. Worked for my XSPC resses a while back.
 
Add a little wasabe and you could make California rolls when you're done!


Just joking...great tip Con!
 
Add a little wasabe and you could make California rolls when you're done!


Just joking...great tip Con!

Lol.

So I got lazy and did not clean the res but that is a good idea.

So after the fact, I think I put the res a little low for easy bleeding. but it still wasn't too bad. I am anxious to fire up my windows 7 (and try out 8). I am sick of using this macbook pro that is on its last leg.

Any thoughts, suggestions, or mistakes you see with my loop? It has been a while.

And now I just need to remember how my raid array was connected and which sata port was my SSD with win7 on it.


Sorry for the poor quality pic.
photo2.jpg
 
I'd add some water to that res, it'll help keep bubbles out of the loop.
Other than that, it looks fine to me.
 
I'd add some water to that res, it'll help keep bubbles out of the loop.
Other than that, it looks fine to me.

Its not easy to till with the poor quality pic but the water line goes up into the fill line at about the level of the dvd drive.

Thanks for the input, Diggrr and everyone else
 
Yeah I see that now after closer inspection. Camera flash and the white lining have conspired to make a pretty good optical illusion at the inlet level. :)
 
Back