• Welcome to Overclockers Forums! Join us to reply in threads, receive reduced ads, and to customize your site experience!

Help Overclocking 1055T GA-990FXA-UD3

Overclockers is supported by our readers. When you click a link to make a purchase, we may earn a commission. Learn More.

aferg34

Registered
Joined
Mar 26, 2014
I've been reading quite a bit about overclocking the 1055T and 990FXA-UD3 board and not really successfully overclocking at any stage.

My setup:
Gigabyte 990FXA-UD3 Rev 4.0
Corsair DDR3-1333 RAM (2x4GB)
Antec Kuhler 650 water cooler
AMD II Phenom X6 1055T

Im not much of a gamer and really just want to get the maximum stable speed out of my setup and any help would be greatly appreciated. I think my ram is the issue only being 1333 but I've seen some other successful OC's w/ this ram so I wanted to troubleshoot elsewhere before I upgrade ram.

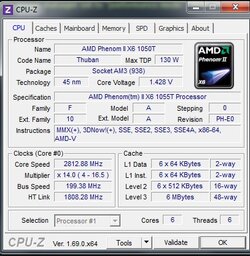
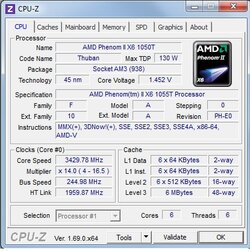
CPU Tab.jpg

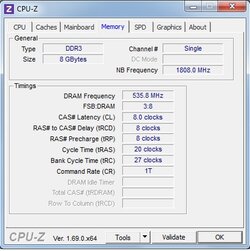
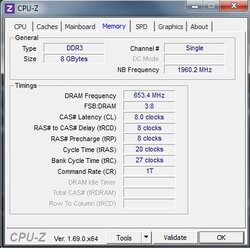
Mem Tab.jpg

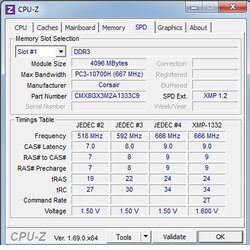
SPD Tab.jpg

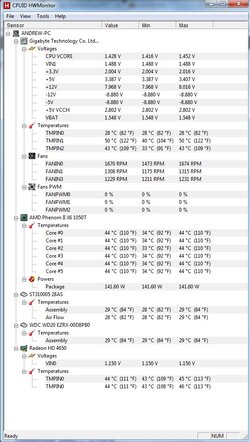
Temps.jpg

#0.jpg

#1.jpg

#2.jpg

#3.jpg

#4.jpg
 
Last edited:
Welcome to OCF aferg34, we'll do what we can to help you out.
I would suggest reading through this guide a couple of times to get familiar with the terms and techniques we'll be using to get you up and running.

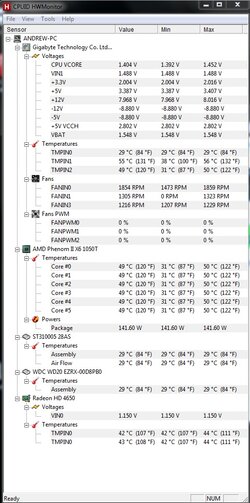
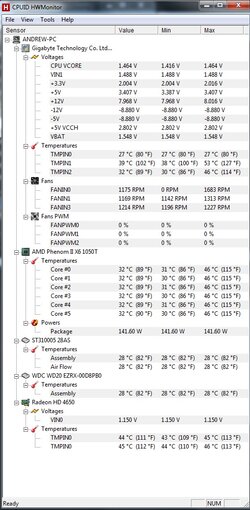
I see you have the pics figured out. One thing I would ask is that you use HWMonitor free it'll give us more vital info we need to help such as voltages and CPU/ socket and core temps. So I would ask that you run P95 blend for 20 minutes or so with HWmonitor open and take a snip of it so we can see what's going on under load.

Thank you. I will post those tonight.
 
Btw I have the bios set at defaults with turbo, ce1 disabled. I forgot to mention for some reason i havent been able to get dual channel ram to enable on this board. I have them in the same color slots as described in the manual. Also tried each stick indv to make sure they were both working properly
 
You'll also want to disable C6, EPU and APM if you have these options.
 
He won't have C6 with an AM3 CPU or APM either I don't believe.

Make sure you disable Cool N Quiet as well.

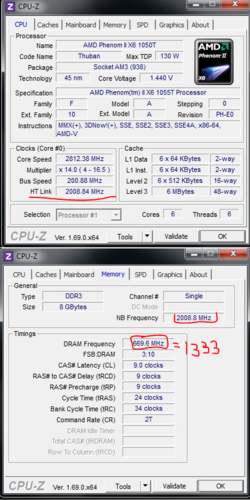
Just looking at the pics from your first post I see one problem already and that is you have not lowered the starting frequencies of your ram, HT Link and CPU/NB in order to make headroom as you increase the CPU frequency (aka, "FSB" and "HT Reference"). As you increase the system bus the frequencies of the ram, the HT Link and the CPU/NB will also grow and anyone of them can cause instability if it gets too high. So, lower those frequencies below stock in bios before you start to overclock the CPU. For instance, lower the RAM frequency from 1333 to 1066. Lower the HT Link and the CPU/NB to 1800.

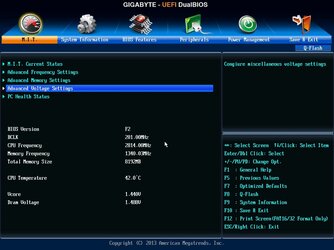
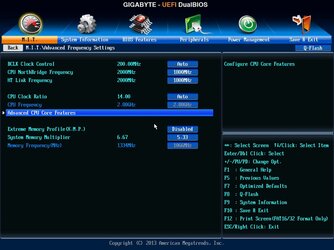
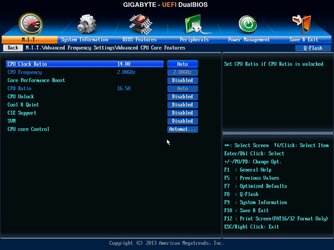
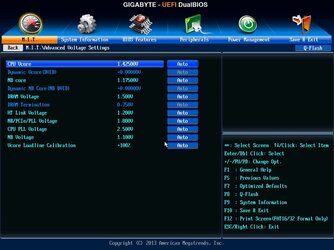
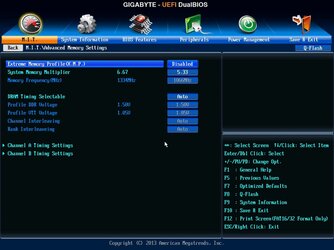
If you will capture some pics of the overclocking sections of your bios and attach them with your next post we will help you pic out the relevant bios items. We need to see what you see in bios as terminology differs greatly from one bios to another.

To capture pics in bios is made easy with a lot of motherboards if you have a USB flash drive. Just insert the flash drive into a USB port and boot into bios. Go to the tab you wish to capture and press F12 (usually it's the F12 key but it may be another key with some boards). You also may need to reduce the file size of these captured images as there is a file size limit the forum upload tool will accept. Plenty of free tools on the internet to resample/reduce image file size. Irfanview is one. Windows Paint will also do it.

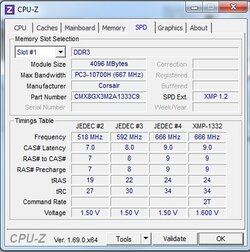
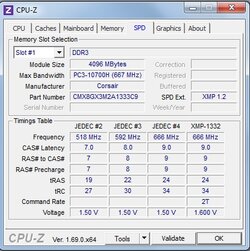
Also, please go back and add a pic of the CPU-z "SPD" tab to the two you already posted. The SPD tab gives info about what the RAM manufacturer recommends for voltages and timings of the ram at various frequencies. Until you do that we have incomplete information.
 

Attachments

  • Too high.PNG
    Too high.PNG
    140.6 KB · Views: 617
Last edited:
Note: CPU-z reports the ram at 667 mhz. This is the base rate, not the "DDR" speed. It is the equivalent of 1333 mhz in DDR3 terms. Just double it.
 
This is what they are wishing to see overall.

Makes answering about overclocking an AMD cpu easier.

In bios disable C1/E, C6, Cool N Quiet, TurboCore (if there), Disable APM and in windows power manager set to "performance mode". Then do as below.

CPU Tab in CPUz from CPUID com
attachment.php


Memory Tab in CPUz from CPUID com
attachment.php


SPD Tab in CPUz from CPUID com
attachment.php


And this is screen capture of HWMonitor (free version) from CPUID com
HWMonitor has been scrolled enough and large enough to show Min/Max of Voltages and includes the CPU Core Temps; which are n0w called Package Temps, fully visible.

This capture is made of HWMonitor after it has been open on the desktop logging Min/Max temps and voltages while Prime 95 was running Blend Mode test on all cores for at least 20 mins and then the capture of HWMonitor was made and it shows the Min/Max temps and voltages before P95 Blend was started and while running P95 Blend mode and gives much greater insight into how the system is performing without guessing.

attachment.php


In order to attach screenshots of INDIVIDUAL images as suggested, first crop and capture the images with Snipping Tool found in Windows Accessories or equivalent. Then click on Go Advanced, a button at the bottom of every new post window. Then click on the little paperclip tool at the top of the Advanced post window when it opens. Clicking on the paperclip tool brings up the file browser/upload tool and the rest is fairly obvious.

How to actually attach images to the forum and not use a link to some outside location where image is stored. Store the image within the forum.
attachment.php


You can attach more than 3 pics at one time by going back up to browse another file and uploading it.
 
Thanks guys. I updated the IMG's as request and I will upload the HWmonitor once prime95 has run for 20 min (~13min from now)
 
Thanks guys. I updated the IMG's as request and I will upload the HWmonitor once prime95 has run for 20 min (~13min from now)

Your testing for temps at stock? Just run it for like 10 minutes to get an "idea". That chip should hardly break 40c at stock loads.

Any how, just wanted to say hi and welcome to the forums. These fellas should have you at or near 4ghz in no time with that chip!

GLHF!! :thup:
 
All img's now updated in OP. You guys are amazing for taking the time to help me :)
 
Your testing for temps at stock? Just run it for like 10 minutes to get an "idea". That chip should hardly break 40c at stock loads.

Any how, just wanted to say hi and welcome to the forums. These fellas should have you at or near 4ghz in no time with that chip!

GLHF!! :thup:

Hi Thank you
 
Just to give you some guidelines, in overclocking we generally see temp-related instability begin when the core temps hit around 55c and the socket temp (TMPIN2) hit around 65c. That will give you some idea so how much headroom you have to overclock in relation to current temps.

Looks like you have already lowered your RAM frequency, CPU/NB and HT Link frequencies to appropriate levels in order to make room for the overclock. Now, start increasing your BCLK Clock Control (we generally call this the "FSB" for "Front Side Bus") 10 mhz increments.

After each increment of increase, run a 20 minute Prime95 blend test to do a tentative check for stability and to monitor temps and voltages.

The first time you fail the Prime95 stress test, add .025 to your CPU vcore and retest. If stable again, add to FSB in 5 mhz increments, stress testing after each increase. Post back with pics of HWMonitor and these three tabs from CPU-z: CPU, Memory and SPD when you hit a wall.

Failing the Prime95 blend test means either BSOD, lockup, spontaneous restart or having one or more of the four core workers drop out.

Have a good time.

Thank you. What voltage should i start with? Currently its set on auto.
 
Take the CPU vcore off of Auto and set it to the default 1.425. We won't add more until you need it.
 
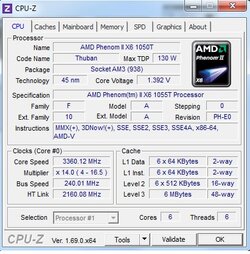
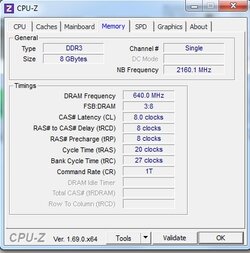
I hit a wall at FSB 240. When I set to 250 my comp wouldn't restart (several beeps). Then i reset FSB to 245 and upped CPU vcore to 1.45 and the prime95 had errors on all cores within 2 minutes. Below are screens of the last successful 20 min prime95 test (FSB 240, CPU vcore 1.425)

cpu 240.jpg

mem 240.jpg

spd 240.jpg

Temp fsb 240.jpg
 
How many sticks of ram are you using? Did you notice in the CPU-z tab, "Memory" that you are running your ram in single channel mode? You need to move one stick over to a different color slot. Now, single vs. dual channel mode has nothing to do with stability but dual channel does give a little better performance.

I also notice that in your last stable configuration your CPU vcore is only at 1.392 according to CPU-z. What's it set to in bios?

At this point I would lower your HT Link Frequency to below 2000. Right now it's showing 2160. I would also increase your NB Core voltage to 1.225. I would then try FSB at 245 again and CPU vcore at 1.475.

I'm running 2 x 4gb DDR3 1333 and properly installed to "enable" dual channel. I have tried putting the sticks in every possible combination without any luck getting dual channel to enable. I'm stumped at why I can't run dual on this MB.

The CPU-NB and HT Link Frequency in bios was set at 1800. I Just now set CPU vcore to 1.475, FSB 245, NB Core volt to 1.225, and HT Link & CPU-NB frequency to 1600. Test is running now.
 
Looks like you bumped your CPU/NB frequency down. Actually, I didn't want you to do that.

Give the vcore a boost to 1.5. You seem to be getting a significant amount of vdrop and vdroop from bios to Windows idle and bios to load.
 
Back