• Welcome to Overclockers Forums! Join us to reply in threads, receive reduced ads, and to customize your site experience!

PROJECT LOG Project 64:OC

Overclockers is supported by our readers. When you click a link to make a purchase, we may earn a commission. Learn More.

Silver_Pharaoh

Likes the big ones n00b Member
Joined
Sep 7, 2013
Not the emulator, those are for gamers without the real deal :p

It was Wednesday, I had nothing to do and I thought, my N64 is just collecting dust..

To Google I went and low an behold, you can overclock this thing! :shock:
Gotta try that I said, and here I am.

EDIT: I have discovered you can switch the multiplier on the fly in game! So switch to 2x for smoother gameplay, and 1x to give yourself extra reaction time/more time to complete puzzles etc. while you are playing! Sweet bonus! :D
UPDATE: I DO NOT recommend switching the multiplier on the fly anymore after doing so caused my N64 to shut down and not reboot! Unplugging everything for a few minutes resolved it though. but it's not worth the risk!


Many guides to go about doing this, but I'll be using this one.

And for some pics to get us started:
IMG328.jpg

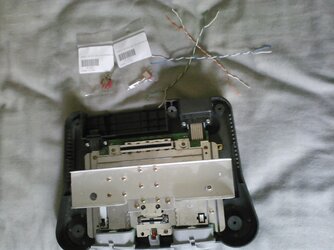
This is the stuff I'll be using.
I had some cat6 cable lying around, so I chopped some off. It'll do fine :)
I also took the liberty of removing those dumb "gamebit" screws. I spent a good hour or so yesterday just removing them. *note to self, buy gamebit screw driver*

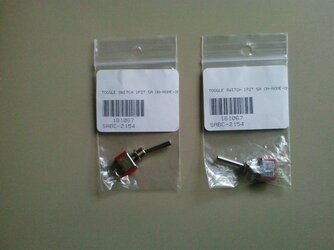
Picked up some switches today:
IMG338.jpg

$5 for both, not bad.


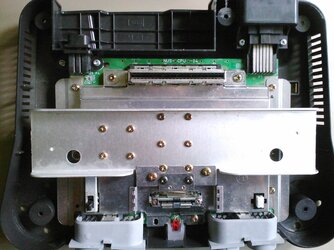
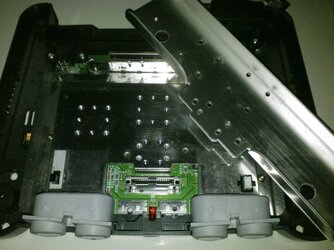
And this is the N64 without the top half.

IMG333.jpg

Huge chunk of aluminum, that's the heat sink. Also lots of EMI shielding.
Screws are in very tight, as I assume that's the only way to transfer any heat :p

Also notice the revision number behind the cartridge slot. NUS-CPU-04.
The last revision was NUS-CPU-09, and I'm reading mixed reports of new revision overclocking better, while some say the old ones are better.. :shrug:
Guess we'll see.

Comments? Suggestions?
Maybe you've even do this mod!
Lemme know what you guys think!

I might be able to work on this more today, but if not, Friday afternoon and Saturday :thup:


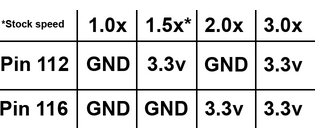
EDIT: Here's how this mod actually works:
Pins.PNG

There are 2 pins on the CPU that control the multiplier.
The default multi is 1.5 for a frequency of about ~93Mhz

A 2x multi equals about ~121Mhz
and a 3x multi equals about ~180Mhz (IIRC)
The 3x multiplier however, is "mythical" virtually no game will boot with the CPU running that fast so it's kind worthless, but might as well include it.

To change the multiplier, one must supply pins 116 and 112 with either 3.3 volts or ground them as shown in the chart above :)
 
Last edited:
So... what does overclocking a console actually do? Aren't their FPS limited anyway?

From your guide...
I know my handwriting sucks, but I'm left handed and write left to right, so I don't normally see the letters I wrote before.
LOL, ALL lefties write that way (I know, I am one!), and my handwriting is quite neat... Is there anyone that writes from right to left or is that called backwards? :p :rofl:
 
Most game ARE FPS limited yes.

But 007: Goldeneye and Perfect Dark are not :)
Actually, I read all RARE games are not FPS capped.

There are 2 other bottlenecks that I CAN'T fix, the RAMBUS RAM (Rambus who? :p ) and the RCP, reality co-processor which gets it's clockrate from the TV somehow :sly:

Either way, every game will feel smoother because the CPU can render those frames faster. Doesn't actually increase the FPS, just renders them to the screen faster.
 
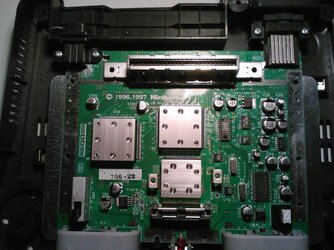
Decided to tear it down to the mobo.

After unscrewing about 50 screws :sly: I reached the mobo.
Of course, that was after removing the huge EMI shield.
IMG339.jpg

IMG341.jpg

And there it is... The motherboard.
This older revision has 2 nice enhancements.

The actual extra slabs of aluminum on the actual RCP, CPU and RAMBUS RAM chips, and:

IMG345.jpg

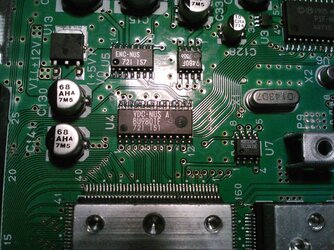
This little baby.
That's the VIDEO output chip, and the 04 revision is the last to have this model. What's so special about it?

The RGB mod. If I buy another RGB amplifier chip, I can boost the colours and vividness of the whole video output. :thup:

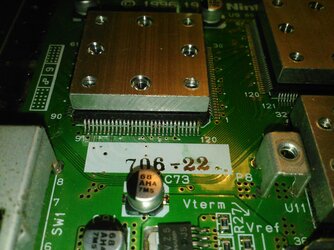
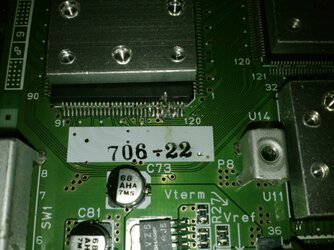
Now... Here are the legs I must un-solder and remove from the motherboard.
IMG343.jpg

OH GOD they are tiny.
I'm actually not sure if my dad's soldering iron has a tip thin enough for that...
Might have to buy a new soldering gun (don't make his anymore I think) or possibly heat up an old flat tip screwdriver and melt it off like that :-/
(That's last resort of course ;) )

Next up:
Need to find 2 capacitors that feed 3.3 volts and make sure they are close to the CPU.

EDIT: Woah! Fired her up to find 2 3.3 volt capacitors, within 10 minutes the RCP is too hot to touch! And it isn't even playing a game! :shock: Might have to consider a fan....
 
Last edited:
Well, I got the 2 legs unsoldered...

But I got solder on 3 other legs, and while I was trying to remove the solder, I completely ripped another leg right off the PCB.

There's no fixing that :rain:


So until I can locate another N64 that's NOT $60 (Yes, the hock shop store wants $60 wtf??) This project will be on hold.

If anyone has one, lemme know. Defiantly want to finish this mod :thup:
 
You ripped the leg off of the board? Usually they are on the components. Do you have a picture?
 
You ripped the leg off of the board? Usually they are on the components. Do you have a picture?

Hard to explain...
See spoiler below.
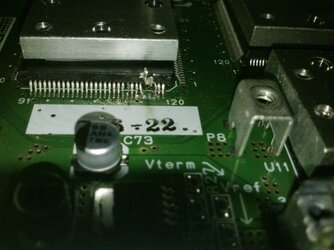
Okay here we go:
IMG349.jpg

IMG350.jpg
You can see legs #117 and 118 are still covered in enough solder that the 2 have electrical contact, and you can also see the other leg that has been ripped off the board...

I have one last crazy idea for this now dead N64, expose the corresponding traces, and solder wires to the legs and connect those wires to the traces.
But, they are very small traces... Hmm...

Now, I was able to separate the trace and remove enough solder from the other legs on the CPU, that there shouldn't be any shorts between any CPU pins.

This means that I can finish the mod tonight, and with any luck the N64 will survive! :)
 
I'm not sure how you did that, but you could "hack" in a fix with solid core wire. It is going to be difficult to do. Why are you unsoldering this chip without a heatgun?

EDIT: Although, it looks like there is board damage on the pins that are bent up. It looks like the solder pad got ripped of the board. I'd put money down on that board and the chip being busted.

There is board damage yes, however there is a lot of the trace that the pin once connected to left. I'm currently trying to solder a wire onto the trace, but I need to expose more copper trace. The wire I'm using did solder to the trace, but not enough exposed trace to be permanent.

As to the heatgun, I only need those 2 pins lifted.
But come to think of it, a heat gun would have been cleaner, but I thought that it would cause all of the solder to run away and solder all the pins together..?
 
Alright!

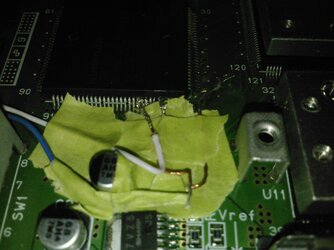
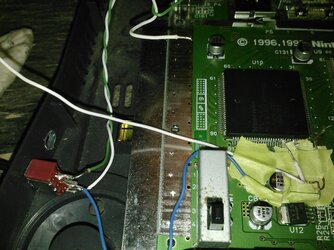
After hours of head scratching, soldering and wire stripping, I was able to patch the pins.
Quite ugly yes, but you won't see that once I put the top cover back on :)
IMG365.jpg

IMG364.jpg
I also went ahead and connected the first switch.
I just need to see which capacitors other people soldered too, and I should be good to go!

With some luck, my N64 will be lightning fast soon :)
 
I think I know now how that pad got lifted with the leg, but I have to ask...

what wattage soldering iron are you using?
 
I think I know now how that pad got lifted with the leg, but I have to ask...

what wattage soldering iron are you using?

100/140 watt soldering gun.
Though I've been useing the 140 watt mode.

It also lacks a fine tip for soldering small things, but it does have a blade with a fine tip. That's what I used to desolder the 2 pins.


Also, an update:
My N64 is officially dead. Found 2 pins touching each other, and went to go resolder them, the one snapped off :(

Luckily, I'll have another one on Tuesday. Only $30 :)

Aww no! Dead Jim, kirk... Jim.... Scotty... Dead Jim!

You need better tools my friend. And using some damp fire proof sponge can help the heat spreading into silicon and traces on the board :thup:

Get a solder iron you can set the temperature on and a set of needle tips :)
 
Aww no! Dead Jim, kirk... Jim.... Scotty... Dead Jim!

You need better tools my friend. And using some damp fire proof sponge can help the heat spreading into silicon and traces on the board :thup:

Get a solder iron you can set the temperature on and a set of needle tips :)

Didn't think about the heat penetrating the traces in the CPU... That could be another reason (if it worked) that could kill it.

Good catch Bobby!

Defiantly gonna look for better tips or a new iron.
Maybe buy one off the egg since I'm about to buy some stuff from them :)
 
Get yourself equipped with the right tools and consider the spread of heat damage and you will do much better :thup:

I want to see a clocked retro machine... No dead projects.

Temp control iron and cooling the surrounding traces and silicon are pretty essential on something machine fluxed and meant to only be applied once :D

Ive butchered enough pcb through heat damage to know. Lol

Modern silcons have such tiny legs it's heat flux and capillary action that solders them.

Be why so many gpu cards develop faults I expect. Its hard to replicate what automated factories do :)

Even two mm banana plugs or plastic bodied eichmann bullet plugs or plastic bodied din plugs are two seconds solder time... Four or five seconds and ooops its a gonner. Lol

Edit: sometimes using multi strand copper wire to soak up the solder you have fluxed to remove can be better than a desolder gun ;)
 
Last edited:
If I had some free time, I'd try this, because guess what I have? A heat gun, adjustable soldering iron, a set of fine point tips, and a N64 :D

Just commenting so I can find this later.
 
If I had some free time, I'd try this, because guess what I have? A heat gun, adjustable soldering iron, a set of fine point tips, and a N64 :D

Just commenting so I can find this later.

Yup. Cool mod eh? Breath some life back into an old but awesome console. :)

Defiantly going to try the heat gun on round #2.
 
Let me know how it goes. So far the only thing I managed to do with mine is make some Dali inspired PCB boards... :(
 
Back