• Welcome to Overclockers Forums! Join us to reply in threads, receive reduced ads, and to customize your site experience!

Flexible tubing build: PC 011 dynamic

Overclockers is supported by our readers. When you click a link to make a purchase, we may earn a commission. Learn More.

Zerileous

Senior Member
Joined
Jun 21, 2002
Update: Here are some recent upgrades to this loop.

Some of you might recall my previous thread for advice and planning for this loop. It's finally coming together! Thank you to everyone in the community for your advice and support, special thanks to GTXJackBauer for his extensive help and advice with this project! Here is the thread for reference.

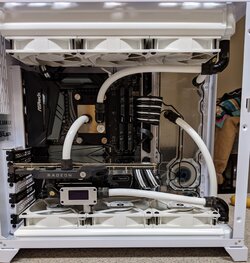
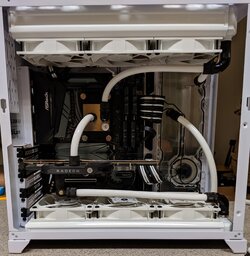
Components are in sig. Watercooling: EK-Supremacy EVO AMD - Full Nickel, EK-FC Radeon Vega RGB - Nickel, EK-Vardar EVO 120ER BB (500-2200rpm) - White x 6, Black Ice Nemesis 360GTX® Dual-Core Xtreme Profile Radiator - White, EK-D5 Vario Motor, Radikult 360mm res. holes reversed for rear pump mounting, PrimoFlex Advanced LRT Tubing - 3/8in. ID X 1/2in. OD - Elegant White, Bitspower fittings matte black.

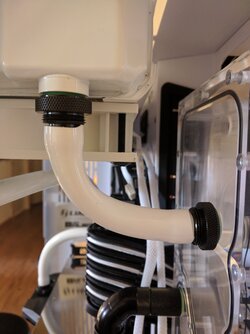
First pic is a question, is this bend too tight? It seems to be on the verge of kinking...
IMG_20190115_121335.jpg

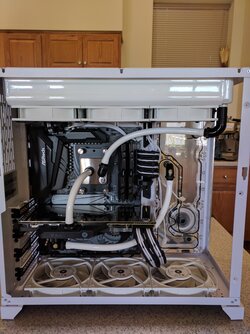
Overall shot, what do you think? I considered flipping the CPU block and going res>cpu>gpu>rad, but I didn't like the long tube from GPU back to rad. Probably be less restrictive but I think the D5 can handle this. Going to re-do the run from CPU>Rad so the 90 deg fitting can aim straight up. (this is just a mock up, fittings not tightened and compressions off, no plugs, just FYI in case someone was worried for me!)
IMG_20190115_121923.jpg

Adding additional pics from post below:

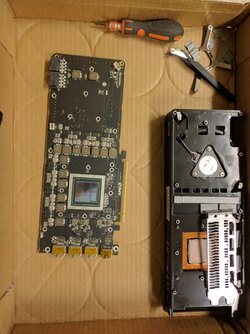
Nude Vega 64
View attachment 203739

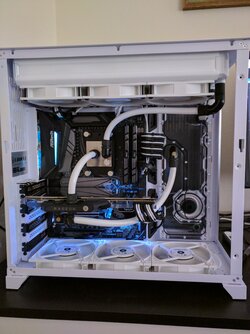
No glass
View attachment 203740

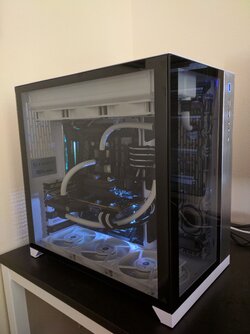
Glass
View attachment 203741
 
Last edited:
helluva nice job - i just hope mine turns out half as good as your's did. Is the "window" to the cable management chamber your reservoir? if so, did you fabricate it yourself?

i drooled over that case and it's sister, the PC011-AIR, but they didn't have the HDD bays i needed, but you do have me drooling - i'm envious of the headroom above the motherboard - and you've even got me tempted to spray my radiators white

damn nice execution, you made me jealous
 
helluva nice job - i just hope mine turns out half as good as your's did. Is the "window" to the cable management chamber your reservoir? if so, did you fabricate it yourself?

Yeah that's a reservoir and pump top. It was made by Radikult, you can find his stuff on ebay. This is his normal 360mm, designed to fit in a 360 rad spot, except I had him reverse the holes so the drain and fill hole are on the same side as the pump. I think he has a distribution panel now too, for hard lines. He also has stand-off's for the mounting spots if desired you can mount it above fans/rad. he has 240, 280, 120, etc, for D5 and DDC.


Looks great! Well done!

Thanks! I was a bit worried about the different shades of white when I unboxed everything, but the mild tint on the tempered glass really blends it all together.
 
many, many pretty!!!!!!
the drives are on the back of the motherboard tray?

Just one m.2 SATA SSD 1tb. Although it has room for 2x 3.5" and 3x 2.5" drives back there, I'm not currently using those spots.
 
nice job! im also a pc011 guy. they are among the sweetest cases out there. one day i will use it in a build!
 
Wanted to add a couple more pics, in progress and complete.

Nude Vega 64
IMG_20190110_151026.jpg

No glass
IMG_20190123_123818.jpg

Glass
IMG_20190124_102957.jpg

Overall the loop is performing decently. It is probably a little bit under-radded for silence. This is because at the last second I switched from a 1070ti to a Vega 64, which is hot. I did this so I could use a freesync monitor, and now nvidea is going to support them anyway :eek:. I was going to go with the D5NEXT for combined flow & temp monitoring with fan control, but it wouldn't fit behind the res, so in that case I chose form over function. When I do 6 mo. maintenance, I will probably add a rad to the bottom. I am having good luck running fan curves off of the CPU. Initially I was getting delta Ts over 20 (from measuring rad output air with a kitchen thermometer), but thats because fans were based off of some kind of motherboard package sensor instead of on die, and they were barely spinning up. Currently it's silent during idle with the pump at 2500rpm and fans at 500rpm, but under load it gets a bit louder, fans in the ballpark of 1500rpm. It takes aida64 with graphics enabled to max the fans at 2200rpm. The nemesis GTX does indeed scale well as advertised, more than capable of handling the heat given enough fan speed.

GPU tems stay wonderful, I rarely see it over 60c even at load, however, the CPU does seem to suffer. Idles under 40c, and runs under 70c gaming. I have seen 80s with prime95 and aida64 GPU included tests.

Current OC is PBO with a -0.05v CPU offset, LLC5 (lowest), and XMP 3200 (plus DRAM calculator subs) vSOC set to 1.0v, LLC5 which droops to 0.987 (exactally the recomended voltage by the DRAM calculator). Single core loads will pull 4250 easily, while multi core loads usually have two cores at 4150, two at 4100, and two at 4050. TDP has broken 100w at times. Next I'm going to start increasing bclk (after resetting ram to SPD) and see what that does, then go back and see where my ram maxes (it's just too much work to do all the DRAM calculator subtimings for each OC of bclk). Theoretically 42.5x104=4420 which would be a pretty nice single core boost!

For the GPU it really does not seem to hit it's max rated speed until I slide the power slider in afterburner to max. So I haven't touched the speeds otherwise. It does have a DIP switch near the bracket side that I think may be for dual bios, but I need to look into this some more. I plan to flash a liquid cooling bios to it at some point, but I want to get the CPU where I want it to be first.
 
Can I ask a favor, I'm looking at getting a Dynamic, but wanted to use a crossflow radiator. Can you measure the top and see what the longest radiator you can fit is?

Thanks
 
Gorgeous build Zerileous. Sorry if your question was answered already but I would add a couple 45° fittings at that tight bend. This would likely put less stress on that tight bend. Very clean build with outstanding cable management.
 
Can I ask a favor, I'm looking at getting a Dynamic, but wanted to use a crossflow radiator. Can you measure the top and see what the longest radiator you can fit is?

Thanks

Looks just shy of 44cm, I would say 43.5 would fit but it would be very tight. Clearance on the bottom is less due to the PCIe brackets. Also make sure you check out this video for other fittment issues.

Gorgeous build Zerileous. Sorry if your question was answered already but I would add a couple 45° fittings at that tight bend. This would likely put less stress on that tight bend. Very clean build with outstanding cable management.

Thanks for the feedback. I've been running it as is, do you think I'm risking a leak or could I change this in 6 months when I drain for maintenance?

Appreciate all of the compliments, just took my time planning and assembling everything. Using just one M.2 drive really helps with cable management, last time I built a PC I was dealing with IDE ribbon cables.
 
If it's been running without leaks I'd say you're probably in the clear and wouldn't touch it until you do your next flush/refill.
 
Looks just shy of 44cm, I would say 43.5 would fit but it would be very tight. Clearance on the bottom is less due to the PCIe brackets. Also make sure you check out this video for other fittment issues.

Yes I've been researching it all. I'm also considering the Air since I already have a PE 360.
The design of the front on the AIR version moves the IO on the front furter out and eliminated the radiator issue on the side.

I was thinking of using the crossflow on the top to help eliminate one of the longer tube runs needed when both ports are on the same side.
 
If I already had a rad that didn't fit in the back portion, I would just mount it in the front position of the side instead, and put the fans in the back compartment. It's a thin enough rad that you should have plenty of room for fittings even with a top rad. You can look at my first pic to see how much room there is between mounts. I can grab a measurement if needed, and I'm pretty sure the GTX is a wider 120.
 
I just wanted to update this thread with some recent upgrades.

IMG_20190813_230621.jpg

IMG_20190814_022458.jpg

A few months after building I became frustrated with the motherboard PWM control and trying to base RPM off of CPU temp, so I purchased the Aquacomputer QUADRO. This is listed as a fan hub, but it has much of the features of a full fan controller. It can take temperature probe inputs and apply a fan curve to them. This curve will ramp down even when not running the Aquasuite software (e.g. in the BIOS after the loop was heated up with a high load). I haven't tested applying a load in a different OS to see if the curve ramps up.

The original goal of the setup was to have a mild OC on a 1070Ti, however deals presented themselves, OC bugs were caught, and I wound up cramming >300W through a Vega64. The single 360 Nemesis GTX performed admirably and managed to keep component temps under control, however it was exhausting air over 40c and requiring fans to run at full speed under load.

A 360mm Nemesis GTS was installed on the bottom intake, where 3x120mm fans were already present. A Barrowch flow meter was also installed, but then removed as it was not working. I found the impeller to be impossible to turn in any orientation. In hindsight, GTXJackBauer was correct that I should have just gone with a D5 Next, however it will not fit behind my reservoir like a plain D5.

While there is substantial exhausting of the bottom intake passively through the expansion slots, and thus passive intake to the top rad through the vents next to the IO ports. This is still a case where loop order may matter. The GTX is layered rather than flowing side to side, so coolant first flows across the top of the rad, being exposed to the hottest air. Next it flows through the bottom of the top mounted rad and is exposed to case ambient air, which is now partially heated by the first rad. Finally, after a trip through the pump and res, the coolant flows through the bottom rad before going to the components. There is actually a note that comes with the GTX specifically addressing that inlet and outlet orientation matter, so I simply continued the same approach to adding the bottom rad. The coolest air is exposed to the coolest coolant, therefor you never have hot air adding heat back into the loop, or at best negating a section of radiator.

Now deltaT (measured from a temp prove on the the bottom intake and the in loop temperature probe) is under 10c even under load, and fans while not silent are not going full blast. Folding is accomplished with the GPU undervolted, fans at 1000rpm, and deltaT around 7c. While not silent, this is much less obtrusive than the performance folding on the single rad, where watching TV about 7 feet away the fan noise was marked.
 
Last edited:
Nice build .... I was thinking of this case, though more on the lines of a max LC build with 3 thick rads. What kind of issues have you run into with fitting rads.
 
Nice build .... I was thinking of this case, though more on the lines of a max LC build with 3 thick rads. What kind of issues have you run into with fitting rads.

Its a great case. It doesn't have trays to slide rads in and out, so that makes cleaning more difficult than some cases, but being able to remove the front panel helps a lot with securing fittings.

My ideal build would have been a res replacing the front panel and a vertical GPU, but the front panel reservoirs weren't available when I did my build.

Only fitting issue is the 90 degree turn from the exit of the top rad to the reservoir. Hardware labs specifies to use a specific port as inlet and outlet depending on orientation, so I can't easily switch the ports. I've tried a dual rotary 90 and spacers, dual 45s, straight fittings, etc, nothing will run without a slight kink in the tube, but it doesn't seem to impact performance. I've settled for a single 45 for now.

The biggest fitting issue is the side rad, if you want it in the back panel. This video covers a lot of clearance issues:
and this site helps too http://www.lian-li.com/pc-o11-dynamic. The top and bottom 360mm will overlap with the side rad. While you might technically be able to fit a 60mm rad there, room for fittings would be really limited, although a tight 90 might fit, I'm guessing not. There is definitely room for a 60mm rad on the bottom and 25mm fans, but I went with a slim because there would be maybe 1 slot worth of room for the fans to "breathe" against the GPU. The top has plenty of room, 90mm, although it will not be able to overlap the motherboard d/t the top VRM HS, at least with my board.

If you want anything specific measured, shoot me a PM and I'd be glad to let you know. I also think it would be cool to mod the side panel so a larger rad could protrude if you wanted a really thick rad or push/pull.
 
Thanks ….. For rads I will use Black Ice GTX Extreme or the new Nemesis AND the Alfacool UT45. As it Stands I have 2 - 360 AND 2 - 240 debating on buying or building from scratch. The problem with building is finding the time. Right now is planning I have new ram on the way maybe new purchase will be the case or sheet steal. These new Ryzens may not overclock great but they have got me interested in my rig again, don't think I am alone in that.
 
I know what you mean about finding the time. I had this new rad sitting around since May.

I think the UT45 could be made to fit with two GTX. Likewise, I think 2x360 and 1x240 would fit. Again you'll be getting pretty close to the graphics card with a 60mm rad on the bottom, but it should fit for sure. The other thing to watch out for with this case is the graphic card / block height.

They may not overclock great in the conventional sense, but they certainly take advantage of good cooling https://www.gamersnexus.net/news-pc/3492-ryzen-cpu-thermals-matter-coolers-and-cases.
 
Back