Hello again everyone. Long time no see. For those who don't remember, I've been a member for almost 20 years and was a moderator from 2003 to 2008. But life happens and priorities change so I stepped back and drifted away. Well look what I won in an auction: The IBM 5160. The original PC with a hard drive. 4.77mhz (not ghz) of 8-bit processing power with a massive 29,000 transistor count and the ability to utilize 640kb (not mb or gb) of memory. This was what my first computer was and I've been aching to get one again to make a sleeper with. Well now I have one and you're the first ones I wanted to share with.
Not sure how long this will take to finish buthere's a few pics from my phone. A proper walk through will come later.
Save the guts. These things are actually worth something now. I did a sleeper like yours but around 2006ish when I found an XT clone at my dump. Just tossed what was inside, a shame looking back.
I still have the sleeper, haha. A PC XT case with dual Pentium IIIs OC'd to 840 MHz
I'd love to re-do it, if I could mange to fit a 2x120mm rad / CLC cooler in it.
Definitely looking forward to updates, very cool!!
Now that I have a chance to post from my computer, let's do this right.
I called the thread 300hp Ford Model A because this computer is the second ever "home user" "PC". Yes, Apple hit the market first and yes there were other computers before that, but Apple computers are not "PCs" and the stuff before the IBM 5150 and 5160 were things like the early Altair computers, things that didn't have an output screen but relied on banks of LEDs that you would have to interpret, the kind of stuff you would buy in kit form from the back page of Popular Mechanics or some HAM Radio magazine. The first "real, home user PC" in my opinion was the IBM 5150, the "PC" as it was called. The second one was the 5160, the "XT". To me they are akin to the first major automobiles the end consumer could buy, The "Model T" followed by the "Model A". And 300hp comes from the fact that the guts I'm putting in are a lot more powerful than the originals. I could call it a 1,000hp computer but honestly, the most robust micro ATX I have on hand to put into it is only an old Phenom II x4, so let's call it what it is.
So here's a few pics of what I started with. You've seen the front, here's the back:
This is what faced me once I pulled all the daughter cards, drives and motherboard (XT power supply still installed:
You can see all the bracing that is used to hold the motherboard off the bottom of the case, the official IBM versions didn't use individual stand offs like a lot of the clones did. This material is spot welded in. I'm going to have a couple of hours of dremmeling ahead of me to get this out. I'm also going to have to grind out the spot welds that hold the old ISA slots in place.
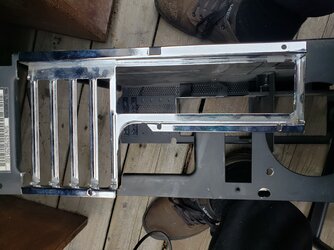
Here you can see I've removed the mounting framework from the bottom and the ISA slots from the back, as well as cleaned up some of the rust.
If you look close you can see I also cut up the drive bay. That's because even micro ATX mother boards are a bit wide than the standard AT format that XT motherboards followed. Here's the original XT board on top of an old s775 micro ATX board I had laying around. The are both sitting flush together on the other end, but the micro ATX extends past the older board.
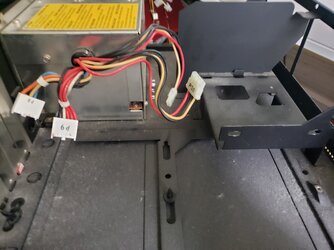
This means the power supply will be pushed further down in the case but no worries, because the XT power supply is so much bigger than a standard ATX, we have room.
Technically I could fit a full sized ATX board in, but it would be very tight and I'd probably wind up completely removing the drive bays. I'm hoping when all this is done I will have a 5.25" floppy drive installed and working, even if it is just to honor tradition.
Here's a shot of the mobo I intend to install to show that by using micro ATX, I only have to remove a small amount from one side of the bay.
Ok, so I got a lot more done during this long weekend, not as many pics as I'd like to have but here's an update.
So after gutting the back to make room for the back panel I was left with some open-air gaps, these were filled with riveted-in sheet metal that was also epoxied in place. You can see the small clamps at the top of the picture to hold the weakest part of the new framework in place until the epoxy dries. I also put a generous amount of epoxy on the standoffs that were added to the old 775 mobo (I don't want to risk damaging the mobo I'll be using in the end). See those two needle-nose pliers down front? Temporary bracing to stop the mobo from shifting around while the epoxy cures. PSU isn't installed yet, just there to show how it will look in the end.
This is how the back looks with the sheet metal cover plates. It'll look better when all painted black.
Standoffs held in place by epoxy. Not sure how well epoxy hold to nylon. I suppose time will tell. Anywho, LET'S PAINT!
Ok, it's still ugly. But I don't have the equipment to weld so rivets and epoxy will have to do.
The hole cutout for the back of the PSU was eyeballed, then I realized I had a removable mounting plate for a PSU in an old case and I could have used it as a template. But I used that to mark and drill the screw holes to attach the PSU so I know that will line up.
There's the whole chassis painted. Pics of assembly will follow later.
Ok, so I did get it installed and moved the ball down the field, but after this update I think I'm going to have to put it on pause for a while. I have a few tricky bits I need to think through if I want to get this as close to 100% original-looking on the outside as possible. Here's a back shot and a front shot with the case off. Motherboard, PSU, HDD and a few PCI(e) cards are installed. The cards are there just to show options, they aren't needed. Onboard will suffice.
From the back you can see the different layers of sheet metal. Not fond of that and I hope to redo the back to make it look seamless in the spring when I can get outside and do some fiberglass/epoxying. For now it doesn't look too bad all black. The front shows one of the problems I'm struggling to resolve: How am I going to cover those drive bays? I want to do an effect that will look like the original, textured covers. I had dozens of them in storage at one point, but tossed them because "obviously I'll never use those again!" I won't gut the original double height 5.25" drive just to get the face plate. It's not a simple cover that screws into the front, it's part of the body of the drive itself. Sacrilege to sacrifice it. I can use the front plate for the old Seagate 5.25" drive, and I have one more in storage that I can take the face plate from, but that leaves me with two single-height 5.25" drive bays to cover. I'm thinking I'll try to make a textured finish that will pass using a piece of pine and then paint it black, just not sure how to get the proper effect... I'd LOVE to add an original single-height 5.25" 360k floppy drive to the system, but I've looked and the few PCI based FDD controllers are very rare and hella expensive, and I'm not down-grading the system under the hood to s775 c2d just to get an onboard floppy connector.
Next, let me show where/how the HDD is mounted.
There's a lot of air holes in the front of the chasis, and fortunately they line up perfectly for a 2.5" drive to be mounted to them.
Now, the other big problem. What do I do about the PSU power switch on the back corner? Currently it is just a gaping hole.
I'm thinking I'll make something out of pine that resembles the original recessed switch and, if possible, bury a momentary-contact toggle switch inside the wood to allow it to actually turn the machine on. As for the reset switch and any front ports, I can hide them on the underside of the front bezel and you won't see them, so that's not going to be an issue.
Anyhow, here's some more shots I took tonight just for looking at.
I'll update more when I move the ball down the field a significant amount but I think this is going to be shelved for a bit.
Looking good man. If I were you I'd try and find a black textured square of plastic and epoxy it where the big-ol switch was. Then you could drill a hole and mount a momentary push-button, they make red does if you want to emulate the look of the original switch. Not sure if you have room, but you could mod the original switch and use it to power on the rig. Add a spring inside or something, so it becomes momentary instead of ON \ OFF.
What's going in the front of this beast? Floppy bezels? Blanking plate? 4 CD drives?
BTW, magic erasers can work wonders on these old beige cases. On the painted metal, and on plastics alike. Just be careful till you see how much or little it scuffs the surface. I have had very good luck using them to clean my old PCs.
This site uses cookies to help personalise content, tailor your experience and to keep you logged in if you register.
By continuing to use this site, you are consenting to our use of cookies.


")


