AN7 Guide to Overclocking:
Everyone knows that for every AN7 owner their are 20 NF7-s Owners, for every guide, mod, bios or tweak for the AN7 you will see 100 for the NF7...
The AN7 is the 'red headed b@stard stepchild' of the Abit NFII Family and generally regarded as an unsuccessful overclocker that pales in comparison to the Nf7-s r2.0
Now it's true that when the AN7 was released, it had a lot of problems, and was a big let down in light of the unrealisticly high expectations of the board being the successor to the NF7-s r2.0, which is debateably the most successful socket A overclocking board of all time.
However, the issues with the AN7 have all been resolved... but the damage had been done, the board was shunned, very few bought it, and the board was stuck with a bad reputation and since no one was using it, there was VERY little support, guides, modded bioses, etc. for the AN7...
Which is why I am here... I feel the AN7 has been shunned long enough, it IS capable of greatness, it CAN hold it's own against the NF7 series, it is about time someone made a Guide (or anything) for it, instead of the NF7.
One last thing... there will most defineately be some NF7-s Fan Boys in here claiming how much better the NF7 is.... nonsense... I agree you will see better overclocks on the NF7 series... but only due to the sheer number of NF7 users, Bioses, Guides, mods, tip, tricks and tweaks... due to the Vast number of Nf7 overclocker, the principle's of Math dictate that group will statistically have a greater number of successful high end overclockers than the AN7.... Even Still AN7 is capable of matching and even outperforming an NF7... afterall, they are practically the same board anyhow.
Note: This guide assumes you are NOT new to overclocking and that you have a basic knowledge of computers and overclocking.
Step 1: Modded BIOS
you will need to get a good modded Bios from Endurcell
AN7_17de82ts <-- CPC off
AN7_17de81ts <-- CPC on
AN7_18de82ts <-- CPC off
AN7_18de81ts <-- CPC on
or you can use some of Tictac's modded Bios's for the AN7
http://www.tictac.katrourke.com/modules.php?name=Downloads&d_op=viewdownload&cid=10
I'm using AN7_17de82ts -- That is generally regarded as the best BIOS for getting high FSB overclocks...
This is where the NF7-s beats us hands down, There are more modded BIOS's for the NF7-s than you can shake a stick at... also it's the creative work of the modded BIOS that allows such great overclocks on the NF7-s, if the AN7 had the same modded BIOS's the AN7 would have a much easier time getting high FSB overclocks. This mostly has to do with the ROMSIP Tables... you'll notice the AN7 modded BIOS's are using the 'de8' table, where as many of the NF7-s modded BIOS's use the de10 ROMSIP Table... this has a lot to do with the AN7's playing catch up... TicTac tryed to convert the the D26MantarayXT bios for the AN7 twice, but failed... bummer, thats a great BIOS.... considering this is an old unpopular platform I think it's safe to assume we won't be getting any new mooded BIOS's at this point. =/
A Note about CPC:
CPC is command per Clock, also known as 1t.... CPC off/disabled is referred to at 2t... 1t is faster, but can limit your clock speed keeping you from high FSB's especially if you're using 2 x 512MB RAM... Basically try both and see which works better, if all things are the same you want CPC on / 1t.... but again with 2. x 512MB you'll probably end up needed CPC off / 2t
Worst Case Senario:
Sometime in your overclocking adventures you may find a way to get a corrupt BIOS. This can happen if you make a mistake flashing a BIOS or if your computer powers off while the BIOS is trying to save (either by power surge, volt fluxuation or by being stupid). You'll know you have a corrupt BIOS because your Computer won't boot at all, won't even POST, and you will be stuck with the infamous Digital POST Code 9.0.
when this happens you'll need to 'Hot Flash' your system. This requires you removing your Bios Chip, and replacing it with a working BIOS Chip. If you have access to another AN7 you're in luck, just boot up the second AN7, remove the BIOS Chip while the computer is in windows, insert the Bad BIOS Chip then Flash the BIOS to the corrupted Chip from windows, this will reprogram your corrupted BIOS Chip. Shut off the Comp, replace the BIOS Chips into there respective computers, Then Boot up.
If you don't have access to another AN7 or compatable board, you can order a pre-programed system BIOS Chip Here from Abit. It's only $6 plus shipping.
here is a quote from Lvcoyote, Abit forum mod and Nf7-s expert:
A note on the L12 Mod:
The L12 Mod is probably one of the most well known and easiest to do Mod for the AMD Socket A series Boards... It resets the default FSB of the CPU and can result the in ability to reach MUCH higher FSB's... Tictac and Enduracell say there is no need to do this Mod when using the above BIOS's as they already will automatically reset the CPU's default speed to 200 MHz...
How to tell if you need it, Load the modded BIOS, go to the BIOS page and select Load Optimal Settings, Save and exit, go back to the BIOS and check the clock speed your CPU is running at, if it's 200, you're fine, If not you'll want to do the L12 Mod...
Some say that you should do the L12 Mod regardless, I did, it was easy, quick and doesn't mess anything up...
Let me say this, there are a few ways to do the L12 Mod, but I only recommend the quick, easy and reversable way outlined HERE
here are some other Links to give you info on the L12 Mod, but as for how to do it, refer to the link above
http://www.xtremesystems.org/forums/showthread.php?threadid=15300
http://www.ocforums.com/showthread.php?t=214364
http://fab51.com/cpu/barton/athlon-e21.html
Note: Harlam357 wanted me to point something out... you will see different guides on the L12 mod, telling you different things... I told him I had come across the same issue and agreed it was worth mentioning... some guides show the L12 mod placing the wire up from the Ah30 pin (to Ah28) and some show the the L12 mod placing the wire down from the Ah30 pin (to Ah32)... it really doesn't matter which way you do it, I have done it both ways and they both work fine... the point is to ground the Ah30 pin and both Ah28 (up) and Ah32 (down) are ground points... Although, it is generally better to do the up version, connecting Ah30 to Ah28... just because the second wire used in the L12 mod uses Ah32 to ground Ag31... and if you use the second wire and do the 'down' verion of the Ah30 grounding with the first wire then you end up with two wires in the Ah32 slot.... which you can do but it does get a little crowed, and isn't recommended because then your cpu may not seat nicely.
BIOS Configuration
Now that you have your modded BIOS, you will need to have it setup correctly... you can read this page here to get info on doing that... Make sure you disable anything in the BIOS you aren't using, like all that dinosaur stuff like LPT1 printer port, parallel port and stuff you may not use like a firewire connection for example...
Furthermore, go with CPU enabled in the BIOS, you can often get a higher clock speed with CPU disabled, but it will cost you a big drop in perfromance about equal to 15 FSB...
A note on APIC:
Some say having this disabled will increase your FSB, some say it doesn't matter... Its worth a try... but 90% of us try to disable it, then can't boot to windows... the reason... well, I was always told that you have to install / re-install windows with APIC disabled in the BIOS, then you can run your comp with APIC off... this is true...
but it turns out there is an easier way to do it that doesn't require a windows re-install, check this out.... for Windows XP only!!
I just did this and it's now booting up with APIC disabled") Not sure if it is going to help my OC or not but it's worth a try.
Not sure if it is going to help my OC or not but it's worth a try.
Step 2: Sofware
First: get the most recently updated Nvidia nForce II Drivers for your AN7
get the latest uGuru here
get the latest Abit Flash Menu here
get the Latest Abit EQ
Next, you'll need some proggies to monitor temps, volts, speeds, do benchmarks, do stability testing, give system info and some of the windows based OC utilities can come in handy as well... although I do 90% of my OC'ing through the BIOS.
you simply can't be an overclocker and live without Prime 95 and memtest86 or memtest86+ so get them now...
Prime 95 is 'The Standard' for burning in CPU's and for determining if your Overclock is stable... Memtest86 is 'The Standard' for burning in your RAM and testing if you RAM is stable at a particular FSB...if your Overclock can pass the Prime Blend Torture test for 12 hours, you can say your stable.... some say 24 hours, some say less... but whatever... not only that Prime 95 has a little benchie feature too.
Memtest86 comes in 2 flavors the original memtest86 or the new offshoot memtest86+ for all intents and purposes they are pretty much exactly the same... memtest86+ is an off-shoot of the original and has been updated more recently than the original... I've used both, I currently use memtest86+
go to www.cpuid.org
and get CPU-Z this is one of the best info tools for your memory, cpu and chipset.
while you're there get PC Wizard it's a system info, test and bench proggie like SiSandra but PC Wizard is free
and even though I personaly don't like Clock Gen its a free windows based overclocking utility and you may as well pick it up while you're there
SiSandra is the standard, it's fantasic, if you know how to get it for free, get it, if not, get the freebie (which still isn't bad) the link I'm giving is to the OCC download center and I'm not sure if its a full version or not, but if you're a serious OC'er you'll want this.
Crystal Mark is another very good benching utility and they also have/incorportate 'cyrstal CPUID' which is basically the same as CPU-Z I'd get this one too... it's free
For Temp and Volt monitoring MBM5 is great...
I personally really like the Abit EQ that comes stock with the AN7 uGuru... That siren used to **** me off though.. but once I learn to go to the monitor settings page, and reset the 'normal' ranges for the different temps and voltages so the alarm wouldn't go off, I perferred using the Abit EQ to MBM5
Lastly, for Windows Based Overclocking Utilities...
quite frankly, I don't find then incredibly useful... but maybe a little useful.. the Abit OC uGuru I think is actually better than most of the 3rd party proggies for this... but changing the FSB with it doesn't really work... but it does allow you to change the volts in real time and offers good features in that department..
I already mentioned and gave links to ClockGen... which sucks IMO..
but nVidia System Utility seems to be quite nice... if you can find a way to unlock the Advanced features of nVidia System Utility for the AN7 it would be awesome, if anyone knows how to do this, please let us know.
the updated version of nVidia System Utility is called nTune, you can try it, but I'm not a big fan of it, I like the old nVidia System Utility better.
Video Card Utility...
it's kinda of beyond the scope of this discussion here... but after you're 100% done stabilizing your overclock... I repeat 100% done... then you want to overclock your video card... GPU and VRAM overclock..
Riva Tuner is a great way to do this.. when doing this you'll also start to bring up your AGP bus and AGP volts in your BIOS... AGP is 66 default and 99 Max, have fun with that LATER... get your basic overclock first.
My friend Harlam357 pointed out some VERY obvious things that I completly forgot about, thanks Harlam... and also gave some really good insight on how we do stability testing... he stated it all very nicely so rather than re-word it... here it is 'straight from the horsed mouth'
Step 3: Hardware
Equipment, you'll need good quality RAM and CPU to make this baord shine... Barton XP Mobile Processor is the CPU of choice... as for RAM, get some good TCCD like the Patriot 3200xblk, TCC5 like the OCZ plat. rev 2, or some other RAM that has proven bandwidth of PC4000 or better... TCCD or TCC5 are good chioces... Avoid Winbond UTT unless it is rated at PC4000 or higher, otherwise it is a complete luck of the draw...
one other note on the RAM.... you will achieve a much higher overclock if you run 2 x 256MB of RAM versus 2 x 512MB or RAM... that's just the way it is... so if you just interested in overclocking for the heck of it... get 2 x 256... if you're interested in real world/gaming performance, I would go with the 2 x 512MB... also... you may have to give up a few FSB to run it in dual channel mode, but it's worth it IMO... but if you're looking to squeeze a few extra FSB out at the cost of overall performance try running single channel.
One other thing, very often the same stick of RAM will perfrom better in a particular slot, so you should try different configurations... for instance I was running my Kingston Hyper-X Winbond CH5 RAM in Dual Channel slots 2 and 3... and when I tried running the same RAM Dual Channel in slots 1 and 3 I saw a dramatic increase in the FSB, suddenly the RAM could obtain an extra 10-15 FSB... If you're running a single stick of RAM (who knows why you'd do that) try it in all 3 slots and see which one will perform best.
What ever RAM you do get, make sure it can run in Dual Channel @ 2-2-2-11, unless you have some really good BH-5, you probably won't be able to hold 2-2-2-11 timings much past 230.... but after 230 run 2.5-2-2-11.... if you can't do that your RAM sucks and you need to get some serious RAM if you want a serious overclock... if for some odd reason you run single channel and/or have only one stick of RAM then run 2-2-2-5... with NF2 boards 2-2-2-5 is optimal for single channel and 2-2-2-11 for Dual Channel.
Also you will need a strong Power Supply Unit, without a good one, you'll never hang with the big boys... OCZ PowerStream is a good one you'll need probably atleast a good 450W or above, but it's not the Watts as much as it is the relative Amps on the 3.3v, 5v and 12v rails...
3.3v = 25a minimun, really should be 30-35
5v = 30a minimum, but you want closer to 40a
12v = 16a minimum
more on this later
Step 4:Cooling
Cooling, I'm only dealing with Air Cooling here... if you got the bucks for liquid or phase change then you're probably more experienced than me and should post you AN7 related experiences here... *cough*Hood*cough*PcPer*cough*... sorry, had to clear my throat..
Gear:
Get a serious CPU cooling system, Thermalright SP-97, SI-97... and despite the jeers I may get, especially from my friend Harlam357, The Thermaltake Pipe101, if properly lapped is a great HSF, coupled with a UFO Fan that puts out over 81 CFM or some other good 90mm fan you won't have any problems.
Some added tips from our resident Thermalright Fanboy
Next, you're gonna need a Real NB cooler, i'm using the Vantec Iceberq 4 cooler, but I had to custom mod mine to fit... so I don't recommend that one, I think Vantec makes a smaller version though that will work great without a mod... like this one
http://www.newegg.com/Product/Product.asp?Item=35-110-103&catalog=62&manufactory=BROWSE&depa=1
I don't care what you get, but get a real cooler... the Thermalright NB-1c would be the best and then stick a litte 40mm fam on there...
After you remove your stock NB cooler, don't throw it away, cuz it makes a great south bridge cooler... the AN7 and Nf7 don't come with a SB cooler and you'll defineately need one... so use it, it works fine on the SB...
the other thing you'll need to do is cool your mosfets... the best heatsinks I found were the OCZ
RAM copper heatsinks you'll need more than one bag to cool all of the mosfets, and with the left overs from your second bag you can cool the RAM controller chips and some chips on your video card... or maybe even your RAM...lol...
Sidewinder Heatsinks are recommended by Harlam357, check them out
Lapping:
Now that you got your hardware you need to prepare it... you need to lap you cpu's HSF, your North Bridge Chip, and your South Bridge Chip too...
Here is a great guide to lapping your HSF these guy go a little overboard IMO... but hey it's a good guide I only used 400 and 600 wet dry because I couldn't find anything higher than that and I got a great finish on my Thermaltake Pipe 101 HSF. you can see some good pics of my Lap job on this page here, just scroll down a little... or just check out my Avatar
once you're done that, the principals are the same for lapping your NB and SB... but obviously, it's a much tighter space and needs to be kept much cleaner, you can use only about 1 drop of water at a time, and it won't have a mirror finish... This is a Very important step, the NF2 NB chips are affectionately called soup bowls... they have horrible contact, when I pulled off my stock NB cooler it had about 10% surface contact... horrible..
There is a great guide here for lapping your NB but they don't use nearly enough tape.. so here is a thread by enduro that has pics of him lapping his NB on the NF7 (same chip) Note: this page also has great advice on how to solder when doing Volt mods, the mods he shows are on a NF7-s so it's not the same mod as the AN7, but the soldering technique is the same
http://www.ocforums.com/showthread.php?t=334674&highlight=nf7+vdd+mod
and another thread showing the pics of Harlam357 lapping his NB on his AN7...
http://www.ocforums.com/showthread.php?t=341343&page=3&pp=30
and here are some pics of me lapping my NB on my AN7:
use Arctic Silver 5 for your thermal compound, for your SB mosfets and anything else you need to attach with an adhesive, just add a little bit of liquid cement or epoxy to it and it should work... if you want to do it right get some Arctic Silver Adhesive. Make sure when you do this that you won't ever need to take it off, once it's on, it's on for good, if you are putting something on temporarily, use thermal tape.
Mosfet Cooling:
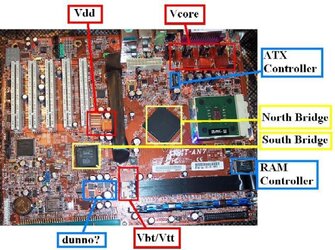
This picture will show all the area's on your AN7 that need to be sinked... note the area's in Blue are optional..
Tebore says that cooling the CPU mosfets (to the left of the CPU) benefit from not only sinking them on the front of the board but also on the back like this, just another tip for all of us extremists.
NOTE: DO NOT mount your NB or SB coolers (or mosfet heatsinks) until you have done the volt mods. The Vdd mod will be incredibly difficult if you have a SB cooler already attached.
Step 5: Volt Modding
NOTE: ATTEMPT THESE AT YOUR OWN RISK, IT IS DANGEROUS AND YOU MAY RUIN YOUR MOTHERBOARD, YOUR COMPONENTS AND MAY EVEN BURN YOUR FINGER. IF YOU SCREW THIS UP, DON'T COME CRYING TO ME, BE CAREFUL, BE EDUCATED. OCFORUMS AND MYSELF ACCEPT NO RESPONSIBILTY FOR ANY ACCIDENTAL DAMAGE OR OVERT STUPIDITY.
The one area where the AN7 beats the NF7 hands down is on the Volts, AN7 has more Vcore, more Vdimm and more Vdd.... but like the saying goes "too much is never enough"..
now, if you're using TCCD RAM, you won't need the Vdimm mod... Hell, few people need more that 3.2 Vdimm but for some volt hungry BH-5 and CH-5 you'll need a little more juice.
This is one of the best general overview guides of Volt Modding I've seen
http://www.vr-zone.com/index.php?i=757
it's a must read
Vdd / NB Chipset Mod
The single most effective Volt mod for me was the Vdd mod... it allowed me to stablize my System at higher FSB's... but note that these volt mods don't just give you MORE volts but they also give you a much tigher control of your volts so you can do much better fine tuning.
The NFII NB can usually handle 2.00 volts no problem. I wasn't sure how high it could be pushed, I just figured that I would monitor the temperature of the NB and give it juice until heat became a problem.... just like the CPU... well... the NB does NOT have any Temp. Monitors... the Sys Temp. does NOT refer to the NB... so the only way to monitor the temp of the NB is to use a temperature sensor, like with the Hardcano controller or some other temp. sensing/monitoring hardware... because NONE of the Temp. Monitoring proggies like MBM5 or Abit EQ or even the BIOS will show the NB Temp...
That being said... I've pumped up to 2.42v through my NB... and it didn't get over 42C (as shown by my Hardcano's temp. sensor under the NB HSF)... so it could probably handle more, but it didn't benefit from it, so I don't run it that high... I use 2.05v in the NB (Vdd) with my OC...
The original person to do the AN7 volt mod was Micutzu, then Cetoole, the links to Micutzu's guide are no longer Active so Cetoole posted some pics, showed me how to do it and then I uploaded my pics too... this thread here has the guide to show you how to do the mod.
This is a rather difficult mod and requires that you have a steady hand, patience and good lighting, as well as good soldering skills... you better know how to Tin a wire and controll hot flux/solder...
This is a good soldering guide
also enduro posted a NF7 guide that has good soldering tips that I referneced earlier
Rule of Thumb: If you're not confident, don't do it... whether you think you can, or think you can't, you're usually right either way
PSU 3.3v Rail Mod:
The next most effective mod of the 3.3v Rail Mod to my Power Supply Unit...
I never realized how important and effective a Mod to the PSU could be until I researched this...
I recommend you do the exact same mod to the 12v Rail on your PSU as well, however I couldn't on mine... this is called the Line Sense Mod... It can't be done on all PSU's... just the good ones... It's is important to note, without a good PSU you may as well pack your bags and go home... if your power supply doesn't have a feed back line sensing the volt output, you have a cheap PSU and you should get another one...
before you attempt this it is important to note that some PSU's have adjustable rails and therefor you don't need to mod anything, just increase the voltage on the rails: OCZ PowerStream is one example.
Very simply your PSU kicks out a certain amount to volts to a respective rail in this case the 3.3v rail... there 'should' be a one of the 3.3v connections on the ATX mobo connector that has two wires going into one slot... the thin wire, i repeat the thin wire is the line sensor... if the line sensor tells the PSU there aren't enough volts the PSU will increase voltage to that rail... so all we do is cut the line sense wire and add in a VR (Variable Resistor, POTentiameter, trimmer,etc) to lower the volts on the line sense wire so that the PSU 'thinks' the volts have dropped on that rail, then it will increase the voltage to the entire rail... so the more resistance in the line sense wire, the higher the voltage will be on the rail.
This mod is incredibly easy... you'd have to be a blind, 1 handed spastic to screw this up.
Here are two great guides on how to mod your PSU:
OC Forums Guide
Bleedinedge Guide
now to be honest, I didn't do mine the correct way like they showed.. I did mine quick and dirty, I snipped the sense line for the 3.3v rail and connected the two ends of cut line sense wire with my VR and I was good to go... they say not to do this cuz the voltage won't be as stable but I haven't had any problems whatsoever. check pic here
for obvious reasons you need to remove your PSU from the case when doing the mod... you need to Jumper the connector pins in the PSU's ATX mobo attachment to turn on your PSU without pluging it in... Like This
Important note: when you do this, if you give the Pot to much resistance the PSU will push the respective rail too high and the PSU will turn off..... if you're lucky... I did this and thought I blew the PSU, I didn't.... thank God... but be careful of that, when you first connect the Pot, make sure it's set to 0 Ohms, or 0 resistance, that way the line sense will read full strength... then you slowly add resistance and watch the voltage on the rail raise up..
once you've done your mod, before you attach it to your mobo, turn on your PSU (out of the case) and check your voltage on the 3.3v rails, adjust it to where you want it, about 3.2-3.6 volts...
see pic here
doesn't have to be exact yet, just make sure it's at a resonable level before you attach it to your mobo...
hook everything back up and go into your BIOS and then fine tune your voltage
should look Like This when done.
PSU 12v / 5v Rail Mod:
12v rail is very important for you overclock it supplies the juice to your CPU and if your running dry on your 12v rail, your OC will suffer... watch your 12v rail and if it's less that 12v, do the mod... or if you're seeing you 12v rail sag under load, then defineatly to the mod...
the 12v rail mod is quite simply done exactly the same as the 3.3v rail mod, just done with the 12v line sense wire.... now some PSU's don't have a 12v line sense wire, if yours doesn't then look to see in there is a line sense wire on the 5v rail... in this case very often doing the mod to the 5v rail will also boost the 12v rail... only way to know for sure if yours is like that is to do the mod...
I don't know of any good reason to mod the 5v rail, but if you need to do so, then do so, again exactly the same..
one last note, quite often the mobo doesn't correctly read the actual voltage coming from the PSU's rails, so it's worth checking manually to make sure how much juice your PSU is actually giving you.
Vdimm Mod
The last mod is the Vdimm mod... well there are a few different ways to do this one... At first I was hell bent on drawing power from the 5v Rail and trimming it down to boost the Vdimm... that way I could get 4v or more if I wanted.... I didn't understand why everyone was feeding off the 3.3v rail, that would max out the Vdimm below the 3.3v rail... I later realized the 5v isn't the best way.... for one you will probably have to do the Vtt mod to stabilze it, two you could burn a mosfet, and three if you feed from the 3.3v rail you're not limited to 3.3v, you just raise the 3.3v rail and you get the added benefit of increased stability to everything the 3.3v rail feeds... which is a lot...
so this mod is actually another very simple one step mod... assuming you already did the PSU 3.3v rail mod... cuz they go together.... actualy you don't have to mod the 3.3v rail... but then your Vdimm will be limited to about 0.15v below your 3.3v rail... which is about how much your AN7 gives you stock.... so actually... with the AN7 you do need to do them both (it's late, i'm tired)
All you do is take a VR, a 1k Ohm 15 turn VR trimmer more turns the better 25 turn is best, connect one end to a ground point and the other end to the R316 resistor shown in the picture... with the VR set to zero resistance you will have increased the Vdimm to the Full strength of the 3.3v rail (minus about 0.15v) to back of the Vdimm less than that you increase the resistance of the VR.... and that's it.. very simple... this mod actually came from Tictac himself...
Check the Picture in this thread that picture is the spot between the AGP slot and the RAM slots.
now, don't do what the instructions tell you to do on that link, do NOT unsolder the resister from that board... listen to what Tictac said
and he is right... with this one you don't have to worry about the position of the VR so much, Full resistance on the VR should produce no change in Vdimm and No resistance in the VR can only give you the full value of your 3.3v rail... The great thing about this is the Vtt Tracks perfectly, atleast for me it did.
soldering the wire to resistor R316 without soldering anything else can be a challenge, take your time and as always, do this at your own risk...
This is what My Vdimm Mod looks like
An interesting note here, the Vtt tracks perfectly, but the AN7 won't register more than 3.48 VDimm in the Bios or windows programs... but it's there and you can see it with the multimeter, and you'll see the Vtt track your real Vdimm in the BIOS even though the BIOS Vdimm reading will max @ 3.48
This picture shows where you can check your voltage you don't have to measure from the back of the mobo, you can just stick your multimeter pins in the corresponding holes in the front of the dimm slot.
I had done this mod successfully and had done alot of testing with it using Windbond UTT Bh-5, but after about about a week, my stupidity caught up to me...
Don't make my mistake!!
EDIT: use a 1k Ohm VR trimmer with atleast 15 turns, I didn't and look what happened!!
Note: Dangit, I adjusted my voltage with the comp running one too many times and now I've ended up with a grounded R316 resistor thx to a voltage spike while adjusting the resistance with the computer running... An added note is to use a 1k Ohm 15 turn VR trimmer, again atleast 15 turn Potentimeter, perferably 25 turn though, this way you can only change the voltage in VERY small increments and thus avoid voltage spikes.... looks like this
again Do at you own risk... learn from my mistake.
My board still works but my Vdimm is stuck on Full Power of the 3.3v rail and I can't turn the Vdimm down lower than 3.3v.... sigh, which sucks cuz I use TCCD... I believe I know how to fix this, but I'm not 100% sure, I'll post the fix once I've done it.
FIXED!!! Victory atlast, and hope for anyone who screws this up!
FIX POSTED HERE!
One last thing concerning Vdimm... Only do this mod if you need more that 3.2v... don't do it for the heck of it... don't do it and then run TCCD at 2.9... you can... but it becomes a pain because adjusting the volts in the BIOS becomes very finiky... everytime you change something in the BIOS you need to recheck you actual voltage because it may get set to full Vdimm by default, especially when saving a new bios profile or changing FSB.... However once your system is dialed in the way you want it it's fine... but you should still configure Abit EQ to launch automatically and sound an Alarm is your Vdimm is higher than you want it, this way you won't burn up your RAM without knowing it...
Conclusion
Well, if you've done all of this (correctly) then you have one hell of an overclocking board! At this point you have the all the raw potential you need, the only thing left to do is Overclock the hell out of it, dail it in and find the sweet spot...
This guide is almost completely finished, I've posted most of what I wanted to say, but I may add more from time to time. This is for all you AN7 users out there, I hope some of you find this helpful, I know I would have been completely stoked to come across a guide like this when I was trying to figure all of this out, instead of the 100's of Nf7-s guides, that I wasn't sure would work on my AN7... If any of you AN7 users can add to this please give us your Input!
I would like to Thank Harlam357, Cetoole, Electric Bill, Sharptooth, Playah, Tebore and Hood for all of there personal help, and I would like to Thank Enduro, Tictac and Enduracell for all there contributions and guides that I learned from.
Most of all I would like to thank Jesus Christ, because it was a miracle that I didn't Fry my board, ruin my RAM, explode my PSU and electricute myself
Everyone knows that for every AN7 owner their are 20 NF7-s Owners, for every guide, mod, bios or tweak for the AN7 you will see 100 for the NF7...
The AN7 is the 'red headed b@stard stepchild' of the Abit NFII Family and generally regarded as an unsuccessful overclocker that pales in comparison to the Nf7-s r2.0
Now it's true that when the AN7 was released, it had a lot of problems, and was a big let down in light of the unrealisticly high expectations of the board being the successor to the NF7-s r2.0, which is debateably the most successful socket A overclocking board of all time.
However, the issues with the AN7 have all been resolved... but the damage had been done, the board was shunned, very few bought it, and the board was stuck with a bad reputation and since no one was using it, there was VERY little support, guides, modded bioses, etc. for the AN7...
Which is why I am here... I feel the AN7 has been shunned long enough, it IS capable of greatness, it CAN hold it's own against the NF7 series, it is about time someone made a Guide (or anything) for it, instead of the NF7.
One last thing... there will most defineately be some NF7-s Fan Boys in here claiming how much better the NF7 is.... nonsense... I agree you will see better overclocks on the NF7 series... but only due to the sheer number of NF7 users, Bioses, Guides, mods, tip, tricks and tweaks... due to the Vast number of Nf7 overclocker, the principle's of Math dictate that group will statistically have a greater number of successful high end overclockers than the AN7.... Even Still AN7 is capable of matching and even outperforming an NF7... afterall, they are practically the same board anyhow.
Note: This guide assumes you are NOT new to overclocking and that you have a basic knowledge of computers and overclocking.
Step 1: Modded BIOS
you will need to get a good modded Bios from Endurcell
AN7_17de82ts <-- CPC off
AN7_17de81ts <-- CPC on
AN7_18de82ts <-- CPC off
AN7_18de81ts <-- CPC on
or you can use some of Tictac's modded Bios's for the AN7
http://www.tictac.katrourke.com/modules.php?name=Downloads&d_op=viewdownload&cid=10
I'm using AN7_17de82ts -- That is generally regarded as the best BIOS for getting high FSB overclocks...
This is where the NF7-s beats us hands down, There are more modded BIOS's for the NF7-s than you can shake a stick at... also it's the creative work of the modded BIOS that allows such great overclocks on the NF7-s, if the AN7 had the same modded BIOS's the AN7 would have a much easier time getting high FSB overclocks. This mostly has to do with the ROMSIP Tables... you'll notice the AN7 modded BIOS's are using the 'de8' table, where as many of the NF7-s modded BIOS's use the de10 ROMSIP Table... this has a lot to do with the AN7's playing catch up... TicTac tryed to convert the the D26MantarayXT bios for the AN7 twice, but failed... bummer, thats a great BIOS.... considering this is an old unpopular platform I think it's safe to assume we won't be getting any new mooded BIOS's at this point. =/
A Note about CPC:
CPC is command per Clock, also known as 1t.... CPC off/disabled is referred to at 2t... 1t is faster, but can limit your clock speed keeping you from high FSB's especially if you're using 2 x 512MB RAM... Basically try both and see which works better, if all things are the same you want CPC on / 1t.... but again with 2. x 512MB you'll probably end up needed CPC off / 2t
Worst Case Senario:
Sometime in your overclocking adventures you may find a way to get a corrupt BIOS. This can happen if you make a mistake flashing a BIOS or if your computer powers off while the BIOS is trying to save (either by power surge, volt fluxuation or by being stupid). You'll know you have a corrupt BIOS because your Computer won't boot at all, won't even POST, and you will be stuck with the infamous Digital POST Code 9.0.
when this happens you'll need to 'Hot Flash' your system. This requires you removing your Bios Chip, and replacing it with a working BIOS Chip. If you have access to another AN7 you're in luck, just boot up the second AN7, remove the BIOS Chip while the computer is in windows, insert the Bad BIOS Chip then Flash the BIOS to the corrupted Chip from windows, this will reprogram your corrupted BIOS Chip. Shut off the Comp, replace the BIOS Chips into there respective computers, Then Boot up.
If you don't have access to another AN7 or compatable board, you can order a pre-programed system BIOS Chip Here from Abit. It's only $6 plus shipping.
here is a quote from Lvcoyote, Abit forum mod and Nf7-s expert:
Good to have an extra one on hand. $6 is cheap insurance.If you have another system or know someone with a system that uses the same BIOS chip as your motherboard you can do a hot flash. This entails removing you BIOS chip and inserting it into a running motherboard and flashing it from Windows. The best scenario for this would be to find someone with another NF7 series motherboard, start their system up and while its running remove their BIOS chip, insert yours and reflash it with the correct BIOS version. Turn the computer off and remove your chip and replace theirs. If your not up to this task or do not have access to another machine, you can purchase a pre-programmed BIOS chip at Abit
A note on the L12 Mod:
The L12 Mod is probably one of the most well known and easiest to do Mod for the AMD Socket A series Boards... It resets the default FSB of the CPU and can result the in ability to reach MUCH higher FSB's... Tictac and Enduracell say there is no need to do this Mod when using the above BIOS's as they already will automatically reset the CPU's default speed to 200 MHz...
How to tell if you need it, Load the modded BIOS, go to the BIOS page and select Load Optimal Settings, Save and exit, go back to the BIOS and check the clock speed your CPU is running at, if it's 200, you're fine, If not you'll want to do the L12 Mod...
Some say that you should do the L12 Mod regardless, I did, it was easy, quick and doesn't mess anything up...
Let me say this, there are a few ways to do the L12 Mod, but I only recommend the quick, easy and reversable way outlined HERE
here are some other Links to give you info on the L12 Mod, but as for how to do it, refer to the link above
http://www.xtremesystems.org/forums/showthread.php?threadid=15300
http://www.ocforums.com/showthread.php?t=214364
http://fab51.com/cpu/barton/athlon-e21.html
Note: Harlam357 wanted me to point something out... you will see different guides on the L12 mod, telling you different things... I told him I had come across the same issue and agreed it was worth mentioning... some guides show the L12 mod placing the wire up from the Ah30 pin (to Ah28) and some show the the L12 mod placing the wire down from the Ah30 pin (to Ah32)... it really doesn't matter which way you do it, I have done it both ways and they both work fine... the point is to ground the Ah30 pin and both Ah28 (up) and Ah32 (down) are ground points... Although, it is generally better to do the up version, connecting Ah30 to Ah28... just because the second wire used in the L12 mod uses Ah32 to ground Ag31... and if you use the second wire and do the 'down' verion of the Ah30 grounding with the first wire then you end up with two wires in the Ah32 slot.... which you can do but it does get a little crowed, and isn't recommended because then your cpu may not seat nicely.
BIOS Configuration
Now that you have your modded BIOS, you will need to have it setup correctly... you can read this page here to get info on doing that... Make sure you disable anything in the BIOS you aren't using, like all that dinosaur stuff like LPT1 printer port, parallel port and stuff you may not use like a firewire connection for example...
Furthermore, go with CPU enabled in the BIOS, you can often get a higher clock speed with CPU disabled, but it will cost you a big drop in perfromance about equal to 15 FSB...
A note on APIC:
Some say having this disabled will increase your FSB, some say it doesn't matter... Its worth a try... but 90% of us try to disable it, then can't boot to windows... the reason... well, I was always told that you have to install / re-install windows with APIC disabled in the BIOS, then you can run your comp with APIC off... this is true...
but it turns out there is an easier way to do it that doesn't require a windows re-install, check this out.... for Windows XP only!!
Right click on "MY COMPUTER" on your desktop.
All the way down you'll see "properties". click on this
Click on the tab that says "Hardware"
Now click on "Device manager".
You will see your computer name and a little collapsed tree.
The first thing you should see says "Computer". Click on the "+" sign and it should say "ACPI computer" or something to that effect. Right click on the name and you should see another 'update driver" . Click on this. A little box will appear saying "Welcome to the Hardware update wizard". Where it says "What would you like the wizard to do", click on "Install for a specific list otr location (Advanced)" Click "next". Click on "Don't search. I will choose the driver to install. Click "next". There you should see an option with a little green flag next to it
"Advanced Configuration and Power Interface (ACPI) PC"
highlight it then click "next" and it should install the driver, just follow the prompts.
I just did this and it's now booting up with APIC disabled
Not sure if it is going to help my OC or not but it's worth a try.Step 2: Sofware
First: get the most recently updated Nvidia nForce II Drivers for your AN7
get the latest uGuru here
get the latest Abit Flash Menu here
get the Latest Abit EQ
Next, you'll need some proggies to monitor temps, volts, speeds, do benchmarks, do stability testing, give system info and some of the windows based OC utilities can come in handy as well... although I do 90% of my OC'ing through the BIOS.
you simply can't be an overclocker and live without Prime 95 and memtest86 or memtest86+ so get them now...
Prime 95 is 'The Standard' for burning in CPU's and for determining if your Overclock is stable... Memtest86 is 'The Standard' for burning in your RAM and testing if you RAM is stable at a particular FSB...if your Overclock can pass the Prime Blend Torture test for 12 hours, you can say your stable.... some say 24 hours, some say less... but whatever... not only that Prime 95 has a little benchie feature too.
Memtest86 comes in 2 flavors the original memtest86 or the new offshoot memtest86+ for all intents and purposes they are pretty much exactly the same... memtest86+ is an off-shoot of the original and has been updated more recently than the original... I've used both, I currently use memtest86+
go to www.cpuid.org
and get CPU-Z this is one of the best info tools for your memory, cpu and chipset.
while you're there get PC Wizard it's a system info, test and bench proggie like SiSandra but PC Wizard is free
and even though I personaly don't like Clock Gen its a free windows based overclocking utility and you may as well pick it up while you're there
SiSandra is the standard, it's fantasic, if you know how to get it for free, get it, if not, get the freebie (which still isn't bad) the link I'm giving is to the OCC download center and I'm not sure if its a full version or not, but if you're a serious OC'er you'll want this.
Crystal Mark is another very good benching utility and they also have/incorportate 'cyrstal CPUID' which is basically the same as CPU-Z I'd get this one too... it's free
For Temp and Volt monitoring MBM5 is great...
I personally really like the Abit EQ that comes stock with the AN7 uGuru... That siren used to **** me off though.. but once I learn to go to the monitor settings page, and reset the 'normal' ranges for the different temps and voltages so the alarm wouldn't go off, I perferred using the Abit EQ to MBM5
Lastly, for Windows Based Overclocking Utilities...
quite frankly, I don't find then incredibly useful... but maybe a little useful.. the Abit OC uGuru I think is actually better than most of the 3rd party proggies for this... but changing the FSB with it doesn't really work... but it does allow you to change the volts in real time and offers good features in that department..
I already mentioned and gave links to ClockGen... which sucks IMO..
but nVidia System Utility seems to be quite nice... if you can find a way to unlock the Advanced features of nVidia System Utility for the AN7 it would be awesome, if anyone knows how to do this, please let us know.
the updated version of nVidia System Utility is called nTune, you can try it, but I'm not a big fan of it, I like the old nVidia System Utility better.
Video Card Utility...
it's kinda of beyond the scope of this discussion here... but after you're 100% done stabilizing your overclock... I repeat 100% done... then you want to overclock your video card... GPU and VRAM overclock..
Riva Tuner is a great way to do this.. when doing this you'll also start to bring up your AGP bus and AGP volts in your BIOS... AGP is 66 default and 99 Max, have fun with that LATER... get your basic overclock first.
My friend Harlam357 pointed out some VERY obvious things that I completly forgot about, thanks Harlam... and also gave some really good insight on how we do stability testing... he stated it all very nicely so rather than re-word it... here it is 'straight from the horsed mouth'
I actually find memtest to be the first line of defense against instability... if an OC can't pass memtest reasonibly, then it isn't gonna pass Prime95. Once happy with memtest results... then Prime(blend test), 24hours!
I can't stress that enough... I have, on many occasions, found Prime failure in the 18-24 hour. 12 hours is simply not enough... even 48 would not be unreasonable for a heavily OCed machine. I like to run at least 3 loops of the Prime95 blend FFT pattern... usually takes ~32hours.
Checking 3D stabiltiy with 3DMark2001SE is also key... too many people brag on its effectiveness as a system stability tester, but primarily when used in conjunction with memtest & Prime95- 3DMark2001SE alone is not a definitive stability tester, should be run after a successful 24+ hour Prime95 blend run.
memtest (24+) -> prime blend (24+) -> 3DMark2001SE (4+ - realtime process)
Fantasic thread by felinusz here - Guidelines for Thorough Stability Testing. Much of what I'm talking about was learned from this guide and of course personal experience... felinusz just lays very sound groud rules for effective stability testing- that work!
Step 3: Hardware
Equipment, you'll need good quality RAM and CPU to make this baord shine... Barton XP Mobile Processor is the CPU of choice... as for RAM, get some good TCCD like the Patriot 3200xblk, TCC5 like the OCZ plat. rev 2, or some other RAM that has proven bandwidth of PC4000 or better... TCCD or TCC5 are good chioces... Avoid Winbond UTT unless it is rated at PC4000 or higher, otherwise it is a complete luck of the draw...
one other note on the RAM.... you will achieve a much higher overclock if you run 2 x 256MB of RAM versus 2 x 512MB or RAM... that's just the way it is... so if you just interested in overclocking for the heck of it... get 2 x 256... if you're interested in real world/gaming performance, I would go with the 2 x 512MB... also... you may have to give up a few FSB to run it in dual channel mode, but it's worth it IMO... but if you're looking to squeeze a few extra FSB out at the cost of overall performance try running single channel.
One other thing, very often the same stick of RAM will perfrom better in a particular slot, so you should try different configurations... for instance I was running my Kingston Hyper-X Winbond CH5 RAM in Dual Channel slots 2 and 3... and when I tried running the same RAM Dual Channel in slots 1 and 3 I saw a dramatic increase in the FSB, suddenly the RAM could obtain an extra 10-15 FSB... If you're running a single stick of RAM (who knows why you'd do that) try it in all 3 slots and see which one will perform best.
What ever RAM you do get, make sure it can run in Dual Channel @ 2-2-2-11, unless you have some really good BH-5, you probably won't be able to hold 2-2-2-11 timings much past 230.... but after 230 run 2.5-2-2-11.... if you can't do that your RAM sucks and you need to get some serious RAM if you want a serious overclock... if for some odd reason you run single channel and/or have only one stick of RAM then run 2-2-2-5... with NF2 boards 2-2-2-5 is optimal for single channel and 2-2-2-11 for Dual Channel.
Also you will need a strong Power Supply Unit, without a good one, you'll never hang with the big boys... OCZ PowerStream is a good one you'll need probably atleast a good 450W or above, but it's not the Watts as much as it is the relative Amps on the 3.3v, 5v and 12v rails...
3.3v = 25a minimun, really should be 30-35
5v = 30a minimum, but you want closer to 40a
12v = 16a minimum
PSU Buyers GuideTin Canary said:Now that we know what wattage doesn't matter, so what really does matter? The amperage rating is the most important factor when choosing a power supply. Most modern Intel and AMD systems should have the +12V rail putting out 16a or more. If you look at the label on your power supply, you will see a chart showing the +12V, +5V, and +3.3V rails and how many amps each rail puts out. Many of the newer 6800 and X800 video cards run off of the +5V rail, and will need many amps to back it up. 30a on the +5V rail should be the minimum if you want to run the latest hardware, 40a preferably. The +3.3V rail supplies power to components such as your memory. +3.3V rail should be atleast 25a, 35a preferred though. Running your memory at 3.1V will eat up alot of juice, but think how much more you're using up when you add more modules. Most overclockers usually run atleast a 400W power supply. Once you start adding voltage to various components, its taking more juice to get it to run properly.
The more reputable brands out there are Fortron, Sparkle, Enermax, Enlight, Antec, PC Power and Cooling, and Thermaltake. The Fortron and Sparkle units are the most cost effective, in some cases costing half as much as their Antec counterparts. One of the best methods for determining a quality power supply....pick it up and see how heavy it is. The heaviier power supplies are generally built with more heatsinks and capacitors and such. The lightweight power supply is the one that can bring you down. The heavier it is, the better it is.
Step 4:Cooling
Cooling, I'm only dealing with Air Cooling here... if you got the bucks for liquid or phase change then you're probably more experienced than me and should post you AN7 related experiences here... *cough*Hood*cough*PcPer*cough*... sorry, had to clear my throat..
Gear:
Get a serious CPU cooling system, Thermalright SP-97, SI-97... and despite the jeers I may get, especially from my friend Harlam357, The Thermaltake Pipe101, if properly lapped is a great HSF, coupled with a UFO Fan that puts out over 81 CFM or some other good 90mm fan you won't have any problems.
Some added tips from our resident Thermalright Fanboy
Harlam357 said:- please add the Thermalright SLK-947U, SLK-900A/U, SLK-800A/U to the list of recommended TR heatsinks. All are fantasic heatsinks for the Socket A platform! A few things to mention:
The U versions, like the SP-97, all require the motherboard to have mounting holes around the socket. That's something to consider when looking for a heatsink or a mobo... also, all of the Thermalright heatsinks currently mentioned in the guide and here are out of production except the SI-97... which imo is the worst of the Socket A TR coolers. I have owned an SI-97... didn't like it. My SLK-947U crushes the SI-97 I had. I won't even compare it to my SP-97.
Next, you're gonna need a Real NB cooler, i'm using the Vantec Iceberq 4 cooler, but I had to custom mod mine to fit... so I don't recommend that one, I think Vantec makes a smaller version though that will work great without a mod... like this one
http://www.newegg.com/Product/Product.asp?Item=35-110-103&catalog=62&manufactory=BROWSE&depa=1
I don't care what you get, but get a real cooler... the Thermalright NB-1c would be the best and then stick a litte 40mm fam on there...
After you remove your stock NB cooler, don't throw it away, cuz it makes a great south bridge cooler... the AN7 and Nf7 don't come with a SB cooler and you'll defineately need one... so use it, it works fine on the SB...
the other thing you'll need to do is cool your mosfets... the best heatsinks I found were the OCZ
RAM copper heatsinks you'll need more than one bag to cool all of the mosfets, and with the left overs from your second bag you can cool the RAM controller chips and some chips on your video card... or maybe even your RAM...lol...
Sidewinder Heatsinks are recommended by Harlam357, check them out
Lapping:
Now that you got your hardware you need to prepare it... you need to lap you cpu's HSF, your North Bridge Chip, and your South Bridge Chip too...
Here is a great guide to lapping your HSF these guy go a little overboard IMO... but hey it's a good guide I only used 400 and 600 wet dry because I couldn't find anything higher than that and I got a great finish on my Thermaltake Pipe 101 HSF. you can see some good pics of my Lap job on this page here, just scroll down a little... or just check out my Avatar
once you're done that, the principals are the same for lapping your NB and SB... but obviously, it's a much tighter space and needs to be kept much cleaner, you can use only about 1 drop of water at a time, and it won't have a mirror finish... This is a Very important step, the NF2 NB chips are affectionately called soup bowls... they have horrible contact, when I pulled off my stock NB cooler it had about 10% surface contact... horrible..
There is a great guide here for lapping your NB but they don't use nearly enough tape.. so here is a thread by enduro that has pics of him lapping his NB on the NF7 (same chip) Note: this page also has great advice on how to solder when doing Volt mods, the mods he shows are on a NF7-s so it's not the same mod as the AN7, but the soldering technique is the same
http://www.ocforums.com/showthread.php?t=334674&highlight=nf7+vdd+mod
and another thread showing the pics of Harlam357 lapping his NB on his AN7...
http://www.ocforums.com/showthread.php?t=341343&page=3&pp=30
and here are some pics of me lapping my NB on my AN7:
SB is done in the same way the NB is done.Darien said:I attached the sandpaper to my stock NB cooler and used that to do the lapping.
I started dry with 220 sandpaper, since I didn't want it to take all day, besides I was all out of 400 grit. I took pics at 15 and 30 minutes,
http://www.ocforums.com/attachment.php?attachmentid=43134&stc=1
http://www.ocforums.com/attachment.php?attachmentid=43135&stc=1
at about 45min I switched to 600 grit wet dry sand paper, using 1 drop of water, the smallest possible, not even a drop, a spec... you can see in the 600 grit picture that I used my stock NB cooler to do the lapping, I just taped small pieces of sandpaper to it and started lapping, worked great...
http://www.ocforums.com/attachment.php?attachmentid=43136&stc=1
http://www.ocforums.com/attachment.php?attachmentid=43137&stc=1
I did the SB too while I had everything out, did it the exact same way, except I used a smaller RAM heatsink to do the lapping... it's necessary to use very small items to do the lapping on these boards because of the confined spaces...
use Arctic Silver 5 for your thermal compound, for your SB mosfets and anything else you need to attach with an adhesive, just add a little bit of liquid cement or epoxy to it and it should work... if you want to do it right get some Arctic Silver Adhesive. Make sure when you do this that you won't ever need to take it off, once it's on, it's on for good, if you are putting something on temporarily, use thermal tape.
Mosfet Cooling:
This picture will show all the area's on your AN7 that need to be sinked... note the area's in Blue are optional..
Tebore says that cooling the CPU mosfets (to the left of the CPU) benefit from not only sinking them on the front of the board but also on the back like this, just another tip for all of us extremists.
NOTE: DO NOT mount your NB or SB coolers (or mosfet heatsinks) until you have done the volt mods. The Vdd mod will be incredibly difficult if you have a SB cooler already attached.
Step 5: Volt Modding
NOTE: ATTEMPT THESE AT YOUR OWN RISK, IT IS DANGEROUS AND YOU MAY RUIN YOUR MOTHERBOARD, YOUR COMPONENTS AND MAY EVEN BURN YOUR FINGER. IF YOU SCREW THIS UP, DON'T COME CRYING TO ME, BE CAREFUL, BE EDUCATED. OCFORUMS AND MYSELF ACCEPT NO RESPONSIBILTY FOR ANY ACCIDENTAL DAMAGE OR OVERT STUPIDITY.
The one area where the AN7 beats the NF7 hands down is on the Volts, AN7 has more Vcore, more Vdimm and more Vdd.... but like the saying goes "too much is never enough"..
now, if you're using TCCD RAM, you won't need the Vdimm mod... Hell, few people need more that 3.2 Vdimm but for some volt hungry BH-5 and CH-5 you'll need a little more juice.
This is one of the best general overview guides of Volt Modding I've seen
http://www.vr-zone.com/index.php?i=757
it's a must read
Vdd / NB Chipset Mod
The single most effective Volt mod for me was the Vdd mod... it allowed me to stablize my System at higher FSB's... but note that these volt mods don't just give you MORE volts but they also give you a much tigher control of your volts so you can do much better fine tuning.
The NFII NB can usually handle 2.00 volts no problem. I wasn't sure how high it could be pushed, I just figured that I would monitor the temperature of the NB and give it juice until heat became a problem.... just like the CPU... well... the NB does NOT have any Temp. Monitors... the Sys Temp. does NOT refer to the NB... so the only way to monitor the temp of the NB is to use a temperature sensor, like with the Hardcano controller or some other temp. sensing/monitoring hardware... because NONE of the Temp. Monitoring proggies like MBM5 or Abit EQ or even the BIOS will show the NB Temp...
That being said... I've pumped up to 2.42v through my NB... and it didn't get over 42C (as shown by my Hardcano's temp. sensor under the NB HSF)... so it could probably handle more, but it didn't benefit from it, so I don't run it that high... I use 2.05v in the NB (Vdd) with my OC...
The original person to do the AN7 volt mod was Micutzu, then Cetoole, the links to Micutzu's guide are no longer Active so Cetoole posted some pics, showed me how to do it and then I uploaded my pics too... this thread here has the guide to show you how to do the mod.
This is a rather difficult mod and requires that you have a steady hand, patience and good lighting, as well as good soldering skills... you better know how to Tin a wire and controll hot flux/solder...
This is a good soldering guide
also enduro posted a NF7 guide that has good soldering tips that I referneced earlier
Rule of Thumb: If you're not confident, don't do it... whether you think you can, or think you can't, you're usually right either way
PSU 3.3v Rail Mod:
The next most effective mod of the 3.3v Rail Mod to my Power Supply Unit...
I never realized how important and effective a Mod to the PSU could be until I researched this...
I recommend you do the exact same mod to the 12v Rail on your PSU as well, however I couldn't on mine... this is called the Line Sense Mod... It can't be done on all PSU's... just the good ones... It's is important to note, without a good PSU you may as well pack your bags and go home... if your power supply doesn't have a feed back line sensing the volt output, you have a cheap PSU and you should get another one...
before you attempt this it is important to note that some PSU's have adjustable rails and therefor you don't need to mod anything, just increase the voltage on the rails: OCZ PowerStream is one example.
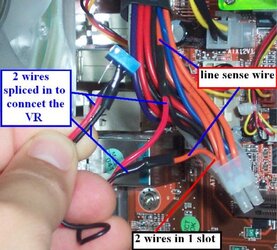
Very simply your PSU kicks out a certain amount to volts to a respective rail in this case the 3.3v rail... there 'should' be a one of the 3.3v connections on the ATX mobo connector that has two wires going into one slot... the thin wire, i repeat the thin wire is the line sensor... if the line sensor tells the PSU there aren't enough volts the PSU will increase voltage to that rail... so all we do is cut the line sense wire and add in a VR (Variable Resistor, POTentiameter, trimmer,etc) to lower the volts on the line sense wire so that the PSU 'thinks' the volts have dropped on that rail, then it will increase the voltage to the entire rail... so the more resistance in the line sense wire, the higher the voltage will be on the rail.
This mod is incredibly easy... you'd have to be a blind, 1 handed spastic to screw this up.
Here are two great guides on how to mod your PSU:
OC Forums Guide
Bleedinedge Guide
now to be honest, I didn't do mine the correct way like they showed.. I did mine quick and dirty, I snipped the sense line for the 3.3v rail and connected the two ends of cut line sense wire with my VR and I was good to go... they say not to do this cuz the voltage won't be as stable but I haven't had any problems whatsoever. check pic here
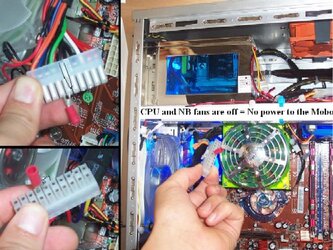
for obvious reasons you need to remove your PSU from the case when doing the mod... you need to Jumper the connector pins in the PSU's ATX mobo attachment to turn on your PSU without pluging it in... Like This
Important note: when you do this, if you give the Pot to much resistance the PSU will push the respective rail too high and the PSU will turn off..... if you're lucky... I did this and thought I blew the PSU, I didn't.... thank God... but be careful of that, when you first connect the Pot, make sure it's set to 0 Ohms, or 0 resistance, that way the line sense will read full strength... then you slowly add resistance and watch the voltage on the rail raise up..
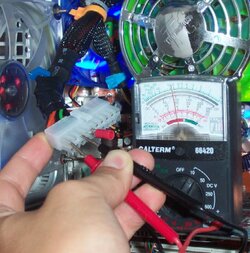
once you've done your mod, before you attach it to your mobo, turn on your PSU (out of the case) and check your voltage on the 3.3v rails, adjust it to where you want it, about 3.2-3.6 volts...
see pic here
doesn't have to be exact yet, just make sure it's at a resonable level before you attach it to your mobo...
hook everything back up and go into your BIOS and then fine tune your voltage
should look Like This when done.
PSU 12v / 5v Rail Mod:
12v rail is very important for you overclock it supplies the juice to your CPU and if your running dry on your 12v rail, your OC will suffer... watch your 12v rail and if it's less that 12v, do the mod... or if you're seeing you 12v rail sag under load, then defineatly to the mod...
the 12v rail mod is quite simply done exactly the same as the 3.3v rail mod, just done with the 12v line sense wire.... now some PSU's don't have a 12v line sense wire, if yours doesn't then look to see in there is a line sense wire on the 5v rail... in this case very often doing the mod to the 5v rail will also boost the 12v rail... only way to know for sure if yours is like that is to do the mod...
I don't know of any good reason to mod the 5v rail, but if you need to do so, then do so, again exactly the same..
one last note, quite often the mobo doesn't correctly read the actual voltage coming from the PSU's rails, so it's worth checking manually to make sure how much juice your PSU is actually giving you.
Vdimm Mod
The last mod is the Vdimm mod... well there are a few different ways to do this one... At first I was hell bent on drawing power from the 5v Rail and trimming it down to boost the Vdimm... that way I could get 4v or more if I wanted.... I didn't understand why everyone was feeding off the 3.3v rail, that would max out the Vdimm below the 3.3v rail... I later realized the 5v isn't the best way.... for one you will probably have to do the Vtt mod to stabilze it, two you could burn a mosfet, and three if you feed from the 3.3v rail you're not limited to 3.3v, you just raise the 3.3v rail and you get the added benefit of increased stability to everything the 3.3v rail feeds... which is a lot...
so this mod is actually another very simple one step mod... assuming you already did the PSU 3.3v rail mod... cuz they go together.... actualy you don't have to mod the 3.3v rail... but then your Vdimm will be limited to about 0.15v below your 3.3v rail... which is about how much your AN7 gives you stock.... so actually... with the AN7 you do need to do them both (it's late, i'm tired)
All you do is take a VR, a 1k Ohm 15 turn VR trimmer more turns the better 25 turn is best, connect one end to a ground point and the other end to the R316 resistor shown in the picture... with the VR set to zero resistance you will have increased the Vdimm to the Full strength of the 3.3v rail (minus about 0.15v) to back of the Vdimm less than that you increase the resistance of the VR.... and that's it.. very simple... this mod actually came from Tictac himself...
Check the Picture in this thread that picture is the spot between the AGP slot and the RAM slots.
now, don't do what the instructions tell you to do on that link, do NOT unsolder the resister from that board... listen to what Tictac said
nah... no need to remove theresistor...
just solder a wire to that resistor
add in trimmer to the wire we just solder
and ground the other end... set resistance to max
and lower 5the resitance to increase vdimm voltage
measure vtt voltage to from pin 2 of dimm connector
just to make sure it still track 1/2 of vdimm voltage
and he is right... with this one you don't have to worry about the position of the VR so much, Full resistance on the VR should produce no change in Vdimm and No resistance in the VR can only give you the full value of your 3.3v rail... The great thing about this is the Vtt Tracks perfectly, atleast for me it did.
soldering the wire to resistor R316 without soldering anything else can be a challenge, take your time and as always, do this at your own risk...
This is what My Vdimm Mod looks like
An interesting note here, the Vtt tracks perfectly, but the AN7 won't register more than 3.48 VDimm in the Bios or windows programs... but it's there and you can see it with the multimeter, and you'll see the Vtt track your real Vdimm in the BIOS even though the BIOS Vdimm reading will max @ 3.48
This picture shows where you can check your voltage you don't have to measure from the back of the mobo, you can just stick your multimeter pins in the corresponding holes in the front of the dimm slot.
I had done this mod successfully and had done alot of testing with it using Windbond UTT Bh-5, but after about about a week, my stupidity caught up to me...
Don't make my mistake!!
EDIT: use a 1k Ohm VR trimmer with atleast 15 turns, I didn't and look what happened!!
WRONG! Don't adjust Volt Mods while your comp is on, you can but you may end up frying your board if your voltage spikesDarien said:now that you have it all hooked up turn on the comp go into the bios and crank up the 3.3v rail, to a little higher than you want your Vdimm, then turn up your Vdimm all the way, remember it will only ready 3.48 in the bios... but I pushed my 3.3v rail up to 3.8v, turned the Vdimm all the way up and it measured over 3.7 on my multimeter, but the neat thing is the bios read the Vtt at 1.86... tracking perfectly...
Note: Dangit, I adjusted my voltage with the comp running one too many times and now I've ended up with a grounded R316 resistor thx to a voltage spike while adjusting the resistance with the computer running... An added note is to use a 1k Ohm 15 turn VR trimmer, again atleast 15 turn Potentimeter, perferably 25 turn though, this way you can only change the voltage in VERY small increments and thus avoid voltage spikes.... looks like this
although dangerous to do while running, If I had used a 1k Ohm 15 turn trimmer, instead of a 20k Ohm 15 turn trimmer, I think I would have been OK.The numbers denote its size. In this case, "104" means that it is a 100K ohms variable resistor whose maximum resistance goes up to 100K ohms. "104" means "10" with 4 zeros behind = 100, 000. "103" would of course denote a 10K ohm resistor.
They can adjust the resistance in smaller steps as they have to be turned many turns to reach the maximum resistance. This is a good thing so that you do not increase or decrease voltage in giant steps.
Also, try not to adjust the voltage real time, as in adjusting the variable resistor while the PC is running. You can do that but it is more risky as sudden voltage spikes up or down and kill hardware.
again Do at you own risk... learn from my mistake.
My board still works but my Vdimm is stuck on Full Power of the 3.3v rail and I can't turn the Vdimm down lower than 3.3v.... sigh, which sucks cuz I use TCCD... I believe I know how to fix this, but I'm not 100% sure, I'll post the fix once I've done it.
FIXED!!! Victory atlast, and hope for anyone who screws this up!
FIX POSTED HERE!
One last thing concerning Vdimm... Only do this mod if you need more that 3.2v... don't do it for the heck of it... don't do it and then run TCCD at 2.9... you can... but it becomes a pain because adjusting the volts in the BIOS becomes very finiky... everytime you change something in the BIOS you need to recheck you actual voltage because it may get set to full Vdimm by default, especially when saving a new bios profile or changing FSB.... However once your system is dialed in the way you want it it's fine... but you should still configure Abit EQ to launch automatically and sound an Alarm is your Vdimm is higher than you want it, this way you won't burn up your RAM without knowing it...
Conclusion
Well, if you've done all of this (correctly) then you have one hell of an overclocking board! At this point you have the all the raw potential you need, the only thing left to do is Overclock the hell out of it, dail it in and find the sweet spot...
This guide is almost completely finished, I've posted most of what I wanted to say, but I may add more from time to time. This is for all you AN7 users out there, I hope some of you find this helpful, I know I would have been completely stoked to come across a guide like this when I was trying to figure all of this out, instead of the 100's of Nf7-s guides, that I wasn't sure would work on my AN7... If any of you AN7 users can add to this please give us your Input!
I would like to Thank Harlam357, Cetoole, Electric Bill, Sharptooth, Playah, Tebore and Hood for all of there personal help, and I would like to Thank Enduro, Tictac and Enduracell for all there contributions and guides that I learned from.
Most of all I would like to thank Jesus Christ, because it was a miracle that I didn't Fry my board, ruin my RAM, explode my PSU and electricute myself
Attachments
Last edited:


