- Joined
- Aug 24, 2007
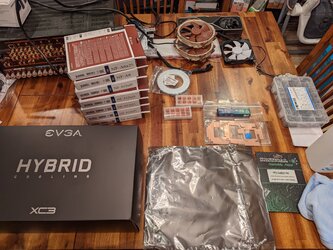
I've been gathering parts for this project for a few weeks now, and tonight was finally the night. Took me five hours start to finish, but I'm getting old and slowing down, and given the price of this card (let alone actually finding one; I was in the queue for 15 months to get this one), I didn't want to mess up and break anything. Anyway, the pile of parts, minus the PC where I've been running the card on air for about two weeks:

On air it got loud and hot, and the memory temps were pushing over 100, not good for longevity. Core basically went up to 83, the fans kicked up, and I had to keep power limit around 80 if I wanted tolerable sound levels. The remedy includes an EVGA hybrid AIO kit, coolmygpu.com plates for both front and back RAM (front plate at https://www.coolmygpu.com/product/hybrid/4?cs=true&cst=custom and I'm not linking the back plate because I'm not sure if it's finalized/public yet), Kriticalpads for the VRMs and inductors (this set https://kriticalpads.com/evga-3090-ftw3-hybrid which includes VRAM pads, but I didn't use these, good to have spares anyway), and some Alphacool 17427 heatsinks over the back side RMA. I am planning to actively cool the heatsinks, but didn't end up ordering the right fan to do this.
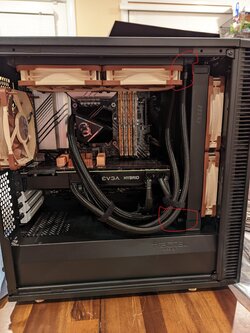
Before I started, I test fit the GPU AIO in the top spot of my Fractal Define Mini C - bad news, the fittings on the existing front MSI P240 AIO interfere, so the GPU rad won't fit in the top spot.

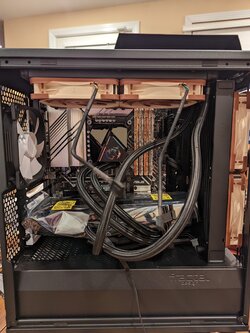
I had to both remount the CPU block to get the tubes on the left so I would have room for the GPU backplate heatsinks, and turn the front CPU radiator upside down so the fittings are on the bottom. During this step, I mounted Noctua A12x25 fans to both radiators. The front radiator is intake, the top one exhausts out the top of the case.

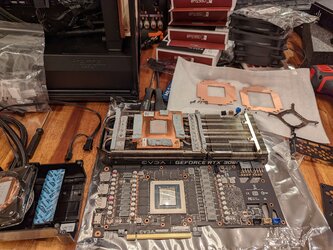
The EVGA hybrid kit (only $100 or so direct from EVGA, super value here!) came with good instructions and plenty of extra screws. It didn't take too long to strip off the air cooler and clean the old pads, putty, and paste off the card. You can see the copper plates from coolmygpu.com above the air cooler.

Dry fitting the plates on the GPU block. You can see the square piece on the bottom left for the single VRAM chip on the bottom of the card, and larger copper sections for the VRAM on either side and above the GPU. The plate that comes with the EVGA hybrid cooler is unused - it uses thick thermal pads and does not cool the VRAM nearly as well as these chunky copper plates stuck together with Arctic MX-5.

Once I was satisfied that I had the plates lined up right, I removed the thermal pads that came with the hybrid kit and added the Kriticalpads pads, a nice minty green.

Next is a heavy bead of MX-5 around the block. This is the contact surface where the coolmygpu.com plate transfers heat from the VRAM to the water block.

Then you add the larger of the two plates and squish it down, then sort of smear the paste into the cracks as best you can.

I don't have pictures of the next step, but you just put some paste on the plate and put the VRAM plate on top. Then, you apply a thin layer of paste to the GPU die and all the VRAM chips. There are no thermal pads between the GDDR6X and the water block now, just copper and MX-5.
After mounting the PCB to the hybrid cooler, I did the rear VRAM chips. These get really hot, and the backplate does a bad job of cooling them. There are some pads in there, but they are pretty thick and the flat backplate doesn't shed heat very well anyway. First step is to paste the chips, which were cleaned of thermal pad residue earlier:

Then line up the plate, being really careful not to hit any of the raised surface mount components. Of particular concern are some parts on the north side in the cove area; these will definitely hit the copper plate if it's too close, and I think shorting something out here would be really expensive

Once I had it lined up and checked clearances of all the raised stuff, I added a few pieces of the supplied thermal tape, and gooped on some Kryonaut (I had run out of MX-5, probably was a little too free with it at the start of the project - you can get a 4 gram tube included with your coolmygpu.com plates at cost, and he's an authorized Arctic dealer now) to make sure the copper VRAM plate contacted the stock EVGA backplate well.

Once I was happy with the placement of the plate, tape, and paste, I put the empty thermal paste box on the card to hold the backplate up. The supplied tape seems really, really strong, and I didn't want the backplate to stick to the copper plate in the wrong position. I put the far two screws in first so the backplate wouldn't move, then carefully lowered it onto the plate and pressed pretty hard to seat the tape. I then put in the rest of the screws.

A bit of paste oozed out, and I checked from the sides to make sure there was contact between everything.

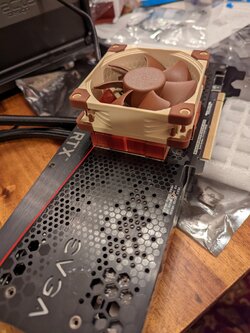
The last step was adding the Alphacool 17427 heatsinks directly on top of the copper plate/VRAM chips, using thin but strong thermal tape. I would have used some of the Arctic Silver adhesive stuff, but I didn't have any on hand and it seems to be discontinued. Anyway, using tape means I can reverse the mods if I need to RMA the card, although if someone wanted to make a more permanent connection between the heatsinks and the card, spare backplates are available on ebay. I mounted the heatsinks oriented so a fan blowing down into the middle would blow through them. I test fitted a Noctua A8, and while it would work great, the CPU block is a little too big to allow this. I have an A6 on hand and I'll test that, but it's really tight above the GPU and I may need to either go down to a 40mm fan, or just leave it passive.

80mm A8 test fitting; I was planning to glue flange nuts or rivet nuts to the backplate and screw the fan down to that, blocking out the corner areas with shielding so the air was forced through the fins. I don't think that's really needed at this point, temps are already great.

Once I realized the heatsinks would have to be passive for now, I turned the rear case fan around and made it an intake. I don't love having an unfiltered intake fan back there, but the airflow seems to really help both the VRAM and the NVMe drive temps, so I think I'll keep it like that for now.

Final product:

Did I mention it's a mATX case/build? Fitting both 240mm radiators in there with everything routed properly was a challenge. I think it looks nice with the copper/gold/brown/black theme, though I gave aesthetics a 0% priority - it's just how it all turned out. The RAM is Trident Z Royal, half gold half silver - there was only one of each kit in stock when I ordered it, but I think it looks nice like this.
I did a quick Furmark 4k preset run and hit GPU core 42C, VRAM junction 56C. Before I did all this, those temps were more like 83C and 100C. I'm very happy with the results.
Disclosures: I bought everything in this post myself, and I have no affiliation with any of the products or vendors in my post. I just wanted to bring attention to the coolmygpu.com plates and the Kriticalpads pre-cut thermal pad sets. I love that people are starting these small businesses to cater to people who want better thermals on their video cards, and I would like nothing more than to see both companies succeed and continue to offer these type of products for future generations of GPU. I'm also thrilled that EVGA offers an affordable official hybrid kit (made by Asetek, same as the MSI CPU AIO in my rig) for their RTX cards. I'm cross-posting this to the EVGA forums.
Thanks for reading this far, let me know if you have any questions or want me to run any tests
On air it got loud and hot, and the memory temps were pushing over 100, not good for longevity. Core basically went up to 83, the fans kicked up, and I had to keep power limit around 80 if I wanted tolerable sound levels. The remedy includes an EVGA hybrid AIO kit, coolmygpu.com plates for both front and back RAM (front plate at https://www.coolmygpu.com/product/hybrid/4?cs=true&cst=custom and I'm not linking the back plate because I'm not sure if it's finalized/public yet), Kriticalpads for the VRMs and inductors (this set https://kriticalpads.com/evga-3090-ftw3-hybrid which includes VRAM pads, but I didn't use these, good to have spares anyway), and some Alphacool 17427 heatsinks over the back side RMA. I am planning to actively cool the heatsinks, but didn't end up ordering the right fan to do this.
Before I started, I test fit the GPU AIO in the top spot of my Fractal Define Mini C - bad news, the fittings on the existing front MSI P240 AIO interfere, so the GPU rad won't fit in the top spot.
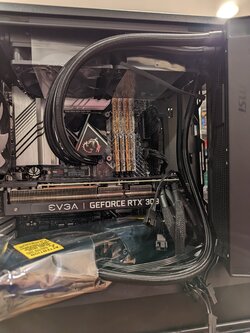
I had to both remount the CPU block to get the tubes on the left so I would have room for the GPU backplate heatsinks, and turn the front CPU radiator upside down so the fittings are on the bottom. During this step, I mounted Noctua A12x25 fans to both radiators. The front radiator is intake, the top one exhausts out the top of the case.
The EVGA hybrid kit (only $100 or so direct from EVGA, super value here!) came with good instructions and plenty of extra screws. It didn't take too long to strip off the air cooler and clean the old pads, putty, and paste off the card. You can see the copper plates from coolmygpu.com above the air cooler.
Dry fitting the plates on the GPU block. You can see the square piece on the bottom left for the single VRAM chip on the bottom of the card, and larger copper sections for the VRAM on either side and above the GPU. The plate that comes with the EVGA hybrid cooler is unused - it uses thick thermal pads and does not cool the VRAM nearly as well as these chunky copper plates stuck together with Arctic MX-5.
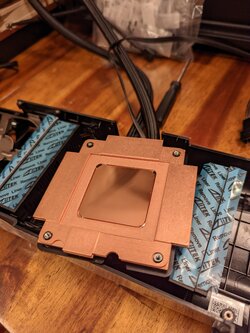
Once I was satisfied that I had the plates lined up right, I removed the thermal pads that came with the hybrid kit and added the Kriticalpads pads, a nice minty green.
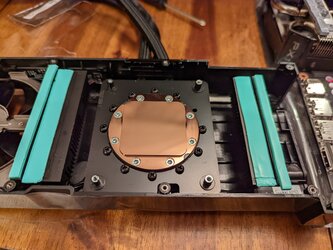
Next is a heavy bead of MX-5 around the block. This is the contact surface where the coolmygpu.com plate transfers heat from the VRAM to the water block.
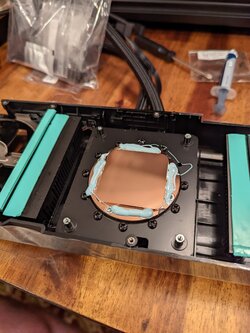
Then you add the larger of the two plates and squish it down, then sort of smear the paste into the cracks as best you can.
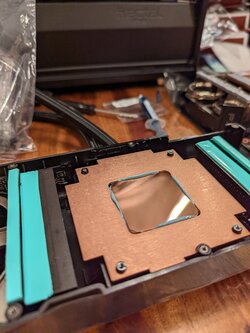
I don't have pictures of the next step, but you just put some paste on the plate and put the VRAM plate on top. Then, you apply a thin layer of paste to the GPU die and all the VRAM chips. There are no thermal pads between the GDDR6X and the water block now, just copper and MX-5.
After mounting the PCB to the hybrid cooler, I did the rear VRAM chips. These get really hot, and the backplate does a bad job of cooling them. There are some pads in there, but they are pretty thick and the flat backplate doesn't shed heat very well anyway. First step is to paste the chips, which were cleaned of thermal pad residue earlier:
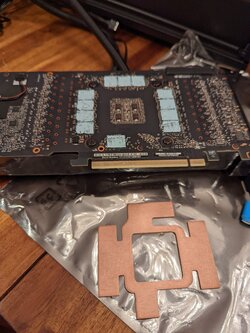
Then line up the plate, being really careful not to hit any of the raised surface mount components. Of particular concern are some parts on the north side in the cove area; these will definitely hit the copper plate if it's too close, and I think shorting something out here would be really expensive
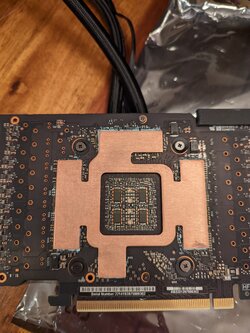
Once I had it lined up and checked clearances of all the raised stuff, I added a few pieces of the supplied thermal tape, and gooped on some Kryonaut (I had run out of MX-5, probably was a little too free with it at the start of the project - you can get a 4 gram tube included with your coolmygpu.com plates at cost, and he's an authorized Arctic dealer now) to make sure the copper VRAM plate contacted the stock EVGA backplate well.
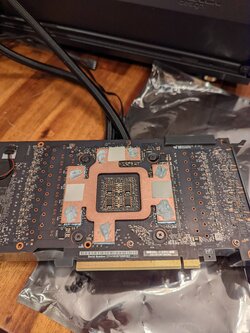
Once I was happy with the placement of the plate, tape, and paste, I put the empty thermal paste box on the card to hold the backplate up. The supplied tape seems really, really strong, and I didn't want the backplate to stick to the copper plate in the wrong position. I put the far two screws in first so the backplate wouldn't move, then carefully lowered it onto the plate and pressed pretty hard to seat the tape. I then put in the rest of the screws.
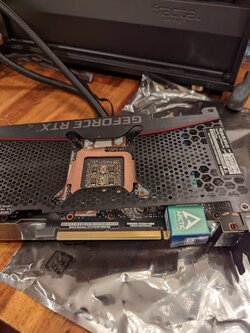
A bit of paste oozed out, and I checked from the sides to make sure there was contact between everything.
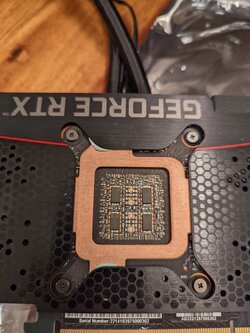
The last step was adding the Alphacool 17427 heatsinks directly on top of the copper plate/VRAM chips, using thin but strong thermal tape. I would have used some of the Arctic Silver adhesive stuff, but I didn't have any on hand and it seems to be discontinued. Anyway, using tape means I can reverse the mods if I need to RMA the card, although if someone wanted to make a more permanent connection between the heatsinks and the card, spare backplates are available on ebay. I mounted the heatsinks oriented so a fan blowing down into the middle would blow through them. I test fitted a Noctua A8, and while it would work great, the CPU block is a little too big to allow this. I have an A6 on hand and I'll test that, but it's really tight above the GPU and I may need to either go down to a 40mm fan, or just leave it passive.
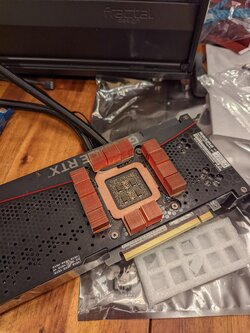
80mm A8 test fitting; I was planning to glue flange nuts or rivet nuts to the backplate and screw the fan down to that, blocking out the corner areas with shielding so the air was forced through the fins. I don't think that's really needed at this point, temps are already great.
Once I realized the heatsinks would have to be passive for now, I turned the rear case fan around and made it an intake. I don't love having an unfiltered intake fan back there, but the airflow seems to really help both the VRAM and the NVMe drive temps, so I think I'll keep it like that for now.
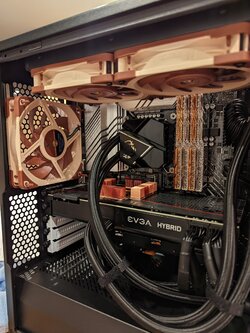
Final product:
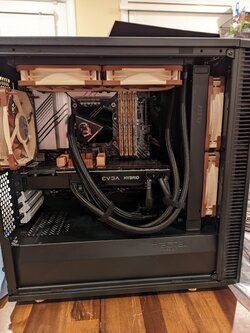
Did I mention it's a mATX case/build? Fitting both 240mm radiators in there with everything routed properly was a challenge. I think it looks nice with the copper/gold/brown/black theme, though I gave aesthetics a 0% priority - it's just how it all turned out. The RAM is Trident Z Royal, half gold half silver - there was only one of each kit in stock when I ordered it, but I think it looks nice like this.
I did a quick Furmark 4k preset run and hit GPU core 42C, VRAM junction 56C. Before I did all this, those temps were more like 83C and 100C. I'm very happy with the results.
Disclosures: I bought everything in this post myself, and I have no affiliation with any of the products or vendors in my post. I just wanted to bring attention to the coolmygpu.com plates and the Kriticalpads pre-cut thermal pad sets. I love that people are starting these small businesses to cater to people who want better thermals on their video cards, and I would like nothing more than to see both companies succeed and continue to offer these type of products for future generations of GPU. I'm also thrilled that EVGA offers an affordable official hybrid kit (made by Asetek, same as the MSI CPU AIO in my rig) for their RTX cards. I'm cross-posting this to the EVGA forums.
Thanks for reading this far, let me know if you have any questions or want me to run any tests
