• Welcome to Overclockers Forums! Join us to reply in threads, receive reduced ads, and to customize your site experience!

EK custom loop LianLi O11D-XL

Overclockers is supported by our readers. When you click a link to make a purchase, we may earn a commission. Learn More.
I've added green lines with arrows and labels. You often want the inlet of the GPU to be nearest the IO plate (farthest from the distro) but check the manual as some blocks don't care or site a minute performance difference from switching. The CPU is much more important as it uses a pressure plate and the CPU block inlet will be in the center of the block while the outlet will be offset. Finally, this will make more sense I hope once the blocks are installed, but you are meant to re-arrange the plugs that are included in the block so that you have straight tubing runs. You can also experiment with using the bottom of the GPU as the inlet and the top as the outlet, as this doesn't matter, just left and right (and that you're not going straight through, they have to be offset). distro.jpg
 
Yea .. I understood that part so far, I just have an issue with how I should approach the angles for the tubes on this one, since they are "in-line" and not opposed to each other like the radiator ones
 
Are you doing soft tubing? Then it really doesn't matter... get a 45 angle on one of the ports on the block... problem solved(?).

EDIT: I see you're going hard tubing. Not my expertise...
 
Yea I know, I listed them earlier in my post of parts I know I'll buy, but I just can't wrap my head around the tubes for the GPU. The cpu block is much easier, I'm just gonna use an extender
 
I know its not a perfect resemblance but what length do I need to measure for the extender? Its between the red or purple line

(this picture shows the distro plate :) )
 

Attachments

  • Unbenannt.png
    Unbenannt.png
    11 KB · Views: 204
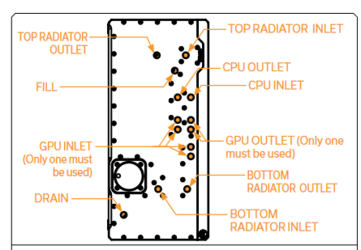
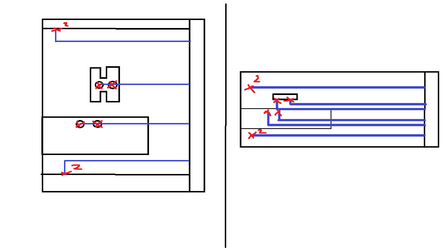
So the terminal on the GPU should have 4 openings. When the card is mounted horizontally (as depicted in your drawing) two will be on top, and two will be on the bottom of the terminal. We can call one front (closest to the distro plate) and one rear (closest to the IO plate of the card). Run the fluid into the bottom rear, and out of the top front, for example (I believe this is one of the more standard approaches and it is the one I use, as some blocks perform better using the rear as the inlet). The two unused holes should be plugged.

For the CPU, you'll want to either use spacers or a short tubing run up or uses spacers, such that as you look down upon the loop (changing your orientation in space from the previous example) such that the motherboard is the bottom, the tubes are stacked vertically on top of each other. Looking more closely at the new EK block, there isn't a middle inlet (they probably did this to accommodate abnormally large fittings, as you can see in the acrylic versions a little jog over to the middle pressure plate built into the block's intake). For AM4 it appears that the inlet must be towards the rear / IO side of the PC and the outlet towards the front / distribution block. In my drawing I had this reversed as one of your holes in your drawn block was close to the center of the block. With the inlet and outlet reversed from my drawing but in the stock EK configuration, the stacking of the hard tubing should make sense.

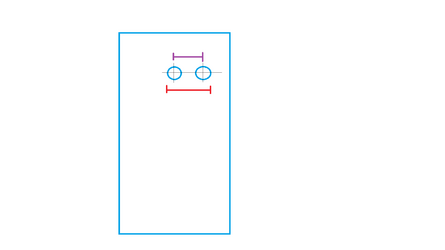
I'm not a hard tubing person myself, so apologies if this is unclear or I've said something stupid, but I think it should work this way. In your last post, what are we measuring? The distro plate? In this case it's going to be somewhat varied because I doubt a 90 fitting straight off the CPU block will make a straight shot to the distro plate in the first place, but for difference I would measure middle to middle, but some of this you're going to have to mock up to figure out IMHO (at least that's how I would do it). This is why buying a lot of extra fittings (especially 90 degree rotaries and extensions) is recommended so you don't have to order parts on trial and error. I know they're expensive but so is the rest of this hobby :(
 
To give you guys an update, I came up with a much simpler solution and more cost effective one.
I'm just gonna buy the pre-bent ones, that way I save around 60bucks and I dont have to worry about angles etc
 
So in my experience building in this case, you are going to need various lengths of g 1/4" extensions and several 45 degree fittings to make that orientation of top rad work properly. I dont think that you will escape this fact in tour build, even with pre bent tubes. It is not a one size fits all installation. I suggest that you spend the little bit extra and do the bends yourself. Once you have all the tools, the tubing is cheap. So if you make mistakes it is no big deal. You are going to need at least 3-4 90 degree fittings and 15, 20, 25mm extenders to make it around the motherboard on the top. It is just how it is in this case. Here are a few pics of my build to give you some ideas and inspiration.

Original design
20200914_131439.jpg

Everything installed
20200915_053654.jpg

finished product
20200920_103149.jpg

With all of the straight runs from your distro plate, you will need 90 degree fittings for each one. You will see that in my build I cut those 90 degree fittings out by doing custom bends. It will help your flow in the loop in the end by doing this. Do not be afraid of doing these bends. I ordered the angle forms and only used them on the 90 degree bends, and was actually getting cleaner and more accurate bends doing it free hand.
 
Its a doubt for me on your take, no offense meant.

If I'm not completely missing something very important I have to always connect both ends of radiator/cpu/gpu blocks to the distro plate (see picture attached)

Everything should work out perfectly fine with just the fittings on the mount holes and 90° pre-bent tubes

- - - Auto-Merged Double Post - - -

The GPU will be mounted vertically, didnt mention this so far I think
 

Attachments

  • Capture.PNG
    Capture.PNG
    28.3 KB · Views: 134
It is possible to still go directly from one component to the other and plug off the corresponding holes in the distro plate. It just defeats the distro-plate look to some degree. At some point mocking it up and start working with the parts is going to be your best bet, there's a reason they are called custom. I do applaud your degree of planning, but it seems like maybe some planning is being done before all the decisions are made, for example most of the mock up drawings we worked on earlier don't necessarily apply to a vertical GPU. There are plenty of options in your distro plate though, so I'm sure you can work something out.
 
Yea I understand, I attached a picture of what I consider my Custom Loop V2.

If I'm not missing something very important its just that kind of simple?

The in/outlets are not 100% accurate its just to provide an image
 

Attachments

  • Unbenannt.png
    Unbenannt.png
    32.7 KB · Views: 119
Yea I understand, I attached a picture of what I consider my Custom Loop V2.

If I'm not missing something very important its just that kind of simple?

The in/outlets are not 100% accurate its just to provide an image

You can chose to believe me or not, no sweat off my back. I have built in this case before, it is why I provided pics. If you face the top rad with the fittings towards the back (rear of the case), you will have to "work around" the motherboard. This is not solely unique to my board. It is what it is, and you will find out. Just try installing your components dry, and you will see what I am talking about. 90 degree rotaries are cheap on amazon. The extensions are not expensive either. You will need them. Buy more than you expect to need. Worst case you can return them. I am traveling for work, otherwise I would provide you with close up pictures that would clarify it better. Good luck with your build.
 
suck it.png
Just for clarity I have uploaded the best pic I have with me from my install showing this. When you figure this out for yourself, make sure to post it here. Not simply for an I told you so, but for an example of why you should listen to those with experience.
 
See page 9 of the manual you linked. Otherwise I'm not sure I understand your question.
 
Hello folks, its been a while. After struggling, losing my mind and even more struggling, I have finished my build.

In the end I had to bend a few things, if I knew it was that easy I'd have done it myself.... stupid me

Anyway, here you can see how I flood the plate for the first time :)

https://streamable.com/k69wa9
 
Looks good. Let's see some finished pics when you get it all buttoned up. Glad that you got a chance to bend some tubes. It really isn't bad doing it, though it can seem a bit intimidating at first.
 
Back