- Joined
- May 12, 2010
- Location
- Phoenix, AZ
Hello everyone, I'm new here but thought I would share a post I did on another board. 2 Parts because it wouldn't let me post it all in one. Hope you like it.
I know it's long but please read the whole thing.
FINE PRINT:
This comparison was done by me with my own money. I bought both units at the local computer superstore. I did this test solely for the knowledge of finding out information. Please keep in mind that any testing equipment or the manner in which it was used in may not be to the manufactures testing procedures or specifications. More importantly! I am just looking for information and really don’t care who comes out on top.
TESTING OVERVIEW:
We are testing the Corsair H50 (H50) and the ECO A.L.C. (ECO). I tested all things that I could think of that would be relative within reason. If I missed anything please let me know and if I can get to it I’ll do it otherwise we’ll just have to settle with what we got here.
The test rig had all stock settings no OC.
*NOTE: I am planning on doing some more tests on the pumps but that will have to wait until this weekend.
APPERANCES:
(Please note that the H50 is about a week older than the ECO hence the dust I didn’t want to blow it out because it’s a good pic for people to understand why spacing the fan away from the rad is a good idea. If you look close you can see the clean “star” pattern were the fan has dead spots due to the hub and support arms.)

On the left we have the H50 and on the right the ECO. They both come with the needed hardware for installation. The 775’s are missing because I am too lazy to pull them off my rigs. If you look at the fins on the ECO you can see there are a few bent fins. This is how I pulled it out of the box. There was also a broken back plate arm. It didn’t bother me too much because it wasn’t my back plate. Now if it had been it’d be a different story. In ECO’s defense the superstore is a bit hard on boxes so who knows?!...
On further inspection the rads measure out the same but the H50 does seem to have slightly (I do mean ever so slightly) bigger end caps.
Next we have the H50 block, it does come with paste on it already just like the ECO but I already had it installed. One thing that bothers me a bit is the dimpling of the paste when I pulled it off. The chip had the same appearance. I may be wrong but I like to see a bit more paste on the blocks when I take them off.

From this pic you can also see the rings at top left. I actually like the way this unit mounts. It has little teeth that hold the block down.
Now let's look at the ECO block. I put my finger in it sorry.

If you look on the four corners you can see the socket sizes on them. You have the 1366, 1156 and 775. To get to the right size you pull up on the spring loaded feet and slide them at the same time. When you let go they lock into place.
You can see that it also comes with a paste pre-applied. I did measure it and it was enough to cover the Q9550 but I’m not sure about the other chips. One thing that I noticed right away was the finish on the copper. It’s not as smooth as the H50. That may bother some people.
One thing I really do like is the barb’s swivel making it much easier to move the tubes around.

A pic of the supplied 120mm fans that come out of the box setup in the exhaust configuration.

INSTALLED:
First I mounted up the ECO. I have heard some rumblings of difficult install but I didn’t think it was any harder to install than any other block.
The knurled knobs make getting it started by hand a painless job. I actually thought with the swivel barbs and knobs it was pretty easy to install.

Next the H50, it also mounts fairly easy. Now I have mounted it before so I may have a leg up on this one.

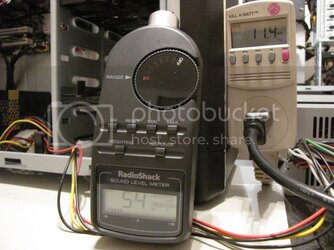
One thing that needs to be addressed is the H50 is noisier that the ECO. In the first pic you can see the decibel meter is at 51 (that’s as quiet as I could get my office) this is with the pump off and no computer on I used an extra PSU I had laying around to run it.

Next pic you can see that the noise went up 3 decibels at this distance.

It’s not overly load but it does make a ticking noise that I thought should be brought up.
The ECO noise level wasn’t even worth a pic it makes the slightest little hum when you put your ear up to it other than that it’s pretty silent.
Overall I think they both look good from an appearance stand point if that’s what you’re into. But if I absolutely had to pic one with ease of install in mind I would probably pick the ECO. It just seems easier to me and the fact that you can get it started by hand is a big + for me.
SUPPLIED FANS CFM: (*NOTE: Pay NO attention to the decibel meter. I have a better setup for that later.)
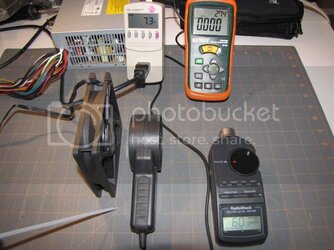
Here is the setup for the CFM test. I am using the spare PSU a Kill A Watt meter and an Extech anemometer.

The sqft of space was calculated for each fan so that I could input the area of each fan into the meter to get an as accurate reading as possible. I used the Kill A Watt just to see how much juice each fan pulled. No, I did not check amps.
You will also notice in the lower left I am using a pointer to point out the measuring lines I used to replicate the test the same for each fan. After getting a stable reading I did move the vane around to see if I could get a better reading (I couldn't).
Continued here: http://www.overclockers.com/forums/showthread.php?p=6493669#post6493669
.
I know it's long but please read the whole thing.
FINE PRINT:
This comparison was done by me with my own money. I bought both units at the local computer superstore. I did this test solely for the knowledge of finding out information. Please keep in mind that any testing equipment or the manner in which it was used in may not be to the manufactures testing procedures or specifications. More importantly! I am just looking for information and really don’t care who comes out on top.
TESTING OVERVIEW:
We are testing the Corsair H50 (H50) and the ECO A.L.C. (ECO). I tested all things that I could think of that would be relative within reason. If I missed anything please let me know and if I can get to it I’ll do it otherwise we’ll just have to settle with what we got here.
The test rig had all stock settings no OC.
- CPU - Q9550 2.8MHz
- Board - Foxconn (bios locked)
- GPU - 1 GB ATI
- Ram - 4GB Corsair Dominator
- PSU - Antec 850plus
- Case fans - Stock CM (came with case)
- Case - CM690
- Rad Fans - Two Magma 69CFM’s push/pull setup
*NOTE: I am planning on doing some more tests on the pumps but that will have to wait until this weekend.
APPERANCES:
(Please note that the H50 is about a week older than the ECO hence the dust I didn’t want to blow it out because it’s a good pic for people to understand why spacing the fan away from the rad is a good idea. If you look close you can see the clean “star” pattern were the fan has dead spots due to the hub and support arms.)
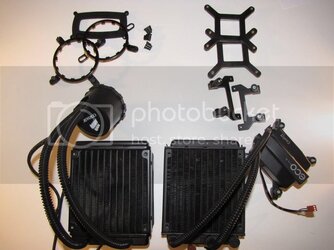
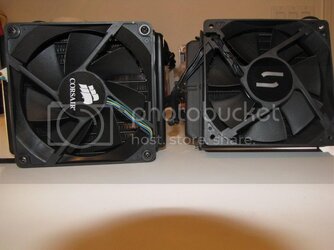
On the left we have the H50 and on the right the ECO. They both come with the needed hardware for installation. The 775’s are missing because I am too lazy to pull them off my rigs. If you look at the fins on the ECO you can see there are a few bent fins. This is how I pulled it out of the box. There was also a broken back plate arm. It didn’t bother me too much because it wasn’t my back plate. Now if it had been it’d be a different story. In ECO’s defense the superstore is a bit hard on boxes so who knows?!...
On further inspection the rads measure out the same but the H50 does seem to have slightly (I do mean ever so slightly) bigger end caps.
Next we have the H50 block, it does come with paste on it already just like the ECO but I already had it installed. One thing that bothers me a bit is the dimpling of the paste when I pulled it off. The chip had the same appearance. I may be wrong but I like to see a bit more paste on the blocks when I take them off.
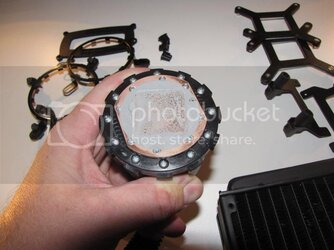
From this pic you can also see the rings at top left. I actually like the way this unit mounts. It has little teeth that hold the block down.
Now let's look at the ECO block. I put my finger in it sorry.
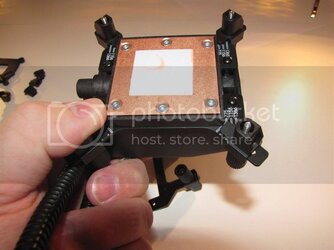
If you look on the four corners you can see the socket sizes on them. You have the 1366, 1156 and 775. To get to the right size you pull up on the spring loaded feet and slide them at the same time. When you let go they lock into place.
You can see that it also comes with a paste pre-applied. I did measure it and it was enough to cover the Q9550 but I’m not sure about the other chips. One thing that I noticed right away was the finish on the copper. It’s not as smooth as the H50. That may bother some people.
One thing I really do like is the barb’s swivel making it much easier to move the tubes around.
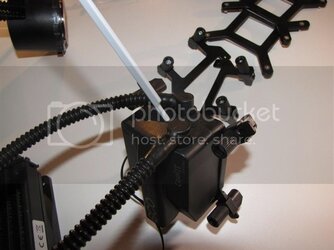
A pic of the supplied 120mm fans that come out of the box setup in the exhaust configuration.
INSTALLED:
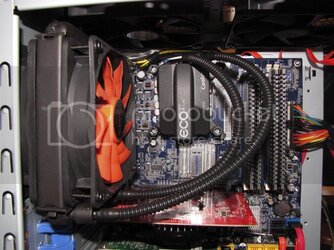
First I mounted up the ECO. I have heard some rumblings of difficult install but I didn’t think it was any harder to install than any other block.
The knurled knobs make getting it started by hand a painless job. I actually thought with the swivel barbs and knobs it was pretty easy to install.
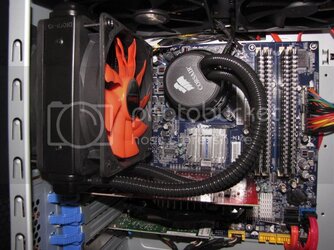
Next the H50, it also mounts fairly easy. Now I have mounted it before so I may have a leg up on this one.
One thing that needs to be addressed is the H50 is noisier that the ECO. In the first pic you can see the decibel meter is at 51 (that’s as quiet as I could get my office) this is with the pump off and no computer on I used an extra PSU I had laying around to run it.
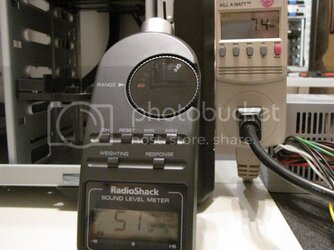
Next pic you can see that the noise went up 3 decibels at this distance.
It’s not overly load but it does make a ticking noise that I thought should be brought up.
The ECO noise level wasn’t even worth a pic it makes the slightest little hum when you put your ear up to it other than that it’s pretty silent.
Overall I think they both look good from an appearance stand point if that’s what you’re into. But if I absolutely had to pic one with ease of install in mind I would probably pick the ECO. It just seems easier to me and the fact that you can get it started by hand is a big + for me.
SUPPLIED FANS CFM: (*NOTE: Pay NO attention to the decibel meter. I have a better setup for that later.)
Here is the setup for the CFM test. I am using the spare PSU a Kill A Watt meter and an Extech anemometer.
The sqft of space was calculated for each fan so that I could input the area of each fan into the meter to get an as accurate reading as possible. I used the Kill A Watt just to see how much juice each fan pulled. No, I did not check amps.
You will also notice in the lower left I am using a pointer to point out the measuring lines I used to replicate the test the same for each fan. After getting a stable reading I did move the vane around to see if I could get a better reading (I couldn't).
Continued here: http://www.overclockers.com/forums/showthread.php?p=6493669#post6493669
.