-
Welcome to Overclockers Forums! Join us to reply in threads, receive reduced ads, and to customize your site experience!
You are using an out of date browser. It may not display this or other websites correctly.
You should upgrade or use an alternative browser.
You should upgrade or use an alternative browser.
Help/Advice on a watercooling build
- Thread starter distilld
- Start date
- Joined
- Apr 12, 2003
- Location
- Middlesbrough
Wow idont like that rubber in there how is that happening . If it keeps going on then i would think it will cause issue . You said you cleaned it once and its back strange . Should be nothing there clean .
The bubbles should go with the water heating cooling over week or 2 . If not and it bothers you i can only think of picking it up and tease them out .
- - - Auto-Merged Double Post - - -
No it doesnt does not look like a channel
- - - Auto-Merged Double Post - - -
And looked again at rubber looks like more built up in second pic i would keep eye on it . If it were me i could not have that there sorry but fins need to be clear
The bubbles should go with the water heating cooling over week or 2 . If not and it bothers you i can only think of picking it up and tease them out .
- - - Auto-Merged Double Post - - -
Just seen this didnt know we are on next page lolWeird that there's an airbubble there to me... that doesn't look like a channel where water goes??
No it doesnt does not look like a channel
- - - Auto-Merged Double Post - - -
And looked again at rubber looks like more built up in second pic i would keep eye on it . If it were me i could not have that there sorry but fins need to be clear
OP
- Joined
- Oct 22, 2021
- Thread Starter
- #63
Current loop status: since my Dark Hero motherboard is fried I've reverted back to my Asus x570 Prime Pro. My CPU waterblock is specifically designed for the Dark Hero and doesn't fit on the Prime Pro, so I'm using my old NZXT z73 AIO to cool my CPU (still the 5950x) until my replacement Dark Hero arrives on Friday. I'll try to RMA the broken Dark Hero but I assume that will be a time consuming process with a low chance of success since I broke it.
I've modified my loop to only cool my GPU for now. I had to remove one of the EKWB 360mm radiators (mounted at the top of the case) to make room for the NZXT AIO radiator. I also disconnected the second EKWB 360mm radiator from the loop for now, since hooking it back up would've just added more work for me to do on Friday when I go to remove the NZXT again.
So right now I have a filled loop cooling my 3080 Ti w/ 2x front-mounted 480mm radiators.
The loop is filled with distilled water right now (w/o any additives). Since I'll be running the loop like this for a week would it be better to drain the water and replace it with some of the EK Cryofuel that I've stockpiled? On one hand it kind of sucks a little knowing that I'll definitely be draining it again at the end of the week (though I do have more than enough Cryofuel to fill it a second time), but on the other hand I don't want to give anything a chance to start growing in there..
Yeah, if you broke it, I wouldn't even RMA it. That's taking advantage of the system. But if your honest with how it broke and let them decide.... it is what it is. ")
I'd still investigate why there is an air bubble in a place where water/air shouldn't be. That's not good.
I'd still investigate why there is an air bubble in a place where water/air shouldn't be. That's not good.
- Joined
- Apr 12, 2003
- Location
- Middlesbrough
And dont worry about water it will be ok i use a silver strip to tide me over works fine 4 weeks with just tap water anything 99% silver will do . Think i still have water in now as im always in out of system . You can just see silver coil
Attachments
OP
- Joined
- Oct 22, 2021
- Thread Starter
- #66
Yeah, if you broke it, I wouldn't even RMA it. That's taking advantage of the system.
I'm only like 98% confident that the broken slot is preventing it from posting. The damage really doesn't look like it's so severe that it would make the board completely useless. So part of the reason for this is to just get confirmation that the damage to the M2 slot really is the cause of the issue. I've already paid for a replacement, so I'm not in it just for a freebie.
I'd still investigate why there is an air bubble in a place where water/air shouldn't be. That's not good.
Hmm, ok. Maybe I'll disassemble that water block one more time to remove those small rubber pieces. When I do that I'll also reverse the direction that water flows through the block, which would make it easier to tilt that air bubble away. In the picture, water is traveling through the block from right to left, so I'd have to tilt things quite significantly to dislodge it. If water were flowing from left to right I don't think I'd need to tilt is as much.
As for the black particles on the fins... I looked closely at the pieces that I removed yesterday. They look like they might be fragments o-rings. I've noticed in some of my hard tubing fittings the inner o-rings are showing signs of wear - some worse than others - from all the times that I've disconnected and reconnected them. None of my fittings are leaking, though, so I don't think anything is damaged enough to be compromised, but that at least would explain how they're getting there.
- Joined
- Jun 21, 2002
That stuff looks like possibly stuff from a rad. They generally come with a fair amount of trash in them and with the amount and size of rads your using it would be difficult to clean. Did you do the "radiator dance" with them?
To my eye the bubble is just a bubble, probably not in a super important part of the block, but if you're concerned you could contact the manufacturer of the block to see if it is a problem.
https://www.overclockers.com/beginners-guide-water-cooling/ said:Radiator preparation is one oft-missed item. Boil sink water and let it cool for 5 min. Pour into the radiator, filling it up, and let it sit 10 minutes. Drain half of the water or so and shake it till your arms hurt, shaking 3-4 minutes, like a crazy person. Drain into a clear container. Do the “radiator dance” again and again till the water coming out is clear and there is no gunk once the water settles. Then do it two more times. Finally, fill the rad with distilled (or deionized) water and do the rad dance one last time. NOW and only now is your radiator 90% clean. No worries, the last 10% will come out in the next year or two when you redo your loop for maintenance.
To my eye the bubble is just a bubble, probably not in a super important part of the block, but if you're concerned you could contact the manufacturer of the block to see if it is a problem.
OP
- Joined
- Oct 22, 2021
- Thread Starter
- #68
Any suggestions on how to mark acrylic tubing when you're bending it? I've tried using dry-erase marker since it writes so easily on it, but it seems like my heatgun bakes the marker onto the tube. I also tried using kapton tape but that leaves residue after taking it off. How do other people mark their bends?
OP
- Joined
- Oct 22, 2021
- Thread Starter
- #69
Still making progress on this. I've replaced the motherboard and had the loop filled and running to test for leaks last night.
The threads inside the left inlet in this picture seem to be stripped. Fittings can still make a good seal but only if they're held still and in place. Any wiggling causes water to leak. I'm a little disappointed with the quality of the plastic here. Given how critical (and pricey) this block is I would've expected the threads to be metal or something more reliable.
I'm worried this will only get worse with each time I attach something there, so I'm going to reach out to EK to see if I can get a replacement for it (just the black block on top, the rest of the water block works fine). In the meantime, are there any tricks I can use to ensure a good seal? I'm going to try teflon tape but I'm not sure if it'll work.

OP
- Joined
- Oct 22, 2021
- Thread Starter
- #71
Some updates since my last post...
I decided that, since I was already water cooling so many components, I might as well throw in an EK Monarch X4, too. So I bought one, along with 4 RAM modules for it.
This turned out to be a Regrettable Decision. In the process of removing the factory-installed heatsinks from my four RAM sticks I apparently broke three of them. Fortunately I had two spares lying around. Thinking I had learned from my mistakes I tried again and broke one of the spares. I'm not sure what I did wrong - I took my time and used a heat gun to loosen the thermal pads, and I've closely visually inspected each stick and can't see any apparent damage to them, but they definitely don't work anymore. So now I've got two (different) working sticks of RAM, and two new replacement sticks on the way.
I'm still waiting on a replacement terminal block from EK for the GPU. In the meantime, though, I was able to continue using the GPU water blocks by bypassing the stripped port. I cleaned the layout up a bit from my last iteration and settled on this, which is closer to my original plan:

Sadly, after filling and bleeding that layout, I came to learn that my SSD (the brand new replacement for the one that I broke a week or two ago) didn't work. The motherboard won't detect it in either of the NVMe slots. As with the RAM, I can't see any signs of physical damage to it. I ran to a local electronics retailer and picked up a new one and that one works, so its got to be a problem with a drive. For anyone keeping track, I'm now on SSD #3.
I needed to drain the loop and disassemble it in order to remove the SSD that wasn't working. After putting it back together I started to fill it, and water began leaking from the GPU blocks. Both the GPU and the motherboard were disconnected from the PSU at the time, which was good since the water ran down between the blocks right where the GPU's memory chips and core are. I quickly aborted the fill and took the blocks off of the GPU to start drying it out. A visual inspection of the GPU block revealed this crack, which must've formed while I was putting the loop back together after removing the SSD:
As you can see, the crack connects the inlet and outlet to one of the screw holes, allowing water to escape the block. So now I'm waiting on a replacement for that to arrive, too. I won't be able to test the card itself until the replacement arrives since I don't have the factory cooler anymore. I paid for overnight shipping to try to expedite its arrival, but the site I ordered from (TitanRig) upgraded the order from overnight service to (free!!) 2-day shipping (they still charged me $100+ for the overnight service, though). So that won't get here until next week.
I decided that, since I was already water cooling so many components, I might as well throw in an EK Monarch X4, too. So I bought one, along with 4 RAM modules for it.
This turned out to be a Regrettable Decision. In the process of removing the factory-installed heatsinks from my four RAM sticks I apparently broke three of them. Fortunately I had two spares lying around. Thinking I had learned from my mistakes I tried again and broke one of the spares. I'm not sure what I did wrong - I took my time and used a heat gun to loosen the thermal pads, and I've closely visually inspected each stick and can't see any apparent damage to them, but they definitely don't work anymore. So now I've got two (different) working sticks of RAM, and two new replacement sticks on the way.
I'm still waiting on a replacement terminal block from EK for the GPU. In the meantime, though, I was able to continue using the GPU water blocks by bypassing the stripped port. I cleaned the layout up a bit from my last iteration and settled on this, which is closer to my original plan:

Sadly, after filling and bleeding that layout, I came to learn that my SSD (the brand new replacement for the one that I broke a week or two ago) didn't work. The motherboard won't detect it in either of the NVMe slots. As with the RAM, I can't see any signs of physical damage to it. I ran to a local electronics retailer and picked up a new one and that one works, so its got to be a problem with a drive. For anyone keeping track, I'm now on SSD #3.
I needed to drain the loop and disassemble it in order to remove the SSD that wasn't working. After putting it back together I started to fill it, and water began leaking from the GPU blocks. Both the GPU and the motherboard were disconnected from the PSU at the time, which was good since the water ran down between the blocks right where the GPU's memory chips and core are. I quickly aborted the fill and took the blocks off of the GPU to start drying it out. A visual inspection of the GPU block revealed this crack, which must've formed while I was putting the loop back together after removing the SSD:

As you can see, the crack connects the inlet and outlet to one of the screw holes, allowing water to escape the block. So now I'm waiting on a replacement for that to arrive, too. I won't be able to test the card itself until the replacement arrives since I don't have the factory cooler anymore. I paid for overnight shipping to try to expedite its arrival, but the site I ordered from (TitanRig) upgraded the order from overnight service to (free!!) 2-day shipping (they still charged me $100+ for the overnight service, though). So that won't get here until next week.
Heh.. RAM watercooling... up there with m.2 watercooling... useless. I'd say ask first, but you'd do it anyway.... 
These troubles will keep me off hard tubing... that and the fact that I change components way too often. These something to be said about KISS (Keep It Simple Stupid).
These troubles will keep me off hard tubing... that and the fact that I change components way too often. These something to be said about KISS (Keep It Simple Stupid).
OP
- Joined
- Oct 22, 2021
- Thread Starter
- #73
Heh.. RAM watercooling... up there with m.2 watercooling... useless. I'd say ask first, but you'd do it anyway....
These troubles will keep me off hard tubing... that and the fact that I change components way too often. These something to be said about KISS (Keep It Simple Stupid).
Logic doesn't work on me.
- Joined
- Apr 12, 2003
- Location
- Middlesbrough
Logic doesn't work on me.
Im thinking you enjoy the pain of it all
Keep at it waiting for next instalment
OP
- Joined
- Oct 22, 2021
- Thread Starter
- #75
Im thinking you enjoy the pain of it all
Actually, I've lost feeling in the tips of my fingers. I think they're getting calloused from messing with fittings for hours on end. So there's no more pain.
(Is that normal? Should I tell a doctor?)Quick question about flow rate.. I'm now running this super-simplified loop with an old graphics card until my replacement water block arrives. All four radiators are hooked up, plus the reservoir, CPU/mobo block, and the High Flow Next sensor. The sensor says I'm getting a flow rate of about 265 l/h. Is that good? Does that sound right given my setup? As a reminder, I'm running EK's dual D5 pump.

- - - Auto-Merged Double Post - - -
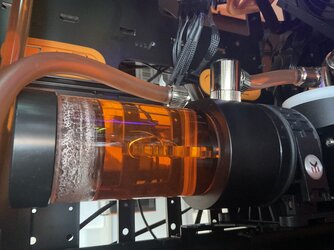
Another question: I've had the loop running like this almost constantly for about 18 hours. How do I get rid of the bubbles in the reservoir? The bubbles in the tubes have cleared out and its running quiet, but I was hoping the reservoir would be clearer now, too.
OP
- Joined
- Oct 22, 2021
- Thread Starter
- #77
Ideal flow rate is about 1-1.5GPM.
HmmÂ… so what youÂ’re saying is I need another pumpÂ…
If you do the math (265L /H = 4.4L /M = 1.xG /Minute, you're right within range. More will not help, really...(the juice isn't worth the squeeze).HmmÂ… so what youÂ’re saying is I need another pumpÂ…
- Joined
- Sep 20, 2001
- Location
- Bakersfield, CA
If you're running dual D5's, I would not go for more pumps necessarily. And I've found it's pretty hard to get more than 1GPM in any loop.
Can you list all of the blocks that are in this loop now, and specify if they are in series or parallel?
Can you list all of the blocks that are in this loop now, and specify if they are in series or parallel?
OP
- Joined
- Oct 22, 2021
- Thread Starter
- #80
If you do the math (265L /H = 4.4L /M = 1.xG /Minute, you're right within range. More will not help, really...(the juice isn't worth the squeeze).
I know, I was joking.
Besides, as fun as it would be to try, I'm not sure where I'd put another pump...If you're running dual D5's, I would not go for more pumps necessarily. And I've found it's pretty hard to get more than 1GPM in any loop.
Can you list all of the blocks that are in this loop now, and specify if they are in series or parallel?
Right now only one block: EK's ROG Crosshair VIII Hero monoblock. There are also 2x 360mm radiators and 2x 480mm radiators in the loop. Earlier today everything was in a series (pump -> 360 rads -> 480 rads -> monoblock -> reservoir -> pump..). This evening I took things apart again and split the radiators into two pairs (1x 360 and 1x 480 each) that get hit in parallel. That seems to have given me a mild boost in flow rate as I'm now seeing a rate of 360 L/h (or 1.59 g/M).
Similar threads
- Replies
- 9
- Views
- 698
- Replies
- 4
- Views
- 1K
- Replies
- 6
- Views
- 3K
- Replies
- 10
- Views
- 1K