• Welcome to Overclockers Forums! Join us to reply in threads, receive reduced ads, and to customize your site experience!

How to bleed an Apogee Drive II

Overclockers is supported by our readers. When you click a link to make a purchase, we may earn a commission. Learn More.

tom100

New Member
Joined
Jan 22, 2006
Hi all

I'm building an NCase M1 with 2 x 240mm radiators and will be (by necessity, I think) using the Apogee Drive II (AD2).

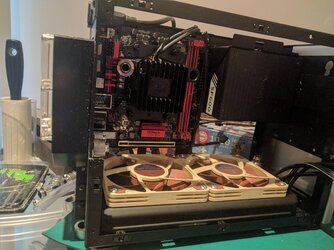
I've pretty much got my loop planned out and I'm now thinking about how to bleed the system. This is especially tricky given that the AD2 will be fixed to the board but must (when performing the bleed) be below the res. You can see a picture here: (the res is on the back of the case, a FrozenQ NCase M1 res).

The relevant bits of the instruction manual for AD2 say:

the lines leading to, and exiting from the pump must be full of coolant*

*I'm aware that watercooling pumps must have fluid coming in but wasn't aware that they had to have fluid coming out? How is this achieved?

and therefore recommends not to fix the AD2 to the motherboard (so you can move it to the lowest point).

I've been considering my options for bleeding the system and think there are four:

1. Leave the AD2 loose and move it to the lowest point

This might work in theory but the problem, as I see it, is that in order to move it you would need to put in quite a bit of extra tubing which might be problematic (for example, once fixed after the bleed it may need to kink to fit).

2. Rotate the case so that the res is at the top

Having rotated the case, it is possible to get the res to the top but it isn't be a huge amount and I'm not entirely sure that it would work given the location of the ports on the res.

3. Directly filling the AD2 input port

You could disconnect the res fitting and put a funnel in the tube which leads to the AD2 input port and bleed the system this way. I think this would work but there is a real danger that the res would overflow into the unconnected drain port.

4. Put a drain valve in between the res and the AD2

You could use something like this - https://koolance.com/drain-valve-for-id-10mm-3-8in and place it between the res and the AD2, put a fitting + some tubing on the g1/4 end and use a funnel to feed the coolant in. Again you may need to be careful to check when the system is full or it may come back out of the drain valve (unless closed in time)? Also, it may be a tight fit getting this drain valve in between the res and the AD2.

I'm sorry that this is so long but I'd be really grateful for any thoughts on the above options (or any options which I may have missed).

Many thanks

Tom
 

Attachments

  • 5pdTegD.jpg
    5pdTegD.jpg
    804 KB · Views: 1,085
You are making this harder than it needs to be. First, disconnect the SATA drive power and data cables from the system drive so it cannot boot. Have the PSU switched off.

If you have the pieces in place in the case with the reservoir higher than the pump you should fill the reservoir with coolant. The most dangerous part is the filling of the reservoir because you don't want to spill coolant onto the motherboard. I use a long fill tube and a funnel to do this part. I position the funnel outside of the case and hold it with a rag so if coolant is spilled during pouring it won't wind up on the motherboard.

The coolant will flow downhill and fill the pump. Flip the PSU switch to on position and hit the case power button to drive the pump. Watch the coolant level in the reservoir. When it starts to run dry, flip the PSU power switch off. Add more coolant. Repeat this process until the reservoir maintains it's level. The whole idea is not to let the pump run dry at any point so as not to damage the bearings. Also watch for leaks. If there are any leaks take care of them before anything else.

At this point you can leave the power on and let the pump run. Shake the case back and forth and forward and backwards to dislodge any air pockets in the radiators. Repeat this a couple of more times. For a while, you will notice small air bubbles are showing up in the reservoir like in a carbonated beverage right after you pour it in a glass. After a couple of hours of running they should be gone. Recheck for leaks.

When you are satisfied that there are no leaks, power the system down and reconnect the system drive.
 
Last edited:
You are making this harder than it needs to be. First, disconnect the SATA drive power and data cables from the system drive so it cannot boot. Have the PSU switched off.

If you have the pieces in place in the case with the reservoir higher than the pump you should fill the reservoir with coolant. The most dangerous part is the filling of the reservoir because you don't want to spill coolant onto the motherboard. I use a long fill tube and a funnel to do this part. I position the funnel outside of the case and hold it with a rag so if coolant is spilled during pouring it won't wind up on the motherboard.

It will flow downhill and fill the pump. Flip the PSU switch to on position and hit the case power button to drive the pump. Watch the coolant level in the reservoir. When it starts to run dry, flip the PSU power switch off. Add more coolant. Repeat this process until the reservoir maintains it's level. The whole idea is not to let the pump run dry at any point so as not to damage the bearings. Also watch for leaks. If there are any leaks take care of them before anything else.

At this point you can leave the power on and let the pump run. Shake the case back and forth and forward and backwards to dislodge any air pockets in the radiators. Repeat this a couple of more times. For a while, you will notice small air bubbles are showing up in the reservoir like in a carbonated beverage right after you pour it in a glass. After a couple of hours of running they should be gone.

When you are satisfied that there are no leaks, power the system down and reconnect the system drive.

Thanks for the response.

The problem is precisely that the fluid will not run downhill because the res is below the pump (the AD2). Hence one of the options above is needed to ensure that the pump has fluid at all times.
 
The res has to be higher than the pump so gravity can take over. Having the res below the pump will not work. The res has to feed the pump. They way you have it setup at the moment you're fighting against gravity. Unless you remove the res from where it is now, and hold it up higher then the pump, then start feeding the pump. Once the fluid is running and the res is full, then mount it back to where you got it.

Understand that having the pump higher than the res, the pump will have to work harder. In time you will kill the pump.
 
As nebulous said, you cannot should not have the res below the pump. What is the make and model of the case?
 
Last edited:
Can you orient the case temporarily so that the reservoir is above the pump during the filling process? Tilt it, it, turn it, lay it on it's side? Can you temporarily detach the reservoir from the case and position it higher or turn it around? If you lay the case down on it's side the pump will be lower than the reservoir. Then temporarily pivot the reservoir so that the fill port is pointing up.

I see it, it looks to be a bayres on the left of the case on the back above the pci slots.
 
I'm having trouble figuring out what is the bottom of the case. Is this a tower case or does it lay flat? Looks like the reservoir is bolted on the outside of the back panel just above the I/O hardware. Okay, I see from the first post it is an NCase M1.

You might do better to dispense with the reservoir and use a fill "T". Place the T above the pump. The radiator at the top of the case would in effect serve the function of the reservoir once the system is up and running.
 
Last edited:
The res has to be higher than the pump so gravity can take over. Having the res below the pump will not work. The res has to feed the pump. They way you have it setup at the moment you're fighting against gravity. Unless you remove the res from where it is now, and hold it up higher then the pump, then start feeding the pump. Once the fluid is running and the res is full, then mount it back to where you got it.

Understand that having the pump higher than the res, the pump will have to work harder. In time you will kill the pump.

With respect that does not seem to be the case. The manufacturer's instruction for the AD2 says as follows:

Once your Apogee Drive II has primed properly and the loop is full, then it is ok to install it to the motherboard, even if it is position higher than the coolant supply

This makes sense when you think about how AIOs work - the pump can be in any location.

- - - Updated - - -

As nebulous said, you cannot should not have the res below the pump. What is the make and model of the case?

It's an NCase M1.
 
See my edits in post #7. Do either of your rads have fill ports?


Another option is to remove the whole loop from the case, fill it and then reinstall it. You would have to figure out a way to power the pump outside the case, however.
 
I'm having trouble figuring out what is the bottom of the case. Is this a tower case or does it lay flat? Looks like the reservoir is bolted on the outside of the back panel just above the I/O hardware. Okay, I see from the first post it is an NCase M1.

You might do better to dispense with the reservoir and use a fill "T". Place the T above the pump. The radiator at the top of the case would in effect serve the function of the reservoir once the system is up and running.

Yeh, its a bit confusing as the case has had the sides taken off. The bottom of the case is where the fans are located. The 2nd rad will be mounted on a side bracket). Correct - the res is mounted on the back (io side) of the case. I hadn't heard of a fill T - please could you show me an example.

- - - Updated - - -

See my edits in post #7. Do either of your rads have fill ports?


Another option is to remove the whole loop from the case, fill it and then reinstall it. You would have to figure out a way to power the pump outside the case, however.

I'm not quite sure what a fill port is?
 
Here's a whole page with illustrations with T-lines.

The fillport is where the cap is in the res. That's what the fillport is. Where you fill it with distilled water.

Tbh those illustrations don't mean much to me.

Is there anything wrong with option 4 above - that is, simply putting in a t junction before the pump and adding a ball valve to that t junction?
 
It's the images to give you an idea what a T-line is and how it's used. You can add the T-ine however you wish so long as it's before the intake on the pump so it'll feed the pump. The T-line will replace the resevoir in tight/small spaces and act as a small resevoir.

Adding a T-line with the existing resevoir is defeating the purpose of the T-line.
 
A radiator fill port is just a removable threaded plug on the top side of the radiator tank that you can remove and use to pour the coolant in.
 
Back