- Joined
- Feb 18, 2002
Click on the spoiler if you have to ask why, otherwise skip to how, below.
You will need:
0. A hard drive formatted under Windows Vista/7/8/10 - do not format hard drives under Windows XP because correct partition offset would not be achieved if hard drive is formatted under Windows XP.
1. A USB FLASH Drive.
2. RMPrepUSB.com freeware
Download the latest RMPartUSB and see what the password is to open the download is here:
http://www.rmprepusb.com/documents/rmprepusb-beta-versions
3.
You do not need a modified BIOS.
You do not need to set BIOS passwords of any kind.
You do not need to disable secure boot in BIOS.
You do not need to disable Fast Boot
You do not need to switch Secure Boot > OS Type > Windows UEFI Mode to Other OS [unless you have problems multi-booting]
You *DO NEED* to go into BIOS and setup your BOOT order and have NON-UEFI Windows XP installation media first, and drive you are installing Windows XP to second. Every other drive disabled, if they were not already disconnected from the computer, which they should be.
You will need
-ASUS AHCI driver for XP
and
-ASUS Tools and files for W7/XP USB installation
downloaded from
http://forum.hwbot.org/showthread.php?t=142062
4. Windows XP ISO.
Integrate Windows XP installation with ALL patches Microsoft ever released for Windows XP, so that you install Windows XP with Service Pack 3 plus all the patches that came after SP3.
Do so like this:
Here we go:
01. Insert blank USB Flash Drive and Start RMPrepUSB.
02. You may use any Volume Label but Select NTFS > make no other changes, do NOT Choose Source, just [lower left] 6 Prepare Drive > OK > OK
03. Wait for it to finish then click on Install grub4dos [center right button]
04. YES > OK > [Enter] > **STOP!!** Press on Cancel [do NOT copy grldr file when asked]
05. Exit [lower right]
06. Extract ASUS Tools and files for W7/XP USB file Install OS from USB.rar
Copy contents of folder Install OS from USB\XP\USB root to USB Flash Drive's root directory.
07. Extract ASUS AHCI driver for XP file iaStor_skl.rar
Copy contents of folder iaStor_skl to USB Flash Drive's root directory.
08. Copy the actual .iso file, Windows XP iso file to USB Flash Drive's root directory and make sure file name is XP.iso and not something else.
09. Disconnect E-V-E-R-Y-T-H-I-N-G from the motherboard so that only one hard drive is connected to it and make sure it is connected to one of the main Intel SATA ports, not additional ones you may have on the side.
10. F8 at startup should let you boot from the newly created USB Flash Drive.
You may see two versions of the USB Flash Drive.
DO NOT SELECT the UEFI version. If the non-UEFI version is not there, you need to go to BIOS and set the non-UEFI as a boot priority device.
BOTH non-UEFI and UEFI must be selected in the BIOS list, but boot from the non-UEFI version.
All non SATA/IDE drives should be disconnected, they should not show up in the boot device list at all, or the Windows XP installation may try to write to them and fail, which will crash the installation process, so only have a single IDE/SATA Windows XP drive connected
You may see the cursor flash in the upper left corner.
*WAIT*WAIT*WAIT*
11. SELECT: Widows XP Setup Step 1 (TXT-mode)
12. Wait for ISO to load and after you see Remember to press F6... message, *GET READY* to press Enter after which you will see a blue screen and at the bottom: Press F6 if you need to install a third party SCSI or RAID driver...
START PRESSING F6 then F7 then F6 then F7 (one after the other)...
13. Blue Windows Setup screen appears > Press S >
Select: FiraDisk Driver (32-Bit) and press Enter
Press S
Select: Intel (R) SKL SATA AHCI Controller (X99+Skylake) and press Enter
Press S
Select: ASMEDIA USB3 Controller Driver and press Enter
14. Press Enter to Continue
15. Setup is Starting Windows > Enter > F8 (to agree) > Select partition where Windows XP should be installed. No partition should ever be formatted under Windows XP, only under Windows Vista/7/8/10 so > Leave the current file system intact (no changes)
PAY ATTENTION TO DRIVE LETTER OF PARTITION YOU ARE INSTALLING TO, that will be the Windows XP system drive letter after installation completes.
16. Wait for the process to finish and ALLOW the timer to run out telling you the computer will be restarted, do not press Enter to Restart immediately. Start pressing F8 to be able to select to boot from the USB Flash Drive again. If the computer freezes, restart it manually and boot from USB Flash Drive again.
17. This time SELECT: Widows XP Setup Step 2 (GUI-mode)
18. Windows XP may hang on first boot, just like in the "good old days".
If (when) that happens, Reboot!
Windows XP would, of course, not be the only OS on your system, why would you only have one? 
• I reboot into Windows XP to reimage Windows 10 and my Windows 8 and/or other:

Windows XP does not use BCD so it is an excellent OS to reimage other Operating Systems from.
• I reboot into Windows XP every time I need to group files or folders on the screen.
Windows XP allows you to group files or folders on different parts of the screen whereas in Windows 7/8/10, you can *only* do this on their Desktops and nowhere else. Windows 7/8/10 have no option to turn Auto-Arrange off. Registry edits which force Auto-arrange to be turned off cannot be used, because they break other Windows 7/8/10 features.
You can group pictures on different parts of your screen to sort them, you can group music files to sort them for your "mix tape" - I group my music files then pick one from the group and move it to another part of the screen, and so on. That's how I make my "mix tapes".
I also sort through files, prioritizing them for work by sorting them on different parts of the screen.
Whoever came up with the idea to PREVENT us from grouping files on Windows 7/8/10 - did us a great disservice. An option, just an option is all they have to give us, but nooo, so now we have to figure out how to install Windows XP on 2016 motherboards.
• Sometimes I run into a problem using software. Sometimes Photoshop, sometimes music editing, sometimes video editing. I even know of a bug in WordPerfect that Corel refuses to fix for three consecutive newer versions, that was not present in an old version of their program, so in cases like that, I reboot into Windows XP where sometimes earlier versions of the same software works, allows me to do what I want to do. I then get back into Windows 8/10 in a minute or two.
• Windows 7/8/10 Search Engine is more difficult to use and is not as reliable as Windows XP Search Engine. I have screenshots to prove how Windows 7/8/10 search engines can and do miss search hits that are there.


http://www.overclockers.com/forums/showthread.php/616264
I only use Windows 7/8/10 Search when they actually finds files. If they do not, I ether use a third party program like http://mythicsoft.com/agentransack/ or reboot into Windows XP to make sure there are no hits.
• Windows 8/10 Explorer status bar does not show file details which were available in previous versions of Windows. The only features left in Status Bar in Windows are the total number of items, items selected and size of selected items (but only up to 99 files). In addition, Status Bar control in Windows 8/10 is not standard but uses private undocumented control (DirectUI). This means not even external software can provide useful file information.
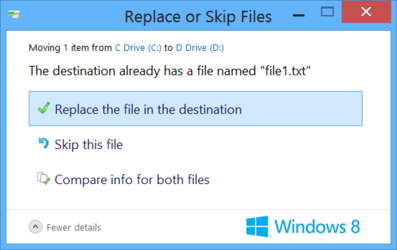
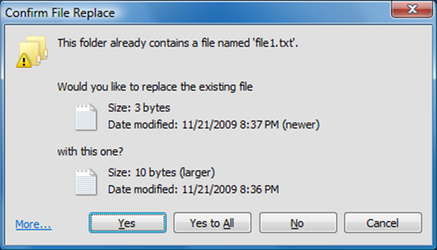
This and copy-paste window, which is SO MUCH WORSE in modern Windows, because it does not give you the overview of files being replaced without AN EXTRA CLICK, which therefore takes half a second off my efficiency so it is more efficient to use Windows XP if you are into super-fast computing where half a second makes a difference for the speed with which you work.

vs.

• I reboot into Windows XP to reimage Windows 10 and my Windows 8 and/or other:
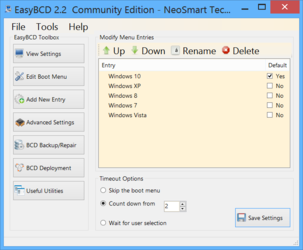
Windows XP does not use BCD so it is an excellent OS to reimage other Operating Systems from.
• I reboot into Windows XP every time I need to group files or folders on the screen.
Windows XP allows you to group files or folders on different parts of the screen whereas in Windows 7/8/10, you can *only* do this on their Desktops and nowhere else. Windows 7/8/10 have no option to turn Auto-Arrange off. Registry edits which force Auto-arrange to be turned off cannot be used, because they break other Windows 7/8/10 features.
You can group pictures on different parts of your screen to sort them, you can group music files to sort them for your "mix tape" - I group my music files then pick one from the group and move it to another part of the screen, and so on. That's how I make my "mix tapes".
I also sort through files, prioritizing them for work by sorting them on different parts of the screen.
Whoever came up with the idea to PREVENT us from grouping files on Windows 7/8/10 - did us a great disservice. An option, just an option is all they have to give us, but nooo, so now we have to figure out how to install Windows XP on 2016 motherboards.
• Sometimes I run into a problem using software. Sometimes Photoshop, sometimes music editing, sometimes video editing. I even know of a bug in WordPerfect that Corel refuses to fix for three consecutive newer versions, that was not present in an old version of their program, so in cases like that, I reboot into Windows XP where sometimes earlier versions of the same software works, allows me to do what I want to do. I then get back into Windows 8/10 in a minute or two.
• Windows 7/8/10 Search Engine is more difficult to use and is not as reliable as Windows XP Search Engine. I have screenshots to prove how Windows 7/8/10 search engines can and do miss search hits that are there.
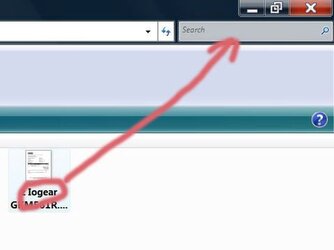

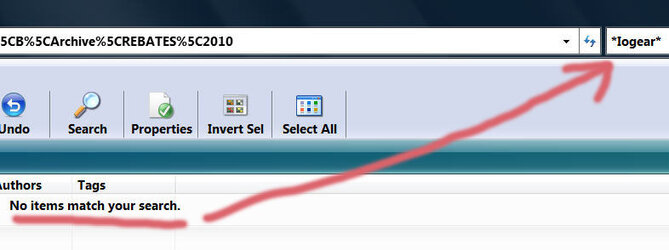
http://www.overclockers.com/forums/showthread.php/616264
I only use Windows 7/8/10 Search when they actually finds files. If they do not, I ether use a third party program like http://mythicsoft.com/agentransack/ or reboot into Windows XP to make sure there are no hits.
• Windows 8/10 Explorer status bar does not show file details which were available in previous versions of Windows. The only features left in Status Bar in Windows are the total number of items, items selected and size of selected items (but only up to 99 files). In addition, Status Bar control in Windows 8/10 is not standard but uses private undocumented control (DirectUI). This means not even external software can provide useful file information.
This and copy-paste window, which is SO MUCH WORSE in modern Windows, because it does not give you the overview of files being replaced without AN EXTRA CLICK, which therefore takes half a second off my efficiency so it is more efficient to use Windows XP if you are into super-fast computing where half a second makes a difference for the speed with which you work.
vs.
You will need:
0. A hard drive formatted under Windows Vista/7/8/10 - do not format hard drives under Windows XP because correct partition offset would not be achieved if hard drive is formatted under Windows XP.
1. A USB FLASH Drive.
2. RMPrepUSB.com freeware
Download the latest RMPartUSB and see what the password is to open the download is here:
http://www.rmprepusb.com/documents/rmprepusb-beta-versions
3.
You do not need a modified BIOS.
You do not need to set BIOS passwords of any kind.
You do not need to disable secure boot in BIOS.
You do not need to disable Fast Boot
You do not need to switch Secure Boot > OS Type > Windows UEFI Mode to Other OS [unless you have problems multi-booting]
You *DO NEED* to go into BIOS and setup your BOOT order and have NON-UEFI Windows XP installation media first, and drive you are installing Windows XP to second. Every other drive disabled, if they were not already disconnected from the computer, which they should be.
You will need
-ASUS AHCI driver for XP
and
-ASUS Tools and files for W7/XP USB installation
downloaded from
http://forum.hwbot.org/showthread.php?t=142062
4. Windows XP ISO.
Integrate Windows XP installation with ALL patches Microsoft ever released for Windows XP, so that you install Windows XP with Service Pack 3 plus all the patches that came after SP3.
Do so like this:
First of all real Windows XP is a 32-Bit OS.
Windows XP 64-Bit is not really Windows XP. In reality, it is
Most people do not know that and think it's just a 64-Bit version of Windows XP. It is *not*.
Only 32-bit Windows XP is the real deal.
Slipstreaming (integrating) Service Pack 4 with the original Windows XP installation files will create an installation which will include all Windows XP updates up to April 8, 2014 when extended support for Windows XP ended.
Certain versions of Windows XP will be supported through April of 2019, with updates applicable to all versions of Windows XP. The included Service Pack 4 enables updates to continue through April of 2019.
0. Service Pack 4 Slipstreaming can only be done if Service Pack 1 or later were slipstreamed already. So we first need to integrate SP1 or SP2 or SP3 with original installation files.
How to Integrate Windows XP and Service Pack 2
1. Copy contents of original Microsoft Windows XP installation files to folder C:\WINXP
[That means actual contents extracted from original ISO or original installation CD.]
2. Copy Service Pack 2 exe file to C:\ drive and rename it to xpsp2.exe
Service Pack 2 exe file can be downloaded from here:
EDIT: [LINK DEAD] looking for new download link from Microsoft, anyone have it?
3. Start Menu > Run... > cmd.exe > Press ENTER >
Now type c: and then press ENTER
Keep typing
cd..
and pressing ENTER until you get to the root C:\ directory
Then type xpsp2.exe -x:c:\SP2 and then press ENTER
4. After extraction completes, Press OK then type this in the cmd window and press ENTER:
cd SP2\i386\update
5. Finally, type this then press ENTER:
update.exe -s:c:\winxp
6. Wait until you see this message: "Integrated install has completed successfully." > OK
Contents of WINXP folder now contain non-bootable integrated (splipstreamed) Windows XP+SP2 operating system installation files.
Now we can integrate the unofficial Service Pack 4 with Windows XP+SP2 installation files.
Interestingly, unlike previous service packs, Slipstreaming of Service pack 4 *must* be done under Windows XP. If it is done under any other operating system, there may be problems with entering Windows XP product keys at time of install.
Source:
http://www.ryanvm.net/forum/viewtopic.php?t=10321
7. Copy SP4 exe file to C:\ drive and rename it to xpsp4.exe
8. *** !!! Disable anti virus software or it may interrupt the integration process with false positive virus detections. !!! ***
9. Start Menu > Run... > cmd.exe > Press ENTER >
Now type c: and then press ENTER
Keep typing
cd..
and pressing ENTER until you get to the root C:\ directory
Then type xpsp4.exe/integrate:c:\winxp and then press ENTER
Contents of WinXP folder now contain non-bootable integrated (splipstreamed) Windows XP+SP4 operating system installation files.
Here we go:
01. Insert blank USB Flash Drive and Start RMPrepUSB.
02. You may use any Volume Label but Select NTFS > make no other changes, do NOT Choose Source, just [lower left] 6 Prepare Drive > OK > OK
03. Wait for it to finish then click on Install grub4dos [center right button]
04. YES > OK > [Enter] > **STOP!!** Press on Cancel [do NOT copy grldr file when asked]
05. Exit [lower right]
06. Extract ASUS Tools and files for W7/XP USB file Install OS from USB.rar
Copy contents of folder Install OS from USB\XP\USB root to USB Flash Drive's root directory.
07. Extract ASUS AHCI driver for XP file iaStor_skl.rar
Copy contents of folder iaStor_skl to USB Flash Drive's root directory.
08. Copy the actual .iso file, Windows XP iso file to USB Flash Drive's root directory and make sure file name is XP.iso and not something else.
09. Disconnect E-V-E-R-Y-T-H-I-N-G from the motherboard so that only one hard drive is connected to it and make sure it is connected to one of the main Intel SATA ports, not additional ones you may have on the side.
10. F8 at startup should let you boot from the newly created USB Flash Drive.
You may see two versions of the USB Flash Drive.
DO NOT SELECT the UEFI version. If the non-UEFI version is not there, you need to go to BIOS and set the non-UEFI as a boot priority device.
BOTH non-UEFI and UEFI must be selected in the BIOS list, but boot from the non-UEFI version.
All non SATA/IDE drives should be disconnected, they should not show up in the boot device list at all, or the Windows XP installation may try to write to them and fail, which will crash the installation process, so only have a single IDE/SATA Windows XP drive connected
You may see the cursor flash in the upper left corner.
*WAIT*WAIT*WAIT*
11. SELECT: Widows XP Setup Step 1 (TXT-mode)
12. Wait for ISO to load and after you see Remember to press F6... message, *GET READY* to press Enter after which you will see a blue screen and at the bottom: Press F6 if you need to install a third party SCSI or RAID driver...
START PRESSING F6 then F7 then F6 then F7 (one after the other)...
13. Blue Windows Setup screen appears > Press S >
Select: FiraDisk Driver (32-Bit) and press Enter
Press S
Select: Intel (R) SKL SATA AHCI Controller (X99+Skylake) and press Enter
Press S
Select: ASMEDIA USB3 Controller Driver and press Enter
14. Press Enter to Continue
15. Setup is Starting Windows > Enter > F8 (to agree) > Select partition where Windows XP should be installed. No partition should ever be formatted under Windows XP, only under Windows Vista/7/8/10 so > Leave the current file system intact (no changes)
PAY ATTENTION TO DRIVE LETTER OF PARTITION YOU ARE INSTALLING TO, that will be the Windows XP system drive letter after installation completes.
16. Wait for the process to finish and ALLOW the timer to run out telling you the computer will be restarted, do not press Enter to Restart immediately. Start pressing F8 to be able to select to boot from the USB Flash Drive again. If the computer freezes, restart it manually and boot from USB Flash Drive again.
17. This time SELECT: Widows XP Setup Step 2 (GUI-mode)
18. Windows XP may hang on first boot, just like in the "good old days".
If (when) that happens, Reboot!
Last edited:
