• Welcome to Overclockers Forums! Join us to reply in threads, receive reduced ads, and to customize your site experience!

How to insulate mobo for ss phase unit?

Overclockers is supported by our readers. When you click a link to make a purchase, we may earn a commission. Learn More.

funsoul

Senior Member
Joined
May 3, 2004
Location
NJ, USA
Hiya Folks

OK...want to get going with the phase unit but want to be extra careful as this is my first time going cold. Think I've got it but before doing anything wanted to ask here.

Have read the stickies and guides that are out there and have received guidance from the seller of the phase unit. His preference is the artist eraser method (which I know some of you aren't enamored with).

Here are excerpts from the seller's 'instructions' along with my questions/comments:

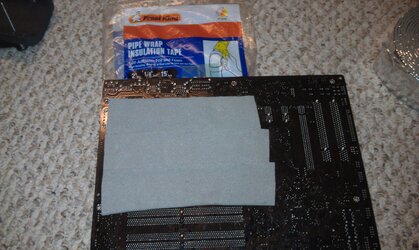
"I'll write up more tomorrow for you, but I always use artist eraser, it's maleable rubber and it's easy to put on and to take off. The eraser is to waterproof the board, which neither frost king or shop towels will do. Some people use nail polish or vaseline but neither are easy to remove like eraser. I think the 2 cubes I sent you should be enough depending on what board you're using. With LN2 you always make a couple of "gaskets" out of shop towel to absorb any moisture when the pot starts thawing, but it's not really necessary with an SS. You can if you want but if you seal up the board good enough you're probably okay without, unless you live in the tropics with very high humidity."

I'm thinking of painting the front/back of the motherboard (around the socket and extending to just beyond the mounting holes) in clear nail polish. Some prefer Liquid Electrical Tape...would that be better than the nail polish?

"No reason to paint the back of the mobo with anything. Only thing you need to do is put a thin layer of eraser over the socket backplate and extend it a little beyond the holes that are used to mount the SS head. Only time you need to concern yourself with anything more than that is if you're running liquid nitrogen."

Others say to forget the nail polish altogether and just use the artist eraser on the front/back of the board. Thoughts on that?

"Sealing the socket is the most critical, and the most hazardous of all, especially with the new socket types used on the 2011, 1155, and 1156 pin sockets. You need to completely seal off the socket to prevent ANY water from reaching the mobo or the CPU. With the older socket types it was rather easy because the socket hold down covered most of the socket and all you had to do was fill the holes with rubber, put small rolls of eraser between the side of the CPU, and then use a very very thin layer of eraser on the hold down itself. YOU DO NOT WANT ANY METAL SURFACE OF THE SOCKET TO REMAIN EXPOSED TO AIR!. With the new type sockets there are larger spaces left between the side of the CPU and the hold down, these must be filled with eraser but you have to be very careful to NOT be too aggressive in pushing in the eraser because it's possible on these sockets to force the eraser to the very edge of the socket pins, so use caution when doing this. If eraser gets into the pins it's very difficult to get out without destroying the socket, and consequently the mobo."

So...open the hold-down and fill from the edges of the cpu to the edges of the hold-down then close the hold-down and cover it with a thin layer of eraser?

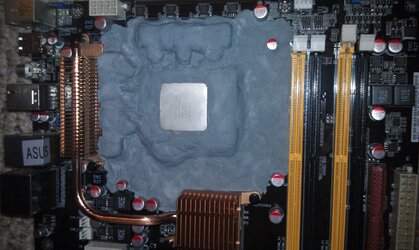
"The attached pic is the eraser field on my Rampage IV Extreme that was running SS. Note how everything is covered other than the chip itself. On the back, the backplate is also covered with eraser stretching a little beyond the mounting holes about an inch in either direction. The backplate is metal, and being connected to the socket will get cold, so you want to make sure no condensate forms down there either."

Ok...have the metal backplate and a rubber one...guessing put the metal one on top of the rubber one?

So...do all that then just mount the head to the mobo? Am I missing anything? Definitely could use some guidance with the mounting of the head onto the board. Attached is a pic of the head.

tia for your help/suggestions/etc!

IMAG0349.jpg
 
Last edited by a moderator:
Probably fine going minimal starting out - see how the frost forms, and don't be afraid to shutdown early if there's a lot of frost/moisture and its making you nervous. If that happens - tear down, unmount, and take everything off to inspect if moisture was getting anywhere it shouldn't. If your insulation approach was good, there should be no water anywhere it doesn't belong. :)

I would try with just artists eraser and frost king starting out.
 
Thanks I.M.O.G.

So...the frost king...cut a few squares then cut a round hole in each square for the phase head then stack the frost king layers, push the phase head into the hole and mount it?
 
For a single stage phase unit you do not need anything other than eraser, armaflex, and a couple of paper towels.
Cold does not travel very far on a SS so you do not have to worry about insulating large areas of the motherboard.

As far as things like conformal,LET or nail polish that really isn't necessary unless you are running ln2. And even then it is not needed if you have a perfect seal with eraser (its more of a personal preference).


So...the frost king...cut a few squares then cut a round hole in each square for the phase head then stack the frost king layers, push the phase head into the hole and mount it?

Yes. I can provide a few pictures of my phase insulation if you want and break it down/ show you some how-to pictures if you'd like
 
Last edited:
For a single stage phase unit you do not need anything other than eraser, armaflex, and a couple of paper towels.
Cold does not travel very far on a SS so not have to worry about insulating large areas of the motherboard.

As far as things like conformal,LET or nail polish that really isn't necessary unless you are running ln2. And even then it is not needed if you have a perfect seal with eraser (its more of a personal preference).

Hmmm...what exactly would I do with the armaflex?

Yes. I can provide a few pictures of my phase insulation if you want and break it down/ show you some how-to pictures if you'd like

Pictures would be awesome moocow!
 
This is just your basic normal insulation guide for using a Single Stage phase unit.

Generally speaking, if you are running a single stage phase unit the amount of cold that travels from side to side is very limited. Cold will travel through the processor to the backplate. But aside from that there is not much to worry about. My guide is kind of overkill, but it doesn't hurt to protect everything around the cpu socket area.
This insulation method can also be used for Dry ice and Ln2, but with those other cooling types I would use much more armaflex, eraser, and paper towels.


To start out you will need the following:
1. Lots of artists eraser. - I just buy them in bulk so I can have a couple of boards insulated at once, or it also allows me to use thick layers of eraser.
2. Armaflex - This stuff is like neoprene foam. It keeps cold from traveling and limits condensation buildup.
3.Shop paper towels- I buy these since they are thicker than normal paper towels. You can also use normal paper towels, shamwow, toiler paper or whatever else you've got sitting around. This is to just soak up any built up water that forms on the eraser.

-First off you want to insulate the socket area on the motherboard.

I generally just fill the whole socket area with eraser all the way to any heatsinks and shove eraser down into any cracks to keep mosfets and other components from getting wet. Most of them will be able to keep themselves warm so you do not have to worry about them getting too cold on the other side of the heatsink.

P1010113.jpg


Next off you want to insulate the backside of the motherboard. I usually just do it around the area where the backplate sits and the mounting holes are. You can extend farther than that for colder cooling methods, but for a single stage mount it is fine.
One of the nice things about eraser is that you can keep using it. You might notice that the eraser I use is a bit dirty, but that is due to it being almost three years old :D

P1010116.jpg


After insulating the back of the motherboard you want to insulate the backplate a bit. I am using the mounting pieces from my F1 CPU pot instead of the mounting from my SS unit but the principal is the same.
In this case I am using the included piece of rubber to keep the cold from spreading to the backplate as much. You can also use armaflex or frost king in place of the rubber.

P1010119.jpg
P1010118.jpg

After that you want to slide the backplate and insulation onto the back of the motherboard

P1010121.jpg

The rods should stick up through the board and be ready to go.
After that I go ahead and cut out a piece of paper towel to fit in the cpu socket area. This soaks up any moisture that shows up on top of the artists eraser. Generally speaking, you want to cut a hole bigger than the cpu socket to mount the phase head (or cpu pot).
P1010122.jpg
P1010126.jpg


Then comes the armaflex. Make sure to cut the hole big enough to fit the evap head as well as whatever insulation covers it. If you are using a cpu pot, a good idea is to cut the insulation so that it covers the bottom portions of the cpu pot in a layered fashion.
With phase, you don't really need to do that. But if you feel like over-insulating to be extra safe you sure can. Personally, I don't feel the need so I have skipped that.

P1010128.jpg


Depending on who makes your Phase unit the insulation might differ. My phase uses some sort of fiberglass insulation inside of a clamshell. If the head of your single stage is bare, you can go ahead and insulate it with tube-shaped armaflex. Just make sure to get a good fit so there is a seal.

P1010129.jpg

A good tip to ensure that your mount is good is to press down the evap head then move it around and check the thermal paste. If everything looks good go ahead and tighten it down using the included mounting hardware provided, or whatever mounting hardware you might be using.

P1010132.jpg

Once it is tightened down everything should be ready to go. Flip the switch and you will be able to bench for hours without worrying about having to maintain a cpu pot.
P1010133.jpg
 
I've generally found that with most single stage phase change units if you just use something like frostking/armaflex that has an adhesive backing. Be it mild or strong, and to just surround the socket area, and under the bottom of the socket aswell. That usually all it really takes. Most single stage setups are not strong enough to pull the board down to the point that you even get the board cold enough to cause condensation much further than a inch away from the socket if that. I'll try to post some pictures later of what I've been doing for phasechange lately. Its extremely simple, and only takes a few minutes and has yet to fail on me.
 
You guys are awesome! Thanks moocow and TsunamiJuan!

Going to pick up some extra insulation at Lowe's in the morning and get the artists eraser part of the job done tomorrow. Who knows? Maybe I'll get this all working on the e8500/p5q-pro and get to some benching over the weekend.

Gotta say...I am SOOO psyched!!! Have about 25 cpus (on 4 mobos) to test. Hoping for some nice boints!

Thank you again....really appreciate the newbie hand holding!
 
Super quick and effective phasechange insulation job. All it takes is some frost king, one side is adhesive backed the other has foil that gets removed, then stacked in layers.

There are 3 layers of frost king the the surface here. This stuff is a fairly mild adhesive, seals great, comes off cleanly and doesnt damage the board or mark it.

front_s.jpg

I was lazy this time and didn't cut rod holes and since it has been removed from the board so I could pull the chip you cant see where the folds where. Not a big deal though. There is enough insulation there that theres no condesnation build up at all between the head and the evaporator head when mounted. Theres a small collar around the evaporator head to thats not shown, but the amount of cooling is so directed that its really not a problem.

back_s.jpg

Single sheet slapped across the back, across the processor socket. I let it go further to cover the chokes and ram some thinking that i might throw a pot on it later in the day and that way i wouldnt have to redo the back atleast.

This is suitable for single stage phasechange cooling, a cascade might require a little more time spent. Depending on the wattage. This level of insulation is not suitable for LN2 or dice without protecting the memory and mosfets more, since a pot will condense even when insulated to a decent degree.

For small amd boards like this, when i run a pot, i insulate around the ram and further from the socket aswell, since the board itself will start to ice between load cycles, so will the ram. But again not a problem with phasechange at all.
 
Thanks moocow!

Ummmm...are those scorch marks all over the top of that cpu?

No problem man.

Dont think so. Its likely the lighting or something the camera is picking up because it looks normal colored in person.
 
Last edited:
So...2 routes to follow....moocow's relatively easy method and TsunamiJuan's ridiculously easy method. That really works TsunamiJuan?? Even though it makes me nervous, am thinking of trying that route first.
 
I use frost king exclusively for LN2 benching* and it has never let me down. Admittedly my method is a bit cleaner than TJ's though. ;)


*I do use a little eraser around the socket to bring it up to the FK for Intel.
 
ok...here's what I've done....

bottom- 1 layer of storm king...should I add a 2nd layer?

top- how's this look? some tight spots but hoping it's ok? should i go out further and/or cover more caps?

Also...are gaskets around the phase head required? It's got thick insulation around it already.

tia!!
 

Attachments

  • IMAG0351.jpg
    IMAG0351.jpg
    1.5 MB · Views: 192
  • IMAG0354.jpg
    IMAG0354.jpg
    1.4 MB · Views: 194
Last edited:
I use frost king exclusively for LN2 benching* and it has never let me down. Admittedly my method is a bit cleaner than TJ's though. ;)


*I do use a little eraser around the socket to bring it up to the FK for Intel.

Yeah that was on of my dirtier cut jobs. But it works all the same. Didn't look quite so bad when it was mounted.
 
Mounted, connected ssd/mouse/kbd/monitor/psu...turned on the psu and mobo light came on but no boot. :( Ss is running fine...-43C at the head.

Found the psu in the back of the basement...could be a bad one that I held on to for some reason. Guess it's off to bestbuy in the morning :(
 
Arrrgghhh! Got the new psu and hooked everything up. Mobo powers as do fans (incl on the graphic card) but no beeps and the monitor doesn't go on :( What the heck???
 
rip off the insulation and make sure that it didn't get under the cpu pins. I try to not lift up the bracket and shove eraser around the cpu. Sometimes it has a tendency to get under the cpu and cause issues.
 
Had the pwr and reset switches plugged in wrong :/

OK...now get the mobo single beep and it's getting to the initial screen sometimes :/ Got into bios once so far and set everything to default for a first try. System re-booted, beeped once and now it seems the keyboard stops working at the initial screen...hitting DEL to get into the bios doesn't do anything. Ugh

I didn't lift up the bracket. Will check under the insulation for signs of moisture.
 
Back