Sims Reaper
New Member
- Joined
- Jul 9, 2013
- Location
- Alberta
Hello,
I'm new to the site, only recently discovered it as I started to really look into water cooling. As I did, I discovered some of your posts with the amazing custom case mods, and figured I'd give it a try.
So here is my NZXT Phantom case mod - water cooling thread. I hope you like what you see, but I am always open to criticism, suggestions and all that comes with the public display here. It's actually why I'm posting this all.
As I mentioned, I'm new here, and this is my first mod job and first water cooling attempt. Its something I've always wanted to do, since I first heard about it, but now I'm in the position where I have the time and money to put towards it.
This whole thing started as a "look-see" for me a few weeks ago. Browsing new-egg, and review sites. Then last week, had a stressful day at work, opted for some impulse online shopping therapy So here is the jist of the purchase list.
Sound Activation Cold Cathode Addon w/ Blue LEDs
Logisys Dual 12" Cold Cathode Kit - Blue
Black Ice GT Stealth 360 X-Flow Radiator - Black
Noiseblocker NB-BlackSilentFan XL2 120mm x 25mm Ultra Quiet Fan - 1500 RPM - 21 dBA
FrozenCPU Superman Applique (I'm a Supe fan, what ca n I say, Plus my last name starts with an S so it fits )
Alphacool VPP655 Variable Speed Pump - HF Top Edition - Acylic
XSPC Razor GTX Titan Full Coverage VGA Block - Reference Design
Backplate: XSPC Titan Backplate
Swiftech Maelstrom 5 1/4" Dual Bay Standalone Reservoir (Maelstrom)
XSPC RayStorm High Performance Acetal CPU Liquid Cooling Block - Intel (Sockets LGA 1155 / 1156 / 1366 / 2011)
EK EKoolant Premium Liquid Cooling Premix Coolant - 1L - UV Blue
1/2" ID - (5/8" OD) PVC Clear Tubing
Pretty pumped about it, but like I said, it was fairly impulsive, and I my main source of input was the few review sites I was able to peruse just as I was building my cart. But let me know how it all strikes you.
Next came the modding part. Now, a 120.3 will not fit in a Phantom case, but I wanted the extra cooling for my GPU loop. I found a great case mod done by Dooms 101
So it gave me the idea to try it as well. And then I knew I had to be able to show off the water system to my friends, so, windows became a must. Of course, the easiest way was to just buy the windowed panel from NZXT, and I almost did. But again, with the help of the internet I opted for the self made method.
So a trip was made to the hardware store, lexan was purchased, and I found a Rotary tool kit on for 50% so it was an instant buy. So became my first mistake... I quickly found that the dremel was not gonna cut straight enough for my needs. And in my rush, I cut the acrylic, score and snap style, to the shape of the window I first wanted, only to quickly change my mind after. I had first thought to just make the panel like the NZXT window, then I wondered why limit myself. So, another trip to the hardware store
24" X 24" Acrylic sheet, Vehicle door trim, Rivet hand tool, and small rivets and backers.
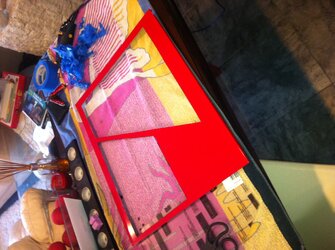
Second purchase complete I cut the new windows in my panel, replacing both mesh vents with the acrylic.
NOTE FOR NEWBIES: One thing they dont say on the forums is how stressfull it is to first cut your pristine side panel
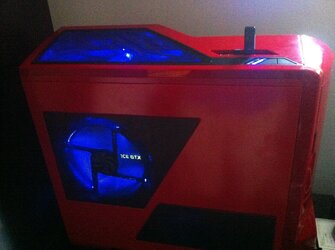
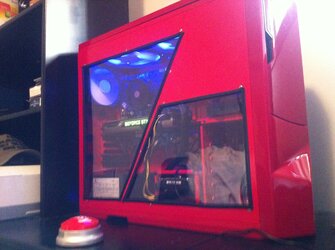
But I really did turn out better than I expected for my first run. It isnt absolutely perfect, but everyone who has seen it thinks it was done professionally, which I take as its pretty good for a first timer.
I'm new to the site, only recently discovered it as I started to really look into water cooling. As I did, I discovered some of your posts with the amazing custom case mods, and figured I'd give it a try.
So here is my NZXT Phantom case mod - water cooling thread. I hope you like what you see, but I am always open to criticism, suggestions and all that comes with the public display here. It's actually why I'm posting this all.
As I mentioned, I'm new here, and this is my first mod job and first water cooling attempt. Its something I've always wanted to do, since I first heard about it, but now I'm in the position where I have the time and money to put towards it.
This whole thing started as a "look-see" for me a few weeks ago. Browsing new-egg, and review sites. Then last week, had a stressful day at work, opted for some impulse online shopping therapy
 So here is the jist of the purchase list.
Sound Activation Cold Cathode Addon w/ Blue LEDs
Logisys Dual 12" Cold Cathode Kit - Blue
Black Ice GT Stealth 360 X-Flow Radiator - Black
Noiseblocker NB-BlackSilentFan XL2 120mm x 25mm Ultra Quiet Fan - 1500 RPM - 21 dBA
FrozenCPU Superman Applique (I'm a Supe fan, what ca n I say, Plus my last name starts with an S so it fits )
Alphacool VPP655 Variable Speed Pump - HF Top Edition - Acylic
XSPC Razor GTX Titan Full Coverage VGA Block - Reference Design
Backplate: XSPC Titan Backplate
Swiftech Maelstrom 5 1/4" Dual Bay Standalone Reservoir (Maelstrom)
XSPC RayStorm High Performance Acetal CPU Liquid Cooling Block - Intel (Sockets LGA 1155 / 1156 / 1366 / 2011)
EK EKoolant Premium Liquid Cooling Premix Coolant - 1L - UV Blue
1/2" ID - (5/8" OD) PVC Clear Tubing
Pretty pumped about it, but like I said, it was fairly impulsive, and I my main source of input was the few review sites I was able to peruse just as I was building my cart. But let me know how it all strikes you.
Next came the modding part. Now, a 120.3 will not fit in a Phantom case, but I wanted the extra cooling for my GPU loop. I found a great case mod done by Dooms 101
So it gave me the idea to try it as well. And then I knew I had to be able to show off the water system to my friends, so, windows became a must. Of course, the easiest way was to just buy the windowed panel from NZXT, and I almost did. But again, with the help of the internet I opted for the self made method.
So a trip was made to the hardware store, lexan was purchased, and I found a Rotary tool kit on for 50% so it was an instant buy. So became my first mistake... I quickly found that the dremel was not gonna cut straight enough for my needs. And in my rush, I cut the acrylic, score and snap style, to the shape of the window I first wanted, only to quickly change my mind after. I had first thought to just make the panel like the NZXT window, then I wondered why limit myself. So, another trip to the hardware store
24" X 24" Acrylic sheet, Vehicle door trim, Rivet hand tool, and small rivets and backers.
Second purchase complete I cut the new windows in my panel, replacing both mesh vents with the acrylic.
NOTE FOR NEWBIES: One thing they dont say on the forums is how stressfull it is to first cut your pristine side panel
But I really did turn out better than I expected for my first run. It isnt absolutely perfect, but everyone who has seen it thinks it was done professionally, which I take as its pretty good for a first timer.


