- Joined
- Feb 18, 2002
- Thread Starter
- #21
Learning Time
===========
[TeraByte Image is one of the oldest and best drive imaging programs in the world.
Accept no substitutions like Acronis and the rest of them.]
Simply reimaging the OS partition onto a new M.2 drive resulted in
INACCESSIBLE_BOOT_DEVICE Blue Screen of Death
This is how I fixed it:
I added the new blank M.2 drive.
I booted into the old M.2 drive which now sees the new empty M.2 drive.
NOW I performed a partition copy from one M.2 to another, because the original partition now had info about the new M.2 drive. After that old M.2 can be removed/formatted and new M./2 will not have the
INACCESSIBLE_BOOT_DEVICE Blue Screen of Death at boot.
So the point is if you just image onto a new M.2 - you get the Blue Screen of Death.
So in other words, the old drive must *SEE* the new drive and then it has info on how to handle it after the new M.2 drive becomes your new boot drive.
- - - Auto-Merged Double Post - - -
Moving on:
I did a copy/paste of a large 30GB blu-ray file from a fast, but still mechanical WD Black hard drive to get these figures:
125MB/s OCZ RD400 128GB M.2 Drive
132MB/s WD Black SN-750 500GB M.2 Drive
This was way too slow and way too similar between the M.2 drives, one of which [OCZ] I've had for 4 to 5 years. I suspected the limitation being the source (mechanical drive) and it was:
When the source is changed from a Mechanical Drive to an M.2 drive - so when transfers went from one M.2 to another M.2, transfer speeds were:
260MB/s OCZ RD400 128GB M.2 Drive
560MB/s WD Black SN-750 500GB M.2 Drive
Wow the new M.2 is truly so much faster!
When imaging partitions however, I measured things to be 75% faster when imaging from one M.2 to another M.2 vs. from one partition to another partition on the same M.2 drive.
- - - Auto-Merged Double Post - - -
These really should be separate posts for clarity EarthDog, but I respect your ownership here.
Point 3:
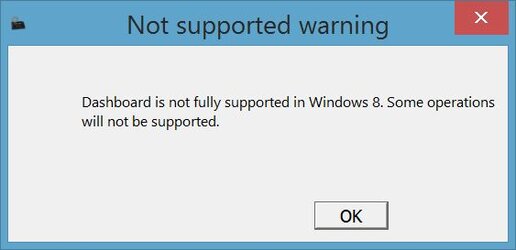
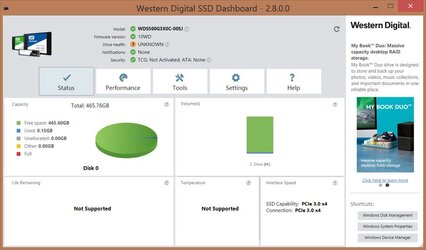
Western Digital SSD Dashboard incredibly does not report vital drive information under Windows 8.1.
An operating system fully supported until 2023, and it's 2020.

Life Remaining is not Supported under Windows 8.1!
Look at this sh**:

No they told me, the only way to see Health Info of my new drive is to upgrade to Windows 10. Like a putz.
@#$%!
How about no?
I rebooted into my Windows 10 partition just enough to run their software and confirm the drive has 100% of expected life on it. You've got to check these things when installing a new drive.
- - - Auto-Merged Double Post - - -
Point 4 is in here:
https://www.overclockers.com/forums/showthread.php/797489
===========
[TeraByte Image is one of the oldest and best drive imaging programs in the world.
Accept no substitutions like Acronis and the rest of them.]
Simply reimaging the OS partition onto a new M.2 drive resulted in
INACCESSIBLE_BOOT_DEVICE Blue Screen of Death
This is how I fixed it:
I added the new blank M.2 drive.
I booted into the old M.2 drive which now sees the new empty M.2 drive.
NOW I performed a partition copy from one M.2 to another, because the original partition now had info about the new M.2 drive. After that old M.2 can be removed/formatted and new M./2 will not have the
INACCESSIBLE_BOOT_DEVICE Blue Screen of Death at boot.
So the point is if you just image onto a new M.2 - you get the Blue Screen of Death.
So in other words, the old drive must *SEE* the new drive and then it has info on how to handle it after the new M.2 drive becomes your new boot drive.
- - - Auto-Merged Double Post - - -
Moving on:
I did a copy/paste of a large 30GB blu-ray file from a fast, but still mechanical WD Black hard drive to get these figures:
125MB/s OCZ RD400 128GB M.2 Drive
132MB/s WD Black SN-750 500GB M.2 Drive
This was way too slow and way too similar between the M.2 drives, one of which [OCZ] I've had for 4 to 5 years. I suspected the limitation being the source (mechanical drive) and it was:
When the source is changed from a Mechanical Drive to an M.2 drive - so when transfers went from one M.2 to another M.2, transfer speeds were:
260MB/s OCZ RD400 128GB M.2 Drive
560MB/s WD Black SN-750 500GB M.2 Drive
Wow the new M.2 is truly so much faster!
When imaging partitions however, I measured things to be 75% faster when imaging from one M.2 to another M.2 vs. from one partition to another partition on the same M.2 drive.
- - - Auto-Merged Double Post - - -
These really should be separate posts for clarity EarthDog, but I respect your ownership here.
Point 3:
Western Digital SSD Dashboard incredibly does not report vital drive information under Windows 8.1.
An operating system fully supported until 2023, and it's 2020.

Life Remaining is not Supported under Windows 8.1!
Look at this sh**:

No they told me, the only way to see Health Info of my new drive is to upgrade to Windows 10. Like a putz.
@#$%!
How about no?
I rebooted into my Windows 10 partition just enough to run their software and confirm the drive has 100% of expected life on it. You've got to check these things when installing a new drive.
- - - Auto-Merged Double Post - - -
Point 4 is in here:
https://www.overclockers.com/forums/showthread.php/797489
I need NVMe drivers for Windows 7 / 8.0 for a Western Digital M.2 drive.
My other OS partitions Windows 8.1 and 10 see the drive out of the box but Windows 7 and 8.0 which I use for testing/miscalenous cannot see M.2 drives without a driver. Companies like OCZ (great job) offer NVMe drivers for Windows 7 / 8.0 but Western Digital, probably in cahoots with Microsoft, once again uses this to force upgrades to operating systems still in Beta testing stages like Windows 10.
Does anyone know where I can get NVMe drivers for Western Digital drives?
There were some allegedly on Microsoft Windows update pages a while ago - but they of course took those down, once again, to force upgrades to Windows 10.
Code:
[QUOTE="c627627, post: 0"]So after some serious hacking I figured it out, using an unsigned driver. So wish I could get a signed one to avoid all this. It is so unnecessary for WD not to have their own download like some other companies do.
Anyway here it goes, it's a bit complicated.

Unsigned driver location will be:
C:\Windows\System32\Drivers\nvme.sys

WARNING: UNINSTALL unsigned driver before reversing these settings, otherwise you may not be able to boot in. If this happens and you cannot boot in, Windows will display the location of the unsigned driver file that prevents it from booting in. Delete or move the listed file away to fix the problem. This would have to be done from another OS of course.


* To disable Digital Driver Signing:

Start > Search for: Command Prompt >
Right click on Command Prompt > Run as administrator >
bcdedit.exe -set loadoptions DDISABLE_INTEGRITY_CHECKS
bcdedit.exe -set TESTSIGNING ON

Must REBOOT to take effect!
after which:
*** You will get a Test Mode water mark in the lower right corner of the screen ***

This is the unsigned driver:

[ATTACH]211540[/ATTACH]


Control Panel > Device Manager
Under Other Devices you will see a yellow exclamation mark next to a PCI Device

Recognize the WD drive by right clicking to see its Properties > Details
Hardware Ids:
PCI\VEN_15B7&DEV_5006&SUBSYS_500615B7....

Now to install the driver:
Right click on PCI Device > Update Driver Software > Browse my computer for driver software > Browse...button to get to the driver folder > Next

Windows Security window pops up > Install this driver software anyway > Close


Now this is how to remove the water mark, use this:
My_WCP_Watermark_Editor.exe can remove the watermark without disabling Digital Driver Signing:

[ATTACH]211541[/ATTACH]


By the way...
This is how to reverse these settings and remove the water mark without that program, [B]but the driver signing requirement will remove the unsigned driver[/B], as well as the water mark:

bcdedit.exe -set loadoptions ENABLE_INTEGRITY_CHECKS
bcdedit.exe -set TESTSIGNING OFF

Must REBOOT to take effect!


What a time consuming nightmare.
Western Digital is [I]not[/I] a user friendly company.[/QUOTE]
Last edited: