- Joined
- Nov 25, 2001
- Location
- Niagara Falls, Ontario, Canada
Hi guys,
Toasted my graphics card yesterday....... in the oven....
Erm, why?
Welllll.... The story starts when I bought a ti4600 for $5 on eBay. I knew it was broken, but the way the seller described things, I thought I had a 50/50 shot at it just being n00bular error, so I took a chance. The card turned up, and it halfassed worked. There were big black blocks missing from the display, and some lines down it. Tapping the BGA RAM chips glitched some of these errors in and out. The card also looked a little bent, like someone bent it out of the way to get at the DIMM slots sometime. The BGA RAM appeared to have bad contact on several pads on several of the chips. Either a result of poor soldering initially or of the card being flexed/bent at some point.
So, all I need to do is resolder the RAM then, easy! ....
.... Two weeks of research later, I had determined several things...
* The entire BGA package must be heated to solder it
* The entire board is soldered in a reflow oven
* The board and package needs to be "baked out" to rid it of all moisture
* The temperature gradient has to be kept low or thermal shear forces will shatter the silicon or break internal interconnects.
* The melting point of solder used is 190C
* Modern components designed to be soldered in reflow ovens are meant to be able to withstand 230C for 30 minutes.
picking over this page in Babelfish (german to english) http://wwwbode.cs.tum.edu/~acher/bga/index.html gave me much inspiration
But further researching led me to take his temp profiles with a pinch of salt, different manufacturers have different specs. Elsewhere, I found some golden rules such as, don't hold 230C for more than 30 mins etc, that seemed to indicate that the chips are a little more robust than indicated. However, he's spot on about shallow temperature gradients and moisture problems.
Anyhoo, my first thoughts led to some adventures with an iron...
http://www.ocforums.com/showthread.php?t=355099
But as I thought more about it, I realised I didn't really want to put any kind of contact pressure on the chips otherwise I'd probably end up just squidging the solder balls flat, or pulling the chip off with "stiction" if I tried to release pressure.
So slowly I came round to the idea, that I should just stick the sucker in the oven and see what happens!
Theoretically, the surface tension on the solder should pull the BGA packages straight and level on the pads when the melting point is reached. I was hoping that they would self correct any bad joints when the MP of the solder was reached.
Erm, How?
Okay, first thing I needed to consider was moisture inclusion in the components. If there is any moisture in the chips when you ramp up to soldering heat, the steam will expand and the components will explode like popcorn kernels. Hence this is known in the industry as "popcorning". So first thing to do was to "bake out" the victim*cough*patient.
Preparing to bake.
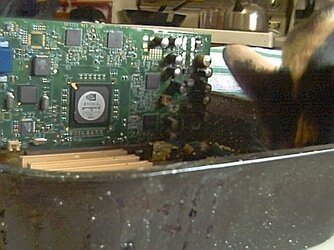
Now, I thought while I was doing this, I may as well do a batch of several faulty components. I had an A7V motherboard, dead with issues unknown and a Duron 900, ditto, and on the off chance that these were also suffering from bad connections, and also just for the pure sadistic pleasure of torturing these sad insignificant little components, I thought I'd put them in the oven at the same time. I also had a couple of bad RAM sticks I was going to throw in there too, but I couldn't find them at the time. Somehow it made some kind of twisted sense to attempt to put an entire barebone setup in the oven at once Also, I wanted to mount the ti4600 vertically, and plugging it into a dead mobo seemed the simplest way to do it. The vertical mounting was both a good and bad idea, you'll see why later.
So having plugged the ti4600 into the A7V and after I had added the Duron, I took a large enamel baking tray and put some plain clay cat litter in the bottom. This was to support the bottom of the motherboard evenly, to avoid soldering it to the baking tray, and to provide some "thermal ballast" to stop the tray heating up to 300C or so every time the thermostat kicked in the heating element. I stripped the boards of everything removable, jumpers, bios chips etc.
So I place this lot in the oven, and starting with the oven cold I set the oven for 110C and turned her on.....
I leave it in there for 8 hours. This is pretty much the minimum recommended bakeout time for the chips.
So it's been gently basking in about 110C for 8 hours, what next?
Well, since it's all in the oven already, I went straight on to the soldering process, because if I took it out, the chips would suck up moisture form the atmosphere again, we're at 110C, we can't hit soldering temp straight off, otherwise the chips might shatter...
1st stage, set the dial for 150C .... wait 20 mins ....
2nd stage, set the dial for 180C .... wait 10 mins ....
3rd stage, set the dial for 210C , start a 5 minute timer.....
2 minutes in, I hear some nerve shattering pops, ooops, seems like some of the caps weren't up to reflow oven spec....
I steel myself, and wait out the 5 minutes, then drop the dial back down to 150C
After 20 mins, I drop it back to 100C, then after another half hour I turned it off.....
A note on the temperatures here. These weren't the indicated temperatures on my dial. In using this oven over the past 3 years, for cooking, I have come to the conclusion that it reads about 20C low on the dial, (i.e. gets 20C hotter than set) so I set it accordingly. If you intend trying this sort of thing, speak to the cook or baker in your household about thier estimate of the thermostat accuracy.
After it had been off 20 mins, I plucked up the courage to take a peek inside, just cracked the door and shut it up again quick, let the whole thing cool off overnight....
I claim partial success!
The good:
* The BGA chips are still on the card, they didn't fall off!
* Nothing burned too bad
* I hit the solder melting point
* none of the chips popcorned or were subject to obvious thermal shattering
The bad
* Several electrolytic capacitors popped.
* Some of the inductors (coils) fell off the card
* some of the caps fell off the card
* IDE shells on the mobo melted
* Several header shells turned rather brown.
Results so far.....
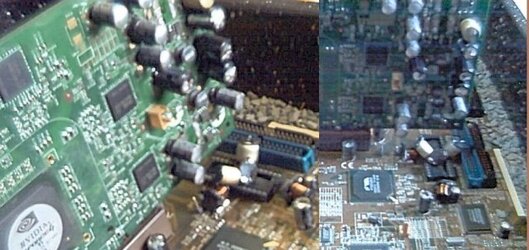
Well the BGAs and the GPU look in great shape, didn't lift off, peeking under the edges as best I can, holding them up to the light, looks like the BGA connections are in great shape, no bleeding or running. It didn't occur to me however that some of the larger capacitors and the inductors were surface mounted DOH!!! so they fell off. I thought they were through hole mounted and didn't bother checking. So I've got to basically rebuild the voltage circuitry. Shouldn't be too bad to do with a soldering iron. In retrospect I also should have removed the elctrolytic capacitors, my gut was telling me to, but I didn't listen. Several may have to be replaced. They did better on the ti4600 than on the A7V though, that lost more, mostly leaks but two small ones exploded.
What's next.....
Well I'm going to be all today replacing the inductors and capacitors quite likely, then I'll get down to testing it to see if it works. Yes I really expect it to still work. Dunno if the mobo might be a writeoff though, depends if I get the ambition to replace 30 or so caps, when it still might not work after....
That's it for now....
Road Warrior
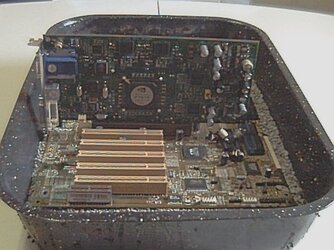
Attached pic, ti4600 mounted in a7V mobo, sitting in the baking tray, atop the kitty litter, note browned PCI slots...
Toasted my graphics card yesterday....... in the oven....
DISCLAIMER
This thread may not be suitable for those of a nervous disposition, the weak of heart or the terminally lily livered.
Following any procedures discussed in this thread is entirely at your own choice and your own risk, if you destroy a $600 card or if you set your house on fire trying to emulate this, neither I nor ocforums is responsible.
Erm, why?
Welllll.... The story starts when I bought a ti4600 for $5 on eBay. I knew it was broken, but the way the seller described things, I thought I had a 50/50 shot at it just being n00bular error, so I took a chance. The card turned up, and it halfassed worked. There were big black blocks missing from the display, and some lines down it. Tapping the BGA RAM chips glitched some of these errors in and out. The card also looked a little bent, like someone bent it out of the way to get at the DIMM slots sometime. The BGA RAM appeared to have bad contact on several pads on several of the chips. Either a result of poor soldering initially or of the card being flexed/bent at some point.
So, all I need to do is resolder the RAM then, easy! ....
.... Two weeks of research later, I had determined several things...
* The entire BGA package must be heated to solder it
* The entire board is soldered in a reflow oven
* The board and package needs to be "baked out" to rid it of all moisture
* The temperature gradient has to be kept low or thermal shear forces will shatter the silicon or break internal interconnects.
* The melting point of solder used is 190C
* Modern components designed to be soldered in reflow ovens are meant to be able to withstand 230C for 30 minutes.
picking over this page in Babelfish (german to english) http://wwwbode.cs.tum.edu/~acher/bga/index.html gave me much inspiration
But further researching led me to take his temp profiles with a pinch of salt, different manufacturers have different specs. Elsewhere, I found some golden rules such as, don't hold 230C for more than 30 mins etc, that seemed to indicate that the chips are a little more robust than indicated. However, he's spot on about shallow temperature gradients and moisture problems.
Anyhoo, my first thoughts led to some adventures with an iron...
http://www.ocforums.com/showthread.php?t=355099
But as I thought more about it, I realised I didn't really want to put any kind of contact pressure on the chips otherwise I'd probably end up just squidging the solder balls flat, or pulling the chip off with "stiction" if I tried to release pressure.
So slowly I came round to the idea, that I should just stick the sucker in the oven and see what happens!
Theoretically, the surface tension on the solder should pull the BGA packages straight and level on the pads when the melting point is reached. I was hoping that they would self correct any bad joints when the MP of the solder was reached.
Erm, How?
Okay, first thing I needed to consider was moisture inclusion in the components. If there is any moisture in the chips when you ramp up to soldering heat, the steam will expand and the components will explode like popcorn kernels. Hence this is known in the industry as "popcorning". So first thing to do was to "bake out" the victim*cough*patient.
Preparing to bake.
Now, I thought while I was doing this, I may as well do a batch of several faulty components. I had an A7V motherboard, dead with issues unknown and a Duron 900, ditto, and on the off chance that these were also suffering from bad connections, and also just for the pure sadistic pleasure of torturing these sad insignificant little components, I thought I'd put them in the oven at the same time. I also had a couple of bad RAM sticks I was going to throw in there too, but I couldn't find them at the time. Somehow it made some kind of twisted sense to attempt to put an entire barebone setup in the oven at once
Also, I wanted to mount the ti4600 vertically, and plugging it into a dead mobo seemed the simplest way to do it. The vertical mounting was both a good and bad idea, you'll see why later.So having plugged the ti4600 into the A7V and after I had added the Duron, I took a large enamel baking tray and put some plain clay cat litter in the bottom. This was to support the bottom of the motherboard evenly, to avoid soldering it to the baking tray, and to provide some "thermal ballast" to stop the tray heating up to 300C or so every time the thermostat kicked in the heating element. I stripped the boards of everything removable, jumpers, bios chips etc.
So I place this lot in the oven, and starting with the oven cold I set the oven for 110C and turned her on.....
I leave it in there for 8 hours. This is pretty much the minimum recommended bakeout time for the chips.
So it's been gently basking in about 110C for 8 hours, what next?
Well, since it's all in the oven already, I went straight on to the soldering process, because if I took it out, the chips would suck up moisture form the atmosphere again, we're at 110C, we can't hit soldering temp straight off, otherwise the chips might shatter...
1st stage, set the dial for 150C .... wait 20 mins ....
2nd stage, set the dial for 180C .... wait 10 mins ....
3rd stage, set the dial for 210C , start a 5 minute timer.....
2 minutes in, I hear some nerve shattering pops, ooops, seems like some of the caps weren't up to reflow oven spec....
I steel myself, and wait out the 5 minutes, then drop the dial back down to 150C
After 20 mins, I drop it back to 100C, then after another half hour I turned it off.....
A note on the temperatures here. These weren't the indicated temperatures on my dial. In using this oven over the past 3 years, for cooking, I have come to the conclusion that it reads about 20C low on the dial, (i.e. gets 20C hotter than set) so I set it accordingly. If you intend trying this sort of thing, speak to the cook or baker in your household about thier estimate of the thermostat accuracy.
After it had been off 20 mins, I plucked up the courage to take a peek inside, just cracked the door and shut it up again quick, let the whole thing cool off overnight....
I claim partial success!
The good:
* The BGA chips are still on the card, they didn't fall off!
* Nothing burned too bad
* I hit the solder melting point
* none of the chips popcorned or were subject to obvious thermal shattering
The bad
* Several electrolytic capacitors popped.
* Some of the inductors (coils) fell off the card
* some of the caps fell off the card
* IDE shells on the mobo melted
* Several header shells turned rather brown.
Results so far.....
Well the BGAs and the GPU look in great shape, didn't lift off, peeking under the edges as best I can, holding them up to the light, looks like the BGA connections are in great shape, no bleeding or running. It didn't occur to me however that some of the larger capacitors and the inductors were surface mounted DOH!!! so they fell off. I thought they were through hole mounted and didn't bother checking. So I've got to basically rebuild the voltage circuitry. Shouldn't be too bad to do with a soldering iron. In retrospect I also should have removed the elctrolytic capacitors, my gut was telling me to, but I didn't listen. Several may have to be replaced. They did better on the ti4600 than on the A7V though, that lost more, mostly leaks but two small ones exploded.
What's next.....
Well I'm going to be all today replacing the inductors and capacitors quite likely, then I'll get down to testing it to see if it works. Yes I really expect it to still work. Dunno if the mobo might be a writeoff though, depends if I get the ambition to replace 30 or so caps, when it still might not work after....
That's it for now....
Road Warrior
Attached pic, ti4600 mounted in a7V mobo, sitting in the baking tray, atop the kitty litter, note browned PCI slots...