• Welcome to Overclockers Forums! Join us to reply in threads, receive reduced ads, and to customize your site experience!

Thermaltake Core X9 build ROG + 5960x Watercooled

Overclockers is supported by our readers. When you click a link to make a purchase, we may earn a commission. Learn More.

gkline

Member
Joined
Jun 13, 2003
Location
Lebanon, PA
At the urging of Earthdog, I'm going to be posting my build log about the Thermaltake Core X9 build I am in the process of.

Nothing fancy and pictures will follow after I clean up the wiring.

Some history. I'm not a computer "expert" and don't work in the computer field. However, like many of you, my hobby, passion, or as my wife of 41 yrs is prone to say "obsession" is computers and building them.

I delved into custom water cooling within the last 2 years and it fascinates me. I prefer function over form and admittedly have gotten obsessed from time to time with radiator capacity. I had been through a bevy of AIO coolers and before that air coolers. However, when custom water cooling is your fascination, look out.

My previous high end computer was a water cooled 3930k with the same 2 Sapphire Tri-X OC R9 290s water cooled with EK blocks. I was using a CM HAF 932 Advanced case which effectively limited my internal radiator capacity to a 360 rad at the top. You can "squeeze" another radiator in there especially if you mod the case but I decided to go external also. It first started with an EK EX360 mounted vertically to the rear but when the rad bug bit I found a new Watercool MO RA3-420 Pro and I leaped.

I was searching for a bigger case that would fit in my space below my built-in table (26") clearance and other than Caselabs and Mountain mod cases the mainline vendors were somewhat lacking. At the same time, I was ready to leap into the X99 chipset and decided I would put the $$$ into the mb/cpu and ram instead of a higher end case (my function over form mentality!)

Thermaltake "saved the day" by announcing their new Core series of cases with the "big daddy" being the Core X9. It measures 15" wide by 18.5" high (exclusive of feet) by 25.25" deep and most importantly can hold 3 (THREE) 480 rads. Best of all I snagged one at MicroCenter in Philly for @$170.00 tax included.

Needless to say, the quest for a new build was on. I already had a EK Coolstream 480 PE rad from another build so I had to decide what I was going to build and how many rads.

As mentioned above I decided to go EXTREME on cpu/ mb so I bought the 5960x/Asus ROG Rampage Extreme V mb/ Corsair DDR4-16g combo from Newegg.

I had cooled my 3930k with a Swiftech ApogeeHD cpu block and it performed well but decided to go with a new EK Supremacy EVO acetal/copper block as it received some of the best reviews recently as a cooler. My gpus ( 2 Sapphire Tri-X OC R9 290s in CF) were already custom watercooled by EK full acetal/copper blocks so they were going into the build. I re-used my Bay/Res, an XSPC Twin D5 model with 2 D5 Swiftech 655 variable speed pumps in series. For tubing I stayed with XSPC basic black 1/2" ID; 3/4" OD since I already had fittings. Most fittings are barb and clamp but there are a few compression fittings. To finish the rad system, I decided on a pair of new XSPC RX480 V3 rads. I previously had a RX360 rad in the 3930k build and though simple it was a cooling BRUTE.

Fans were an interesting question. There are "tons" of fans but one of the Cadillacs was (and if you can find them new still are) the Scythe Gentle Typhoons AP15 GT. They are 1820rpms max BUT excellent radiator fans with incredible stactic pressure from top to bottom of the rpm chain. I was lucky enough to snag a set of 10 used ones from one seller and 2 from another for a fair price (these fans are not cheap but when you own them you know why, double ball bearing and fairly quiet for the amount of static pressure)

Well enough for now. Got to get to work. I'll post more later about the build.

Thanks for listening.
 
I'm on a short lunch break so I'll continue on with my build info. To control 12 AP 15 GT fans, I chose to use my NZXT 6 channel fan controller I had used in my 3930k build. I have 2 fans per channel via fan splitter cables and it works well.

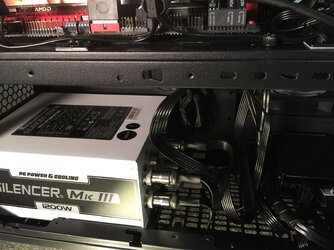
My PSU was my PC Power and Cooling 1200 W Silencer Mk III I just purchased last year. Plenty of power for the cpu, gpus, fans, pumps etc.

What's really attractive about the Core X9 case is the removable top, sides and front. The frame is solid with numerous mounting points. As to the feet let me mention what I did and why. The case comes with 4 fixed feet and no casters. I realized how convenient casters were with my HAF 932 cases (have 2) especially when loaded down with radiators etc. Thermaltake does not, at present, provide casters and my HAF 932 casters had metal mounting plates just a little too big for the size of the Core X9 (1" X 1"). Trying to find nice casters with a 1" x 1" metal mounting base was a bear BUT persistence pays and I found an Apollo Caster Company that stocks thousands of casters and lo and behold I found ones with 1" x 1" metal base plates (swivel stem casters). They fit perfect, matching the holes for mounting the fixed feet.

As for HDD/ ssd storage the X9 comes with 2 BIG cages that holds 3 fullsized HDD each but I need room on the left side for the 3rd radiator and it was a VERY tight squeeze to fit (from rear forward on the left side) PSU, HDD case and 5.25 Bay/Res. My task became easier when I decided to go with identical Samsung 850 EVO 500g ssds instead of HDD. I eliminated the 2nd Big cage and instead used an old 2.5" mounting bracket from an Old Chieftec case. A flat black paint job on the bracket made it look like original equipment and it mounted beautifully between the PSU and the Bay/ res.

More later, lunch break over.
 
Sounds like a lot of attention to detail here, in for pics!
 
Looking forward to seeing pics, that New Core X9 case seems to be a really good choice for a watercooling rig.
 
Let me be clear. I'm sure a Caselab case at $600 to $800 offers incredible flexibility for advanced water coolers and multiple radiators.

The [email protected] Thermaltake Core X9 offers the chance to stuff 3 480 rads in a case and still have room for a pump/ reservoir combo and hdd without hard modding.
 
Back to info on the build, installation of the Asus Rampage Extreme V mb was easy. The motherboard tray is removable from the case (held on by two thumb-type screws in the rear and two permanent type screws in the front. The mounting stems were in the parts bag and fit well. Obviously installing the 5960x in the socket X99 was easy. EK's Supremacy Evo is a premium cpu water block that includes higher end thermalpaste (rumor has it Gelid). The mounting stems screw right into the mounts for the 2011 (3) socket. The only difference is in the directions for the EK block. They recommend switching out the internal mount for the jet plate for the new 2011(3). All parts needed were included and the EK directions on how to do it were very thorough. EK recommend a straight line of thermal paste and I followed their directions with no problems. Your turn the 4 thumb screws until the mount is solid. I used EK compression fittings on the CPU block.

The gpus already had the waterblocks installed from my 3930k build. In that build, the spacing was triple slot between the 2 gpus on the Asus Sabertooth X79 mb so I used a triple spaced EK block to connect them. Unfortunately, the Asus Rampage Extreme V spacing between PCI-E slots 1 and 3 was closer so the block would not work.Fortunately I previously purchased an expandable connector for the two gpus so I used it instead of buying a new gpu block connector. It worked perfectly. Having the removable mb tray really helped when installing the gpus and tightening the connector tube.

Once the cpu, cpu block, ram and gpus were installed, it was time to reinstall the unit in the case. It was very easy and worked well with the rear slots.

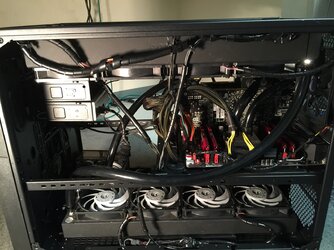
I next installed the 12 AP 15 GT fans onto the 3 radiators. All fans were installed in push mode with the fan connector cables facing outward toward the sides of the case. Since the 2 RX480s were going to be up top I mounted each rad to the removable top mounting brackets, set them in place and measured the short piece of tubing to connect the fittings. I used 2 90 degree fittings facing each other. There was more room to have the rads with the fitting in the rear that having them up front. The flow of tubing was also better. I connected the tube on the fittings which were barbed on the end and used black hose clamps I had purchased. Compression fittings would have also worked but I already had 6-90 degree Alpha cool barb fittings so I used them instead of spending $$ for compression fittings. Once the top 2 rads were in place it was time to mount the 3rd 480 rad (EK Coolstream 480 PE with 4 AP15 GTs)

I was trying to decide whether to mount the rad vertically on the side or horizontally. The horizontal mount turned out to be easier for a few reasons. First, the EK would be the first rad in the loop so the tube supplying water from the output of the XSPC Twin D5 bay res was the lower of the two tubes on the back of the res (both fittings straddled the space between the housing of the twin D5 pumps). The discharge tube from the pumps was a straight shot and short run to a 90 degree fitting going into the EK rad. Bending and twisting was kept to a minimum. By mounting the EK rad flat (horizontally on the bottom) and with the EK fittings to the front this was easily achieved. BTW, I used the HDD mounting tray for the EK rad to sit on. I'll supply picture later to explain. Once the EK rad was in place it was merely a matter of connecting the rest of the tubing.

When I fill the loop I have an old AT PSU with an on off switch to run the pumps while filling the loop. It didn't take as long as I originally thought (helps to have 2 D5s in series). I leak tested for over 8 hours, shut down the system and ran again for a few hours before making all of the PSU connections and running the system.

I ONLY use distilled water, a small 99%silver coil and two drops of "dead water" biocide in my loop.

Well I'll continue on later to ssd setup and installation of Windows 8.1-64.
 
Well I finally did some "wire management" and took some photos. I'm not the greatest at wire management but "basic black" wiring suits me.
Here are a few of the photos. Apologize for quality but I've been up since @3:45 AM doing wiring and just took the photos with my I-Phone.

IMG_0503.JPG

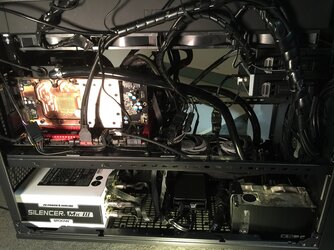
This is an overview of the left side showing from rear to front on bottom psu - ssd bracket - and finally the front of the XSPC Twin D5 Bay res.

IMG_0512.JPG

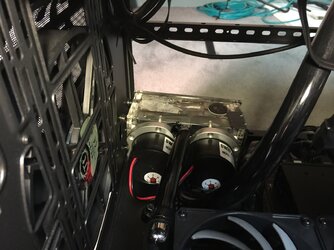
This is the rear view of the Bay res showing the dual D5s in series and the connection to the EK radiator.

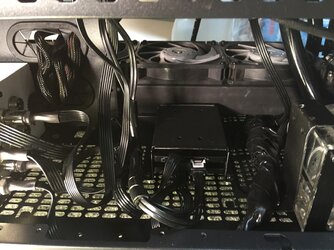
The third photo above shows a close up of the PSU. Having modular connectors for the SAT and 4 pin power connectors is very nice.
IMG_0504.JPG
IMG_0505.JPG

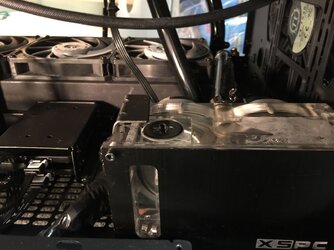
The next two photos above show close ups of the ssd bracket and mounting method for the XSPC bay res. As I mentioned above the Core X9 had a different meathod for mounting the ssds and since I was not using either large HDD case I found in one of my other old Chieftec cases the perfect bracket for ssds. After a "flat black" paint job, I mounted both ssds in the bracket, hooked up the connectors I mounted it to the floor with 2 screw/nut combos. The versatility of this case really shined in that regard. As to the bay/res, I could have let it remain loose and just sit in the case but I found and older shelving bracket that I bent in the top and it held the bay/res snuggly to the case. I aso painted the bracket black. Again the versatility of the numermous mounting spots in the case really helped.
 

Attachments

  • IMG_0506.JPG
    IMG_0506.JPG
    531.7 KB · Views: 2,361
Last edited:
IMG_0509.JPG
The photo above shows a view of the right side of the computer. Great shot of the 4 Typhoons sitting on top of the EK rad. As I mentioned the rad was mounted to one of the HDD mounting brackets. They also act as fan/ rad mounts. Instead of using both mounts (each is a 2 fan mount), I opted to just mount a single bracket to the middle of the 480 rad. The bracket mounts to the case near the center with tabs and toward the side with 2 black thumb screws provided. The case comes with TONS of thumb screws

IMG_0513.JPG
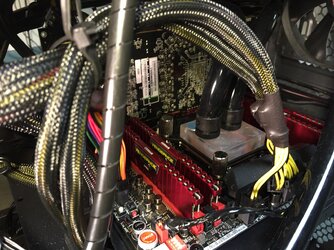
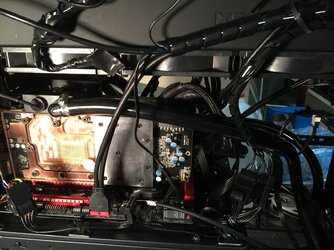
The photo above shows a close up of the EK Supremacy EVO cpu block. I used EK compression fittings as that was easier than barbs with such a close fit.

IMG_0515.JPG

The photo above shows a close up on the right of the 90 degree fittings and hose/clamp connections of the two RX480 rads. It took time to mount the rads to the top case brackets, carefully measure the distance between the two fittings, cut the tube, attach it and secure the clamps. Both fittings were Alphacools.

It also shows the EK (paint peeled of a bit) compression fitting connection from the cpu block to the first EK gpu block. Unfortunately, I didn't take a picture of the connector tube on the otherside of the gpu block connecting it to the 2nd gpu block (identical EK blocks and R9 290 gpus).

IMG_0508.JPG
The photo above shows the left side view and the 2nd gpu block. It's hard to see but on the otherside on the left you might be able to make out the tube connector between the gpu blocks. I have the blocks connected in series. On the top of the second block you can see on the left-side a black plug whick is an XSPC temp sensor plug to measure water temp. You'll see the LED readout in a later photo. The second fitting is a 90 degree Alphacool barb which connects back to the Bay/res.

IMG_0518.JPG

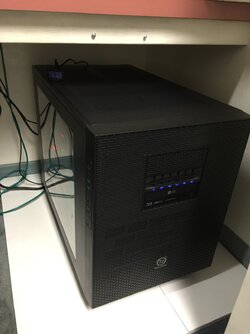
Finally above is an external view of the case. I mounted the LED readout to the top left. The cords were very short so I use a flashlight to check the readout.

You can also see the NZXT channel fan controller with the 6 blue slides. Below it is the LG Blue ray drive.

You will notice also that the case is sitting on white boards. I bought two laminated 4' white boards from Lowes to set on the rug. MUCH easier to roll on. The casters I installed on the bottom have lock outs to keep the case from rolling.

I hope these photos help you get a little better appreciation of the size and flexibility of the Core X9 case. Obviously if I had not added the third rad, I could have used both HDD cages on the right side but since I was only using ssds and since I had the third rad I opted for more rads!

BTW the twin D5s in series can push a ton of coolant.

Thanks for giving me this chance to show you my simple "function over form" build.
 
Last edited:
Earthdog, I hope I corrected it!:)

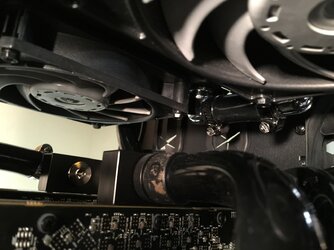
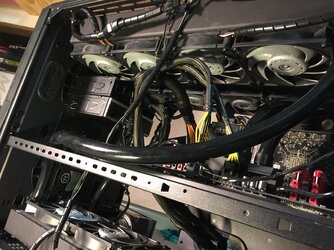
Forgot to post this. A quick look up at the twin RX480s with the Gentle Typhoons.
IMG_0510.JPG
 
Last edited by a moderator:
I'm still in the "playing" stage with this new build. I'm willing to run any benchmarks you might want run for my specs below.
 
Back