- Joined
- Mar 19, 2010
- Location
- California
Hello, world!
This is the first computer I've ever built. Up until now, I've been using laptops. I wanted to build a computer, and just decided to do it from scratch. I put it all inside of a wooden case that my dad and I made. It took a lot of spare time. I've been saving for a couple of years now, and finally acumulated $1,800. My dad contributed $800, plus little things he got at L0wes. Doing this was complicated by the fact that we don't have a shop right now (or for that matter, even a garage).
The case pieces were cut out of 3/4" laminated wood. Nice stuff. My dad is really good at this sort of thing, so he was the "brain" behind the case. He's the one, really responsible. Before putting together, we bull-nosed all the pieces with a 3/4" radius router (no, not the type with a MAC address) tip.
We glued and nailed/screwed where appropriate. The lid apparatus is really cool. As you can see in the first picture, one side had a pin driven in, and the other had a pin with a spring underneath. I place the side with the fixed pin in the hole on the box, and push the other pin to push the other side in place. To remove the lid, I push something pointy through a pinhole in the corner to push the pin out of place. Fixed in place, is an automotive hydraulic lift support. That way, after a certain point, it holds itself up.
The metal port plate on the back, I cut from an old computer case. It is screwed into place. We also cut holes for the power button, and the case fans in the bottom.
When all of the wood work was finished, we painted it with black gloss automotive paint. A lot of sanding and rubbing compound got it to it's current shiny state.
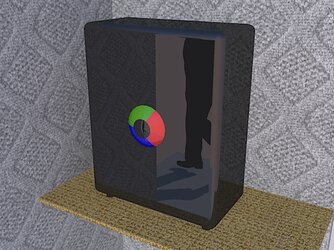
The logo is very cool (yes, I came up with it before Google Chrome even existed). It is made of automotive body putty molded in a plastic miso soup bowl secured from a thrift store. Cured under pressure, sanded, and painted, I drilled a hole into it, epoxied in a bolt, and drilled a hole through the front of the box, and bolted it in place.
The HDD rack is from Performance-PCs.com. The motherboard is secured with some screws that fit the thread inserts, projected with nylon spacers.
This is nothing really whacky. It's not a crazy gaming machine (actually, I built it with content authoring in mind, e.g. Blender). This is just simple, pure awesomeness, in it's most elementary form.
Here are the specs:
Intel Core i7 930
Asus P6T Deluxe v2
NVidia Quadro 1800
Corsair XMS3 DDR3 RAM
Corsair vx450w Power Supply
Seagate 160GB 7500rpm HDD
Intel 80GB Solid State Drive
Noctua NH-U9B CPU Cooler
Arctic Cooling 92mm Case Fans
Plextor PX-880U 48x External DVD Drive
(oops, forgot) OS: Ubuntu 10.04 64-bit
Drooling yet?
And now, the pics...
Full size

Full size

Full size
Full size
Full size

Full size
Full size

Full size

Full size

The whole thing is a bit cramped. I had to do a lot of looking to find a heat sync that was low profile enough. The intake is from the bottom (with filters; this computer is completely dust free) and the PSU is the primary exhaust.
I didn't put spots for disc drive, etc, so I use an external one.
Thanks to...
Those who assisted me in my ignorance
Newegg.com
Performance-PCs.com
Special thanks to...
My dad, who rocks (in a figurative sense)
This is the first computer I've ever built. Up until now, I've been using laptops. I wanted to build a computer, and just decided to do it from scratch. I put it all inside of a wooden case that my dad and I made. It took a lot of spare time. I've been saving for a couple of years now, and finally acumulated $1,800. My dad contributed $800, plus little things he got at L0wes. Doing this was complicated by the fact that we don't have a shop right now (or for that matter, even a garage).
The case pieces were cut out of 3/4" laminated wood. Nice stuff. My dad is really good at this sort of thing, so he was the "brain" behind the case. He's the one, really responsible. Before putting together, we bull-nosed all the pieces with a 3/4" radius router (no, not the type with a MAC address) tip.
We glued and nailed/screwed where appropriate. The lid apparatus is really cool. As you can see in the first picture, one side had a pin driven in, and the other had a pin with a spring underneath. I place the side with the fixed pin in the hole on the box, and push the other pin to push the other side in place. To remove the lid, I push something pointy through a pinhole in the corner to push the pin out of place. Fixed in place, is an automotive hydraulic lift support. That way, after a certain point, it holds itself up.
The metal port plate on the back, I cut from an old computer case. It is screwed into place. We also cut holes for the power button, and the case fans in the bottom.
When all of the wood work was finished, we painted it with black gloss automotive paint. A lot of sanding and rubbing compound got it to it's current shiny state.
The logo is very cool (yes, I came up with it before Google Chrome even existed). It is made of automotive body putty molded in a plastic miso soup bowl secured from a thrift store. Cured under pressure, sanded, and painted, I drilled a hole into it, epoxied in a bolt, and drilled a hole through the front of the box, and bolted it in place.
The HDD rack is from Performance-PCs.com. The motherboard is secured with some screws that fit the thread inserts, projected with nylon spacers.
This is nothing really whacky. It's not a crazy gaming machine (actually, I built it with content authoring in mind, e.g. Blender). This is just simple, pure awesomeness, in it's most elementary form.
Here are the specs:
Intel Core i7 930
Asus P6T Deluxe v2
NVidia Quadro 1800
Corsair XMS3 DDR3 RAM
Corsair vx450w Power Supply
Seagate 160GB 7500rpm HDD
Intel 80GB Solid State Drive
Noctua NH-U9B CPU Cooler
Arctic Cooling 92mm Case Fans
Plextor PX-880U 48x External DVD Drive
(oops, forgot) OS: Ubuntu 10.04 64-bit
Drooling yet?
And now, the pics...
Full size

Full size

Full size

Full size

Full size

Full size

Full size

Full size

Full size

The whole thing is a bit cramped. I had to do a lot of looking to find a heat sync that was low profile enough. The intake is from the bottom (with filters; this computer is completely dust free) and the PSU is the primary exhaust.
I didn't put spots for disc drive, etc, so I use an external one.
Thanks to...
Those who assisted me in my ignorance
Newegg.com
Performance-PCs.com
Special thanks to...
My dad, who rocks (in a figurative sense)
Last edited:


 Nice case to by the way. Looks great for a first build!
