Dis-assembly of a XSPC Photon reservoir
Since there is next to no information or pics etc on the dis-assembly of these popular reservoirs, I decided to pull one of mine apart for everyone's benefit.
I currently utilise a 250 Photon in my rig however I also have on hand a 170 Photon which is used for testing purposes when I test various water cooling bits such as flow meters, pumps etc.
So this afternoon I took my 170 Photon and grabbed a few pics of it while it was in its dis-assembled state!
OK here we go:
NB: Dis-assembling the unit will render your warranty null & void...
So we are all familiar with our Photons - the unit which will be dissected is the standalone Photon 170 reservoir. The 250 Photon is exactly the same sans the longer glass tube. The integrated D5 pump units will be slightly different but I assume by not by much except for the end cap securing the D5.
Photon 170:

First step is top remove the reservoir from its mounting bracket.

Next step is to simply unscrew the Delrin endcaps from the glass tube. I found this quite easy to do and no tools were required. The end caps were fitted firmly but not what I would call overly tight.
You will find that one cap will start to unscrew first - Just keep unscrewing it completely and carefully remove from the glass section taking care not to damage the internal acrylic tube and water deflector plates.
Once one end cap is removed - Carefully hold the glass tube and unscrew the other end cap. Note that the end caps unscrew in a normal anticlockwise direction - No different to undoing a lid off a glass jar....
In fact once the end caps are removed you are simply left with a glass tube that is threaded at both ends.

Just be careful when removing the acrylic centre section as its somewhat a tad more fragile than the rest of the components.
The Photon is quite simple and what I would call quite easy to pull apart.
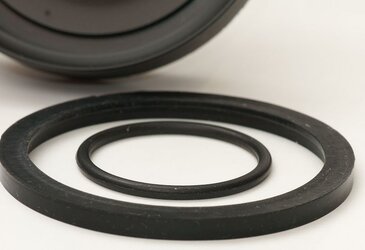
Here is a closeup of the 'TOP' endcap which houses the fill port.
Note the two O-Rings. One for the water fill disc (disc with 4x oval slots - refer to pic further down) to seal up against and the larger outer O-Ring which the glass tube simply screws up flush against.

A closer look at the seals for the 'TOP' fill port section reveals that while the small diameter O-Ring does indeed sport a circular profile, the outer ring is more of a square/rectangular section profile.

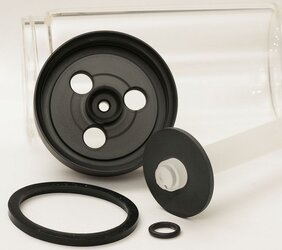
Here is a close look at the actual top port water deflection disc as well as the additional slotted water fill disc. Note that you can use the top port of these Photons as a general inlet port if one so wishes to do so. I have done this as a trial and it can provide a nice waterfall effect if the res is filled only part way and not right to the top.
Top inlet port deflector disc plus additional slotted water fill disc:

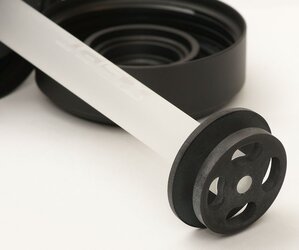
Now lets turn our attention to the 'LOWER' end cap which contains the main inlet/outlet ports and the 5mm LED holder aperture.
Here you can see that it is very similar to the previous top section except for the much smaller centre O-Ring. Note the polished centre acrylic section which is what your LED illuminates through to light up the center acrylic rod.

When re-assembling the unit you will find it much easier to screw on the TOP section first and then slide in the centre acrylic rod with the water deflection plates.
Fit the large O-Rings to the endcaps as they pretty much hold themselves in quite nicely.
Lubricate the O-Rings with some water or preferably some silicone before assembling the ends as this will help to seat all the mating surfaces better than if they are totally dry. Another option is to use diluted diswashing liquid as its very slippery in solution - Just ensure to rinse out the res with distilled water when its complete.
Once in position place the small centre O-Ring onto the acrylic rod [onto the small stepped down protrusion on the very end of rod] and then carefully screw on the bottom end cap while keeping the reservoir completely vertical to ensure that the centre acrylic rod slides into its central position with its O-Ring intact.
Its easy enough to do - You just need to ensure that the centre acrylic rod is completely centered otherwise you will find that the endcap will not screw on all the way and you may end up damaging the centre rod if you tighten the endcap with the acrylic rod not quite in the right central spot.
OK - So I quickly re-assembled mine (takes about 5 mins max) and once done you need to double/triple check for leaks.
So fill it with some distilled water, seal off the ports and wait for some time to see if any leaks develop. Also a good idea to double check it for leaks when first used in a working system - Just in case...
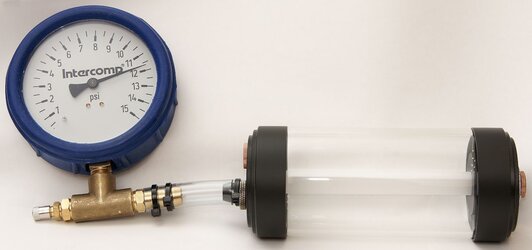
Otherwise if you have access to a pressure tester, pump it up to around 10 PSI or so and verify that it is indeed air-tight.
Here is mine at just under 12 PSI undergoing a short 15 min test...!

Since there is next to no information or pics etc on the dis-assembly of these popular reservoirs, I decided to pull one of mine apart for everyone's benefit.
I currently utilise a 250 Photon in my rig however I also have on hand a 170 Photon which is used for testing purposes when I test various water cooling bits such as flow meters, pumps etc.
So this afternoon I took my 170 Photon and grabbed a few pics of it while it was in its dis-assembled state!
OK here we go:
NB: Dis-assembling the unit will render your warranty null & void...
So we are all familiar with our Photons - the unit which will be dissected is the standalone Photon 170 reservoir. The 250 Photon is exactly the same sans the longer glass tube. The integrated D5 pump units will be slightly different but I assume by not by much except for the end cap securing the D5.
Photon 170:
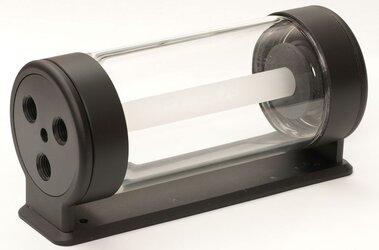
First step is top remove the reservoir from its mounting bracket.
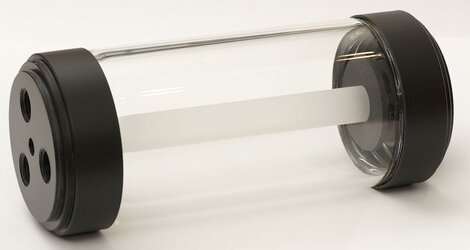
Next step is to simply unscrew the Delrin endcaps from the glass tube. I found this quite easy to do and no tools were required. The end caps were fitted firmly but not what I would call overly tight.
You will find that one cap will start to unscrew first - Just keep unscrewing it completely and carefully remove from the glass section taking care not to damage the internal acrylic tube and water deflector plates.
Once one end cap is removed - Carefully hold the glass tube and unscrew the other end cap. Note that the end caps unscrew in a normal anticlockwise direction - No different to undoing a lid off a glass jar....
In fact once the end caps are removed you are simply left with a glass tube that is threaded at both ends.
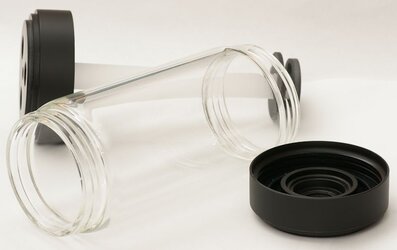
Just be careful when removing the acrylic centre section as its somewhat a tad more fragile than the rest of the components.
The Photon is quite simple and what I would call quite easy to pull apart.
Here is a closeup of the 'TOP' endcap which houses the fill port.
Note the two O-Rings. One for the water fill disc (disc with 4x oval slots - refer to pic further down) to seal up against and the larger outer O-Ring which the glass tube simply screws up flush against.
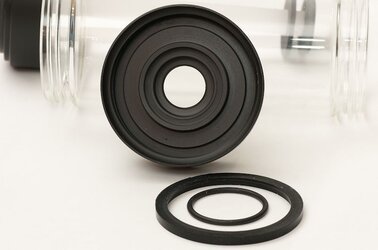
A closer look at the seals for the 'TOP' fill port section reveals that while the small diameter O-Ring does indeed sport a circular profile, the outer ring is more of a square/rectangular section profile.
Here is a close look at the actual top port water deflection disc as well as the additional slotted water fill disc. Note that you can use the top port of these Photons as a general inlet port if one so wishes to do so. I have done this as a trial and it can provide a nice waterfall effect if the res is filled only part way and not right to the top.
Top inlet port deflector disc plus additional slotted water fill disc:
Now lets turn our attention to the 'LOWER' end cap which contains the main inlet/outlet ports and the 5mm LED holder aperture.
Here you can see that it is very similar to the previous top section except for the much smaller centre O-Ring. Note the polished centre acrylic section which is what your LED illuminates through to light up the center acrylic rod.
When re-assembling the unit you will find it much easier to screw on the TOP section first and then slide in the centre acrylic rod with the water deflection plates.
Fit the large O-Rings to the endcaps as they pretty much hold themselves in quite nicely.
Lubricate the O-Rings with some water or preferably some silicone before assembling the ends as this will help to seat all the mating surfaces better than if they are totally dry. Another option is to use diluted diswashing liquid as its very slippery in solution - Just ensure to rinse out the res with distilled water when its complete.
Once in position place the small centre O-Ring onto the acrylic rod [onto the small stepped down protrusion on the very end of rod] and then carefully screw on the bottom end cap while keeping the reservoir completely vertical to ensure that the centre acrylic rod slides into its central position with its O-Ring intact.
Its easy enough to do - You just need to ensure that the centre acrylic rod is completely centered otherwise you will find that the endcap will not screw on all the way and you may end up damaging the centre rod if you tighten the endcap with the acrylic rod not quite in the right central spot.
OK - So I quickly re-assembled mine (takes about 5 mins max) and once done you need to double/triple check for leaks.
So fill it with some distilled water, seal off the ports and wait for some time to see if any leaks develop. Also a good idea to double check it for leaks when first used in a working system - Just in case...
Otherwise if you have access to a pressure tester, pump it up to around 10 PSI or so and verify that it is indeed air-tight.
Here is mine at just under 12 PSI undergoing a short 15 min test...!
Last edited:
