• Welcome to Overclockers Forums! Join us to reply in threads, receive reduced ads, and to customize your site experience!

The Big Black Beast - My Prometeia/Peltier Cooled Case Project

Overclockers is supported by our readers. When you click a link to make a purchase, we may earn a commission. Learn More.

felinusz

Senior Overclocking Magus
Joined
Feb 26, 2003
Location
Taiwan
THE BIG BLACK BEAST

My Prometeia/Peltier Cooled Case Project


I've gotten right deep into my latest computer project, the biggest one that I have undertaken as of yet :).

I finally managed to borrow a digital camera, so I feel that it is ripe time to start a picture-filled project log, to chart my progress.


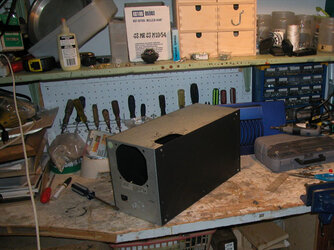
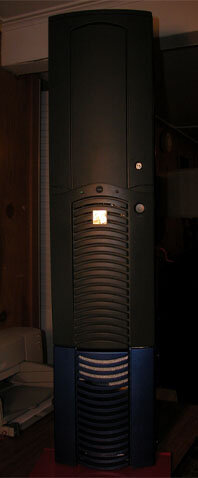
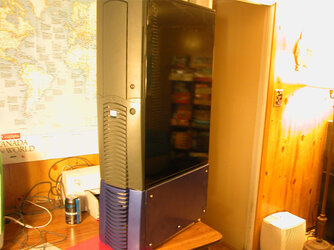
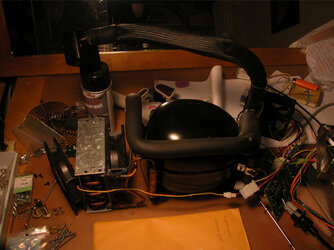
I am building on, expanding, and further modifying my modified Full Tower case, to accomodate a modified Prometeia Mach II, and a single-pass radiator peltiered GPU watercooling circuit, in an aesthetically pleasing cased system.

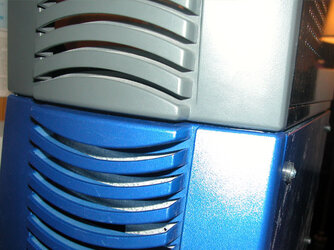
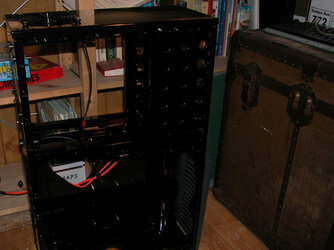
The case I am basing my system on, is the generic and much-hated Chieftec Dragon. One of my goals is to take the Dragon, and make it into something personal and somewhat unique - although the finished product will obviously still be based on a Dragon case, the goal is to have it be clearly my Dragon case.

Updates to this log will be as frequent as I can make them - I work as fast as my spare time allows me to :)
 
Last edited:
First off, we have my stock Mach II, now caseless while I do work on the stock Mach II bottomcase.

The unit will eventually be regassed with R402, increasing the units capacity and temperature potential a good deal. R402 is my gas of choice, because it offers a ~5% capacity benefit over R507, and also beats R507 out by a few degrees. R507, and R404a are the two most popular Mach I/II regass choices - the two being very similar performance-wise (the two are similar gasses as well - a small addition of R134A being the only difference between them).

I will be using the Mach II to cool a heavily overvolted processor 24/7 - the extra capacity and performance of an R402 regass is worth the effort for my purposes. A new evap head with a thicker base then the stock evap (a slightly thicker base is better for high-heatload applications) may also be added to the unit later on.
 

Attachments

  • =1CaselessStockMachII.JPG
    =1CaselessStockMachII.JPG
    64.1 KB · Views: 4,486
Sweetness. This will rock.
I will be checking this thread a lot. I can't wait to see the finished product man . I am sure its going to look dope.

I sure hope I can live up to your expectations :).


Lets take a look at the Topcase I will be using to house the computer, peltiered watercooling, PSU(s), and everything else.

The case is a modified Chieftec Dragon Full Tower. The modifications are mostly mounting holes, blowholes, and small additions - the major work that I have done so far to the case, summed up:

~ Case front mounting for a double size Heatercore (2 X 120mm blowholes)
~ Top mounting for a single size Heatercore/120mm fan (1 X 120mm blowhole)
~ 90 degree PSU rotation
~ Rear panel access holes
~ Side-Panel 120mm blowhole
~ Big vent at back
~ All metal parts are Powdercoated a gloss black

This case was modified to suit my watercooling needs - I was watercooling when I first set the system up. With a slightly different approach to cooling this time around, the 'old' case will be needing some small changes, a few mounting/access holes mostly (most of which I have already cut). I will also be making a new top-panel for the case, with either a mesh window, or a plexi window, and a 120mm blowhole.

I also need to paint the topcase plastic front panels gloss black, to match the metal portion of the case. I have bought some gloss black Krylon Fusion plastic paint for this, and will paint the panels when it warms up outside.

The big deal with the topcase, and the theme for the system, is the powdercoating job - I got this entire case coated a gloss black when I first made it, the metal parts are quite nice looking as a result.


The original Black Beast is the topcase that the final system will be using. Please note, that the side panels are not put on the case in this picture (it is stripped down) :).
 

Attachments

  • =2Beastopcase.JPG
    =2Beastopcase.JPG
    55.1 KB · Views: 4,374
Last edited:
Since gloss black, and black in general, is the color scheme for the case and system, I may as well explain why I choose to get my metal case parts powdercoated, as opposed to just painting them myself.

This picture (below) explains: a gloss powdercoat is just incredible looking.

I am also incompetant when it comes to properly preparing a surface for painting, and taking the time to do a good job at it ;) :eek:

For $100 CAD, I can get pretty much as many pieces of 'scrap' metal (fan grilles, pre-cut sheets of modders mesh, case panels, cases, drive bays, the works) powdercoated a gloss black. While it seems pricey, it is worth the cost given the amazing end result you get.

My plan is to amass all the metal parts that will need coating, and then get all the powdercoating done in one run, in order to save money.

I get all my powdercoating done at Colourific Coatings, near Toronto (http://www.colourificcoatings.com/).

Ewww, dusty (yet reflective!)!
 

Attachments

  • =3Powdercoat.JPG
    =3Powdercoat.JPG
    81.2 KB · Views: 4,326
Last edited:
Here we have my workroom, my humble modshop :)

So far, the only tools I have used are my brand new Dremel, my various files, my Hole Saws, my Hand Drill, and my ruler, and about $60 worth of reinforced cutting wheels for my Dremel - these are expensive but worth it when working with steel.

I should take the time now, to say that the Dremel is one of the best purchases I have ever made. By the end, this mod will have been almost entirely done with that little Dremel - a very versatile and useful little tool.


Here you can see the stock Mach II bottomcase in my messy workroom.
 

Attachments

  • =4Workshop.JPG
    =4Workshop.JPG
    81.8 KB · Views: 4,258
Last edited:
The bottomcase needs to fit underneath the 'old' case, matching the Chieftec Dragon topcase, and lining up with its dimensions.

The bottomcase is where the Mach II unit goes, the unit's evap extends out of the bottomcase into the topcase, and mounts to the processor being cooled. The topcase is the standard computer case side of things.

Herein lies the problem: The stock Mach II bottomcase is longer, and narrower then the Chieftec Dragon case.

The topcase and bottomcase need to line up nicely, and fit together as if they were made to go together. After some pondering of the problem, I received excellent insight from Marci of Oc-UK - he did a similar mod, and made an 'extension' for the Mach II bottomcase.


Instead of cutting the stock bottomcase down to size, I simply disguised it, making a 'skirting kit' that has it visually matching the Dragon topcase. I bought myself a Chieftec Dragon Mid-Tower from Tigerdirect for ~$30, and proceeded to butcher it for parts.

I cut the Dragon's back side panel in half, using each of the halves to make a side-panel extension ('skirting') for the Mach II bottomcase. I took the distinctive Dragon front panel, and cut it down to size, sussing it out so that the front of the Mach II bottomcase actually extended into the front-panel, effectively hiding the bottomcase's additional length over the topcase. I mounted the new side panels to the stock case's sidepanels, rising them out from the case with some rubber washers and five mounting screws.

The extra Dragon case's top panel will also be used, I'll be putting a window and a 120mm blowhole into it.

Here is the bottomcase with the skirting kit. The blue case will be coated gloss black, and the blue plastic front panel painted gloss black with some Krylon Fusion.
 

Attachments

  • =5Bottomcase.JPG
    =5Bottomcase.JPG
    90.5 KB · Views: 4,236
Last edited:
With the bottomcase done, I wanted to take a look at how the finished case will probably look when entirely assembled.

Keep in mind, that the topcase and bottomcase front panels need to be painted. The bottomcase also needs to be powdercoated - nothing matches right now :)

Here is what we have.
 

Attachments

  • =6fullcase.JPG
    =6fullcase.JPG
    16.6 KB · Views: 4,162
Another picture of the topcase/bottomcase.

The sizing is pretty much done at this point. There is still a bit of work to do on the bottomcase, namely fitting a really large fan and possibly some blowholes, but the bottomcase piece is mostly done at this point (except the painting/coating).
 

Attachments

  • =7casefull2.JPG
    =7casefull2.JPG
    58.5 KB · Views: 4,165
Another picture of the topcase/bottomcase - this is one very big computer case. At this point, it is important to note the decent alignment of the cases, and ignore the mismatched colors :).

The bottomcase front panel is still a little crooked - the final thing will be properly aligned once I attach it properly.


This is as far as I have gotten for now. More updates will come soon - Mach II regassing, bottomcase touchups/fan modifications, and plastic panel painting are all on my agenda for the next week :).

Comments are welcome, as is any advice.
 

Attachments

  • =8lineup.JPG
    =8lineup.JPG
    76.1 KB · Views: 4,115
That would kind of give me the willies having a computer that tall and narrow. I suppose its going on the floor though so it can be braced on the sides or something. That's going to look pretty sweet once its painted.
 
:eek: Whoa, check out that monster.

:D Keep the pictures flowing man. I'll be watching and waiting. Just to ask though, what is your system right now? Could you list the components? Still on NF2?
 
Back