• Welcome to Overclockers Forums! Join us to reply in threads, receive reduced ads, and to customize your site experience!

[O/C] nMediaPC 1080P HTPC Case Review

Overclockers is supported by our readers. When you click a link to make a purchase, we may earn a commission. Learn More.
Hmmm, this looks like a nice little, inexpensive HTPC case. I currently have a larger, full ATX nMediaPC case (The 6000b) and I think it's a pretty decent case, especially for the price.

I have been thinking about changing around my main HTPC to a mATX or ITX setup, I think this could be a good choice for cases.

It's just what a case needs to be, a box to hold the important stuff but still look decent on the outside. :)

But I will say that their naming for the case is quite gimmicky. :) "Hey my HTPC case even has 1080p!"
 
I dont understand the lack of IR receivers in so many HTPC cases.
Its makes them fairly useless as far as i am concerned.
I do not like to have to resort to using an external receiver, its looks awful.

IMHO its not a HTPC case if the IR receiver is not built in.
Its just yet another "desktop" style case
 
IR? What could you possibly need that for? An old VCR remote?

logitech harmony etc etc.

either way i have a buddy who has a very similar nMedia case... build quality is, meh... its alright but not the best... for just a lil more you can grab a silverstone gd05b and have a TOP notch htpc case... altho it is matx... but you shouldnt need more than that in a htpc.

btw... personally i hate IR... LOS sucks.... i like beign in the other room and being able to change music with my ati wonder remote (RF)
 
IR? What could you possibly need that for? An old VCR remote?

And nd4 said, for Harmony remotes, etc. It is SO much better to browse your movie collection without having to pickup another remote or a keyboard. My wireless keyboard just sits on the endtable unless I feel like browsing the internet from the couch or something. In most cases, the Harmony is all I use.


But as far as it being built in, I think it's better to keep the costs down and not include stuff that some people might not want or need.

As I said before, I have a larger nMediaPC case (The 6000b). Both that and this one have a little window where you can install their little LCD screen. I personally think that screen would be pointless, I can't really imagine any info on there that I could really find necessary. But I took my IR receiver, removed it's casing and put the receiving eye behind a small hole in that little window. It comes blacked out and you would peel that black out plastic off if you were going to install the LCD module. So I just put a small hole in it, and mounted the reciever to the surrounding screwmounts. I then modified an internal USB header cable with an external USB port so that I didn't have to run the wire out the back of the case.

I know this is an old post but I have been searching everywhere to find someone with an nmedia case who built in IR. The thought of a USB dongle hanging around really bothers me.

Do you have any other info or pics of the mod?
 
I know this is an old post but I have been searching everywhere to find someone with an nmedia case who built in IR. The thought of a USB dongle hanging around really bothers me.

Do you have any other info or pics of the mod?

I don't have any pics. I switched remotes and decided to just stick the new receiver on the top of the case. It's inside a cabinet so it's never seen anyway. But I've made up some pictures, from various ones I found around the net, to hopefully show you how to do it (it's fairly easy, not much modding involved):

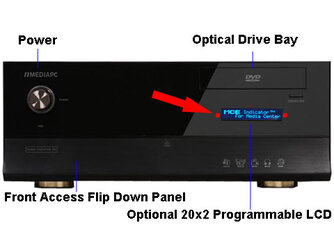
First you have to remove the front of the case. The 6000b has a window where you can add an LCD display to the front of the case. On either side of this window are screw holes (Marked in red on either side of the window) where you can mount the IR receiver. There is a black film which covers the window if you aren't using it. I just removed enough of it to allow the IR receiver to get light through it. If you do too much, you can see into the case; a paper hole punch does a perfect job. *See EDIT at the bottom for a picture
6000b.jpg

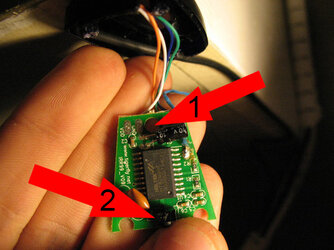
You have to remove the shell from the IR receiver, should be as simple as removing a couple of screws from the bottom. You will end up with something similar to this:
IR reciever Arrow.jpg

Arrow #1 points to the hole which you will put the screw through, then into the screw hole from the previous picture, and secure it to the case.
Arrow #2 points to the receiver eye. You have to very gently bend this so that it becomes parallel to the PCB, basically you bend it down.
Now you mount it in the case so that the little bubble of the reciever eye is pointing toward the little window of the case.
Before you affix it, you want to dry fit it so that you know where to make a hole in the black film.

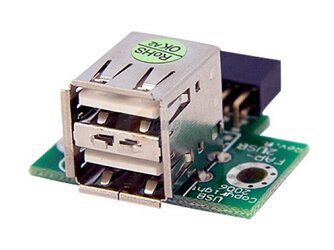
Now you can either just slip the cord somewhere through the back of the case, then plug it in one of the back USB I/O ports of the motherboard. Or you can use one of these and just plug it internally (a little cleaner):
header.jpg


I hope you can gather what I'm saying through these pics, I never took pics of what I made so I just had to find some random pics on the internet. Hope this helps! :)


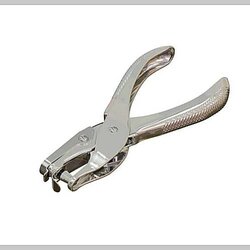
EDIT: This is a paper hole punch, it makes a nice sized hole in the black film and keeps it looking decent. If you have one, it's a great option:
holepunch.jpg
 
Last edited:
I don't have any pics. I switched remotes and decided to just stick the new receiver on the top of the case. It's inside a cabinet so it's never seen anyway. But I've made up some pictures, from various ones I found around the net, to hopefully show you how to do it (it's fairly easy, not much modding involved):

First you have to remove the front of the case. The 6000b has a window where you can add an LCD display to the front of the case. On either side of this window are screw holes (Marked in red on either side of the window) where you can mount the IR receiver. There is a black film which covers the window if you aren't using it. I just removed enough of it to allow the IR receiver to get light through it. If you do too much, you can see into the case; a paper hole punch does a perfect job. *See EDIT at the bottom for a picture
View attachment 115119

You have to remove the shell from the IR receiver, should be as simple as removing a couple of screws from the bottom. You will end up with something similar to this:
View attachment 115120

Arrow #1 points to the hole which you will put the screw through, then into the screw hole from the previous picture, and secure it to the case.
Arrow #2 points to the receiver eye. You have to very gently bend this so that it becomes parallel to the PCB, basically you bend it down.
Now you mount it in the case so that the little bubble of the reciever eye is pointing toward the little window of the case.
Before you affix it, you want to dry fit it so that you know where to make a hole in the black film.

Now you can either just slip the cord somewhere through the back of the case, then plug it in one of the back USB I/O ports of the motherboard. Or you can use one of these and just plug it internally (a little cleaner):
View attachment 115121


I hope you can gather what I'm saying through these pics, I never took pics of what I made so I just had to find some random pics on the internet. Hope this helps! :)


EDIT: This is a paper hole punch, it makes a nice sized hole in the black film and keeps it looking decent. If you have one, it's a great option:
View attachment 115123
Thank you much, I really appreciate it.... I should be able to handle it from here.
 
Back